JSON Web Tokens (JWT) is a security mechanism to transfer information between two parties by using JSON-format tokens that are self-signed. Consumer of JWT can perform JWT signature verification, which is a cryptographic process to verify the authenticity of the information contained in the token, as well as validations of the information within the token payload.
It can be used for both Authentication(proving who you are) or Authorization(proving what you can do). JWT is just a container for claims. It can be used for authentication (identity proof) or authorization (permissions proof).
It would be created post first verification of credentials(Username and password). The generated JWT Token would be passed along downstream ms for verification. In below case JWT is not generated often.
1.User Credentials Verification -> 2.JWT Token Generation -> 3.Microservice 1 using JWT -> 4.Microservice 2 using same JWT
Integrity and Authentication
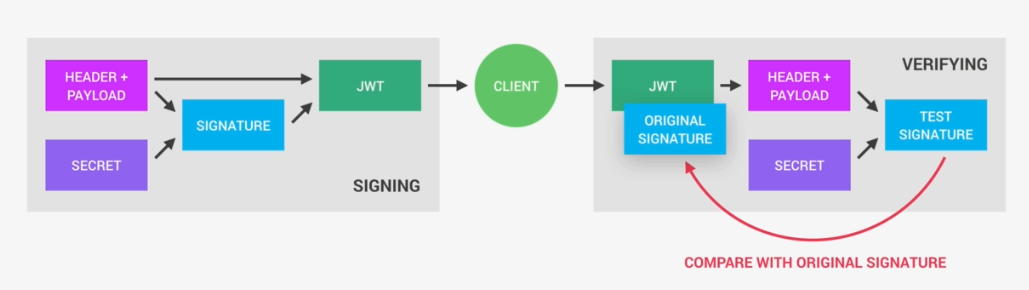
Integrity means the data hasn’t been tampered. To check the message has been tampered, sender generates a digest of the msg to be sent and attaches the digest along the msg during transfer. This is done using hashing algorithm. The receiver after receiving the message uses the same hashing algorithm and generates the digest for the message. If both the sent and generated hash are same then the message is not tampered.
Digest = SHA256(Header+Payload)
W.R.T JWT context we use RS256 algorithm which is RSA + SHA256 together.
Yes He can. But JWT doesn’t stops just with hashing. It adds signature using private key(RSA) or symmetric key(HMAC). Without knowing the secret key(private or symmetric) key the recalculated hash is useless.
Being able to prove that something really comes from the claimed source and hasn’t been forged
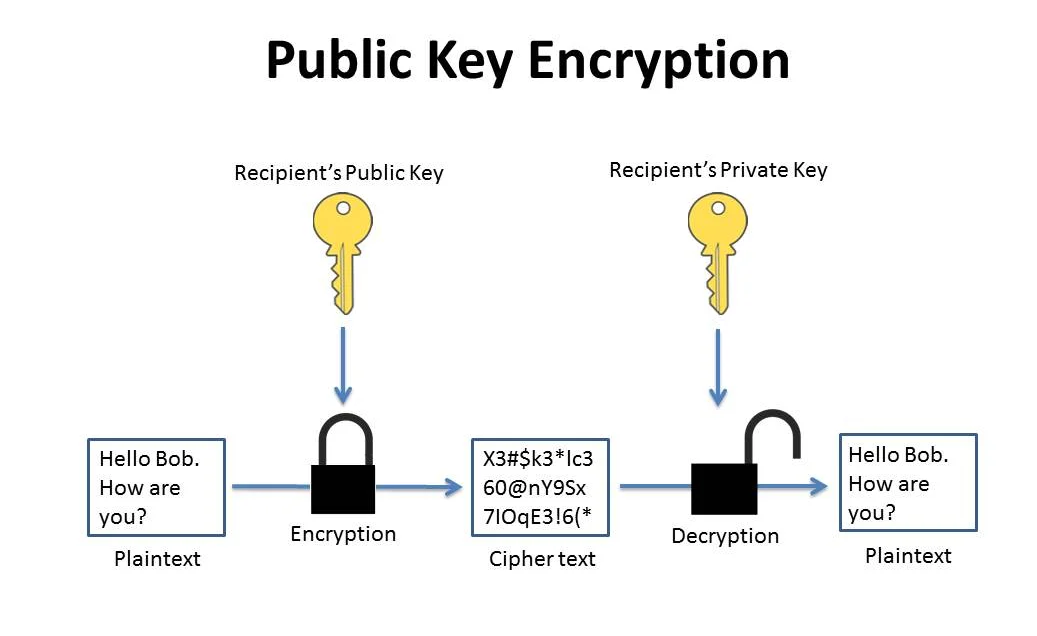
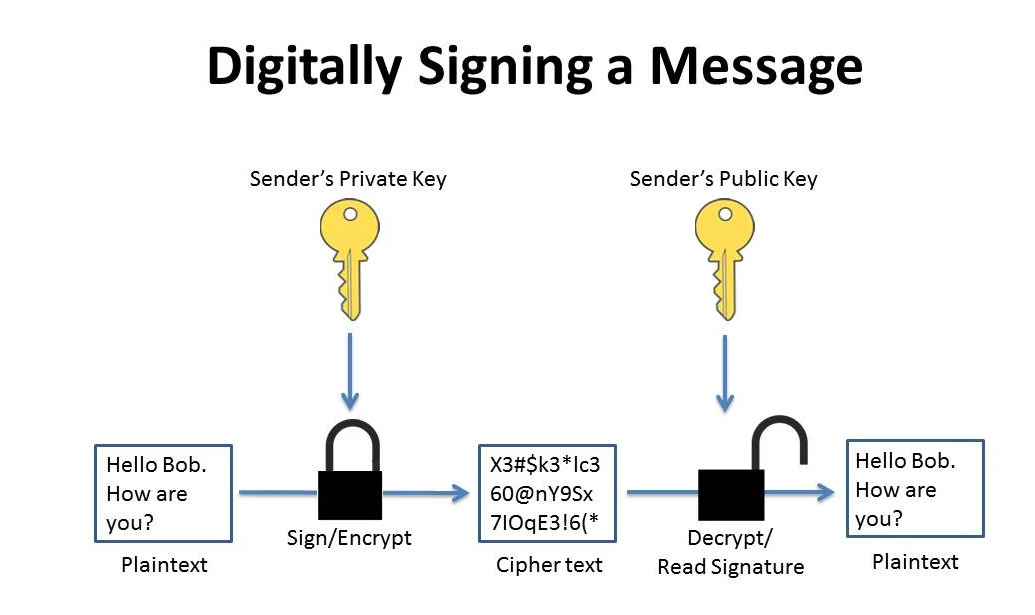
Through Signature. The Digest is taken and Encrypted with the person private or symmetric key. Now the receiver decrypts the msg at his end with either public key or symmetric key and regenerates the hash to check if it is tampered. Now if the msg is sent by person who he claims to be it should have been signed by private key which is unique to the sender. By this JWT assures Authenticity.
Encryption using Secret(Digest)
Encryption using HMAC Secret(Digest) //Incase Symmetric Key
Encryption using RSA Secret(Digest) //Incase Private Key
No. Encryption algorithm needs secret without which encryption cannot be done.
Signature is special kind of encrypted text which has hashed text containing claims once decrypted. All text which doesn’t contains claims or hash would qualifies for simple encrypted text. Signature is always fixed length(I.E. Fingerprint) where as simple encrypted would be of varying length.
JWK (JSON Web Key): A JSON representation of a cryptographic key (public or private). JWKS (JSON Web Key Set): A collection of JWKs, usually containing one or more public keys.
A JWK URL is an endpoint (usually HTTPS) that exposes the JWKS of an identity provider. When JWTs are signed with a private key (RS256, ES256), verifiers need the corresponding public key. Instead of hardcoding keys, services fetch them dynamically from the JWK URL. By using the JWK URL, clients can always fetch the latest keys without manual updates and easy to rotate signing keys periodically for security
{
"alg": "RS256",
"typ": "JWT",
"kid": "key-2026-01"
}
In real-world systems, issuers often rotate signing keys for security. A verifier may have access to a JWKS (JSON Web Key Set) with multiple public keys. The KID tells the verifier which public key to use to validate the signature. JWTs are often sent in HTTP headers (Authorization: Bearer ). Base64URL encoding ensures the token only contains URL-safe characters
Encoding just makes data transport-safe and compact.
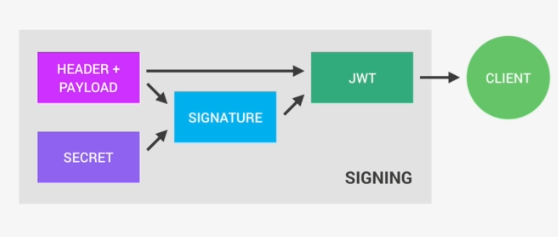
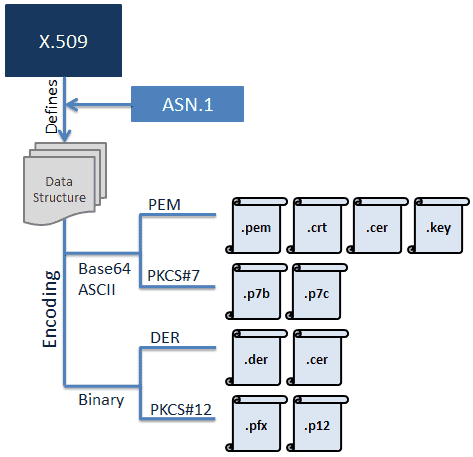
The JWT will have the following components – Header, Payload/body,Signature
xxxx.yyyy.zzzz
ie
Base64URLencode(Header).Base64URLencode(body).Base64URLencode(signature)
Signature will have the following pseudo-code
RSASHA256(Base64URLencode(Header).Base64URLencode(body), Secret)
JWT consists of three parts
- Header – Javascript Object Signing and Encryption (JOSE) Header. This part of the token provides details about the encryption mechanisms that must be applied to verify the token signature to confirm the authenticity of the information (claims) contained in the token.
When working with JWKS, JOSE header will specify the following attributes:
- Encryption algorithm – alg Declared with value “RS256” (asymmetric encryption algorithm, described at this specification)
- Key id – kid This attribute contains the identifier for the public key that must be used to perform signature verification.
- Token payload – It consists on a set of key-value attributes commonly referred to as “Claims”, where the attribute name and value are called “Claim Name” and “Claim value”. Claims are ultimately the lowest level of information contained in the JWT, and can be used by the resource owners to determine any kind of information about the user who owns the token (access level, identity, authorization, etc.).
- Token signature – JWS. From the security standpoint, this is the most important part of a JWT, as it contains the token signature that must be used to perform the verification of the token. Token signature is the result of taking the token payload and apply RS256 encryption using the private key of the RSA key pair.
Token Signature = RS256 Encryption of Header, Payload signed with Secret
What are basic security goals?
Integrity is about making sure that some piece of data has not been altered from some “reference version”
Authenticity is about making sure that a given entity (with whom you are interacting) is who you believe it to be.
Non-repudiation It is the inability to refute responsibility. For example, if you take a pen and sign a (legal) contract your signature is a nonrepudiation device.Digital signature in this case.
What is the difference between Hash, MAC, and Digital Signature?
Hash – A (unkeyed) hash of the message, if appended to the message itself, only protects against accidental changes to the message (or the hash itself), as an attacker who modifies the message can simply calculate a new hash and use it instead of the original one. So this only gives integrity.
Message Authentication Code MAC – also known as keyed hash, protects against message forgery by anyone who doesn’t know the secret key (shared by sender and receiver). This means that the receiver can forge any message – thus we have both integrity and authentication (as long as the receiver doesn’t have a split personality), but not non-repudiation. MACs can be created from unkeyed hashes (e.g. with the HMAC construction), or created directly as MAC algorithms.
Digital Signature – A (digital) signature is created with a private key, and verified with the corresponding public key of an asymmetric key-pair. Only the holder of the private key can create this signature, and normally anyone knowing the public key can verify it. So this provides all of integrity, authentication, and non-repudiation.
|
Hash |
MAC(HMAC + SHA256) |
Digital Signature(RSA, PKCS1) |
| Integrity |
Yes |
Yes |
Yes |
| Authentication |
No |
Yes |
Yes |
| Non-repudiation |
No |
No |
Yes |
| Kind of keys |
None |
Symmetric |
Asymmetric |
Does JWT is both Hashed and Signed?
JWT is both hashed and signed. Hashing algorithm used is specified in the Header. To make hashing stronger we use salt which is sometime refered as secret. However, using this secret is sometime confused with signing of JWT. Signing is a process where only the signer knows the key with which the payload is signed. As far the resource and authorization server are same usgae of the term signing and hashing holds true. Incase if resource and authorization server are different and symmetric key is used, signing payload should no longer used since signature is unique to entity but in above case there are two entities which holds the same signature.
Sometimes JWT is both hashed and signed. Most realtime implementation of JWT uses this methodology to make JWT more secure.
Why we do base64 encoding in JWT?
JWT is actually not Base64, instead, it’s Base64Url Encoded. It’s just like Base64, but there are a couple of characters different so that we can easily send a JWT as part of a Url parameter. All three parts of the JWT are Base64Url encoded, which makes the JWT URL-encoded, which means it can be shared between two or more parts using HTTP.
What are two common ways of implementation of JWT?
- Method 1 – Using asymmetric algorithm using public and private key. Implementing JWT using this method helps in authorization by Resource Server
- Method 2 – Using symmetric algorithm using same key for Signing. In this case only the server which has issued can authorize the user. The same copy of the key could be shared to resource server but at cost of compromising security scale.
Do we always need Public and Private Key?
No. It depends on the implementation. When the Authorization and the Resource server is same then we dont need two different keys. In this case the key is referred to as secret and secret is used for signing payload. But when Authorization and the Resource server are different then we need private key to sign the resource and public key to read the signature.
Symmetric Signing uses HS256 algorithm for signing. The same would be seen in header field.
{
   "typ":"JWT",
   "alg":"HS256"
}
Asymmetric signing uses RS256 algorithm for signing.
{
   "typ":"JWT",
   "alg":"RS256"
}
What is the difference between RS256 and HS256?
RS256 (RSA Signature with SHA-256) – is an asymmetric algorithm, and it uses a public/private key pair: the identity provider has a private (secret) key used to generate the signature, and the consumer of the JWT gets a public key to validate the signature. Since the public key, as opposed to the private key, doesn’t need to be kept secured, most identity providers make it easily available for consumers to obtain and use (usually through a metadata URL).
HS256 (HMAC with SHA-256) – on the other hand, involves a combination of a hashing function and one (secret) key that is shared between the two parties used to generate the hash that will serve as the signature. Since the same key is used both to generate the signature and to validate it, care must be taken to ensure that the key is not compromised.
If you will be developing the application consuming the JWTs, you can safely use HS256, because you will have control on who uses the secret keys. If, on the other hand, you don’t have control over the client, or you have no way of securing a secret key, RS256 will be a better fit, since the consumer only needs to know the public (shared) key exposed by JWK URL.
Why we need JWK Endpoints?
In Asymmetric signing public key should be exposed so who ever uses it could decrypt to read the signature. Validation will happen in the following steps
- Retrieve the JWKS from JWKS endpoint
- Get JWT and decode it.
- Grab the kid property from the header of the decoded JWT.
- Search the key with the matching kid property in retrieve keysets.
- Build a (public)certificate using the corresponding keyset
- Use the certificate to verify the JWT’s signature.
JWK consists on a JSON data structure that represents a cryptographic key. The members of the object represent properties of the key, including its value. A JWK Set is simply JSON data structure that represents a set of JWKs.
There are attributes that are mandatory within JWK, regardless on the signing algorithm
- kid (Key ID) Parameter is used to identify a key, with the purpose to choose among a set of keys within a JWK Set during key rollover. kid parameter is utilized to lookup the appropriate public key, as it is also included in the JWT JOSE header.
- kty (Key Type) Parameter. This attribute identifies the cryptographic algorithm family used with the key, such as “RSA” or “EC”.
- use (Public Key Use) Parameter. This parameter identifies the intended use of the public key. The “use” parameter is employed to indicate whether a public key is used for encrypting data or verifying the signature on data.
Values defined by this specification are:
- sig (signature)
- enc (encryption)
- exp (Expiration) Parameter. Although “exp” is not mentioned in the JWK specification, it is widely used in the same way as described in the JWT specification, which can be found here. Its purpose is to define the expiration time for the given JWK. “exp” MUST be a number containing a NumericDate value.
- alg – parameter identifies the algorithm intended for use with the key.eg in RSA, we can have RSA256 or RSA512
JWT are used for authorization and not authentication. So a JWT will be created only after the user has been authenticated by the server by specifying the credentials. Once JWT has been created for all future interactions with the server JWT can be used. So JWT tells that server that this user has been authenticated, let him access the particular resource if he has the role.