Strategy Design Pattern provides a way to extract the behavior of an object into separate classes that can be swapped in and out at runtime
This pattern enables an object to choose from multiple algorithms and behaviors at runtime, rather than statically choosing a single one.
PaymentProcessor.java
public class PaymentProcessor{
    private PaymentType paymentType;

    public void processPayment(String paymentAmount){
        if(paymentType.equals(PaymentType.CASH)){
            System.out.println("Cash Payment on Delivery");
        }else if(paymentType.equals(PaymentType.NET_BANKING)){
            System.out.println("Net Banking Payment ");
        }else if(paymentType.equals(PaymentType.UPI)){
            System.out.println("UPI Payment by GPay or Paytm ");
        }else if(paymentType.equals(PaymentType.DEBIT_CARD)){
            System.out.println("Debit Card Payment ");
        }else if(paymentType.equals(PaymentType.CREDIT_CARD)){
            System.out.println("Credit Card Payment ");
        }else{
            System.out.println("Gift Coupon");
        }

    }

    public void setPaymentType(PaymentType paymentType) {
        this.paymentType = paymentType;
    }
}
In this code, the PaymentProcessorclass has a processPayment method that takes a payment amount and processes the payment. The payment type is set using the setPaymentType method, which sets the paymentType field. The processPayment method then checks the value of paymentType and processes the payment accordingly.
The problem with this code is that it violates the Open-Closed Principle, which states that classes should be open for extension but closed for modification. In this code, if you want to add a new payment type, you would have to modify the processPayment method, which violates the Open-Closed Principle.
Places where different algorithms(Strategy) is used to address a single solution I.E Different sorting algorithms can be encapsulated into separate strategies and passed to an object that needs sorting, Different formatting strategies can be encapsulated into separate strategies and passed to an object that needs formatting, Different payment methods can be encapsulated into separate strategies and passed to an object that needs to process payments.
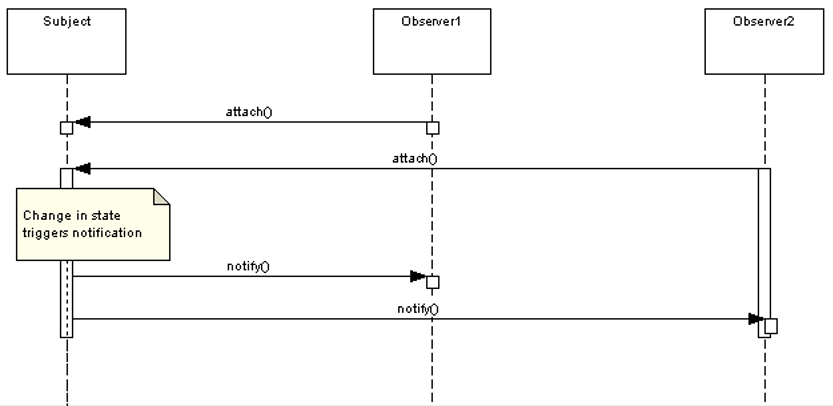
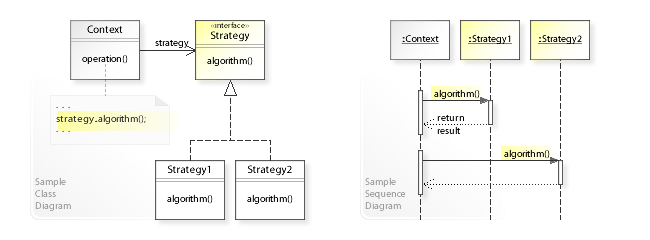
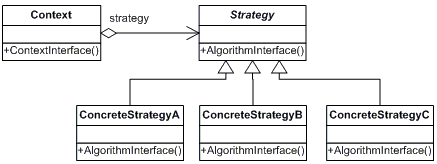
The Strategy Design Pattern works by separating the behavior of an object from the object itself. The behavior is encapsulated into different strategies, each with its own implementation of the behavior.The context maintains a reference to a strategy object and interacts with it through a common interface. At runtime, the context can swap the current strategy with another one, effectively changing the object’s behavior.
- Identify the algorithm or behavior that needs to be encapsulated and made interchangeable.
- Define an interface that represents the behavior, with a single method signature that takes in any required parameters.
- Implement concrete classes that provide specific implementations of the behavior defined in the interface.
- Define a context class that holds a reference to the interface and calls its method when needed.
- Modify the context class to allow for the dynamic swapping of the concrete implementations at runtime.
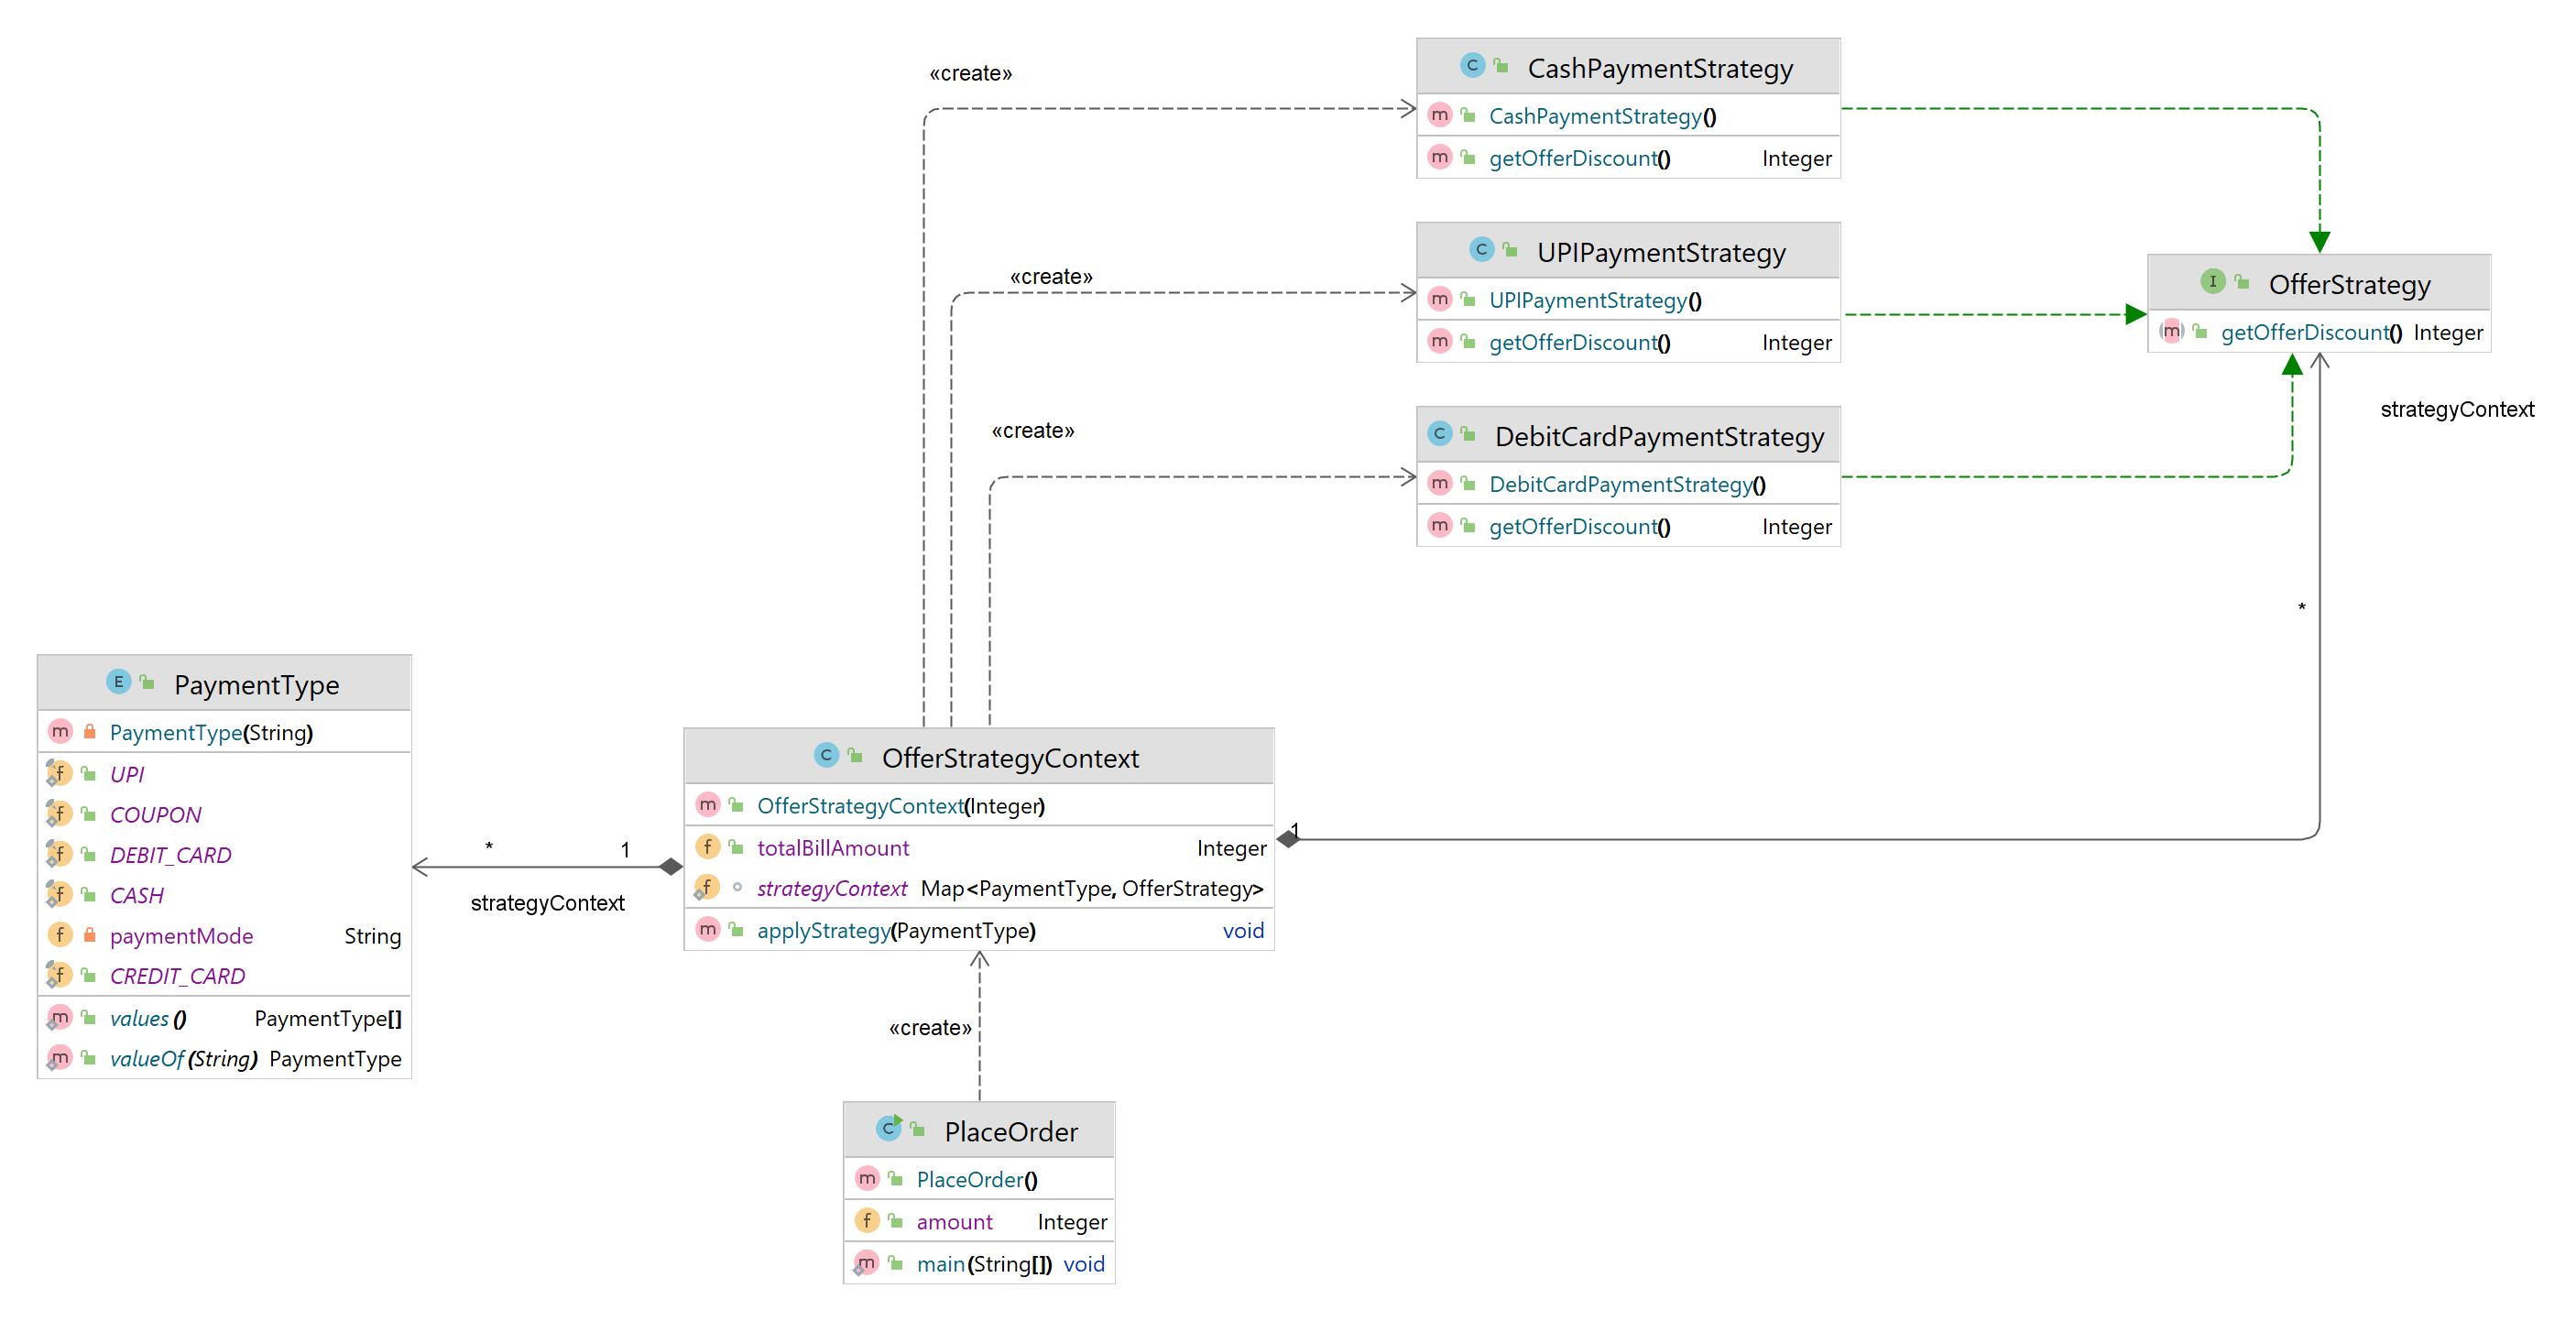
OfferStrategy.java
public interface OfferStrategy {
    public Integer getOfferDiscount();
}
CashPaymentStrategy.java
public class CashPaymentStrategy implements OfferStrategy {
    @Override
    public Integer getOfferDiscount() {
        return 0;
    }
}
DebitCardPaymentStrategy.java
public class DebitCardPaymentStrategy implements OfferStrategy {
    @Override

    public Integer getOfferDiscount() {
        return 5;
    }
}
UPIPaymentStrategy.java
public class UPIPaymentStrategy implements OfferStrategy {
    @Override
    public Integer getOfferDiscount() {
        return 3;
    }
}
OfferStrategyContext.java
public class OfferStrategyContext {
    public Integer totalBillAmount;

    static Map<PaymentType, OfferStrategy>  strategyContext = new HashMap<PaymentType, OfferStrategy>();

    static{
        strategyContext.put(PaymentType.DEBIT_CARD, new DebitCardPaymentStrategy());
        strategyContext.put(PaymentType.CASH, new CashPaymentStrategy());
        strategyContext.put(PaymentType.UPI, new UPIPaymentStrategy());
    }

    public void applyStrategy(PaymentType paymentType) {
        OfferStrategy offerStrategy = strategyContext.get(paymentType);
        Double discAmt =  totalBillAmount*(offerStrategy.getOfferDiscount()*0.01);
        Double finalPrice = (totalBillAmount - discAmt);

        System.out.println("Discount of " + offerStrategy.getOfferDiscount() + "% applied on Total amount :" + totalBillAmount);
        System.out.println("Discount Amount :"+ discAmt);
        System.out.println("Final Amount to be paid after offer:" + finalPrice);
    }

    public OfferStrategyContext(Integer totalBillAmount) {
        this.totalBillAmount = totalBillAmount;
    }
}
PaymentType.java
public enum PaymentType {
    CREDIT_CARD("CREDIT_CARD"), DEBIT_CARD("DEBIT_CARD"), CASH("CASH"), COUPON("COUPON"),UPI("UPI");

    private String paymentMode;

    PaymentType(String paymentMode) {
        this.paymentMode = paymentMode;
    }
}
PlaceOrder.java
public class PlaceOrder {
    public Integer amount;

    public static void main(String[] args) {
        OfferStrategyContext objOfferStrCtxt = new OfferStrategyContext(100);
        objOfferStrCtxt.applyStrategy(PaymentType.DEBIT_CARD);
    }
}
Output
Discount of 5% applied on Total amount :100
Discount Amount :5.0
Final Amount to be paid after offer:95.0
The same strategy design pattern could be implemented using Factory method by moving code to Factory class and deciding the strategy based on the static factory method call.
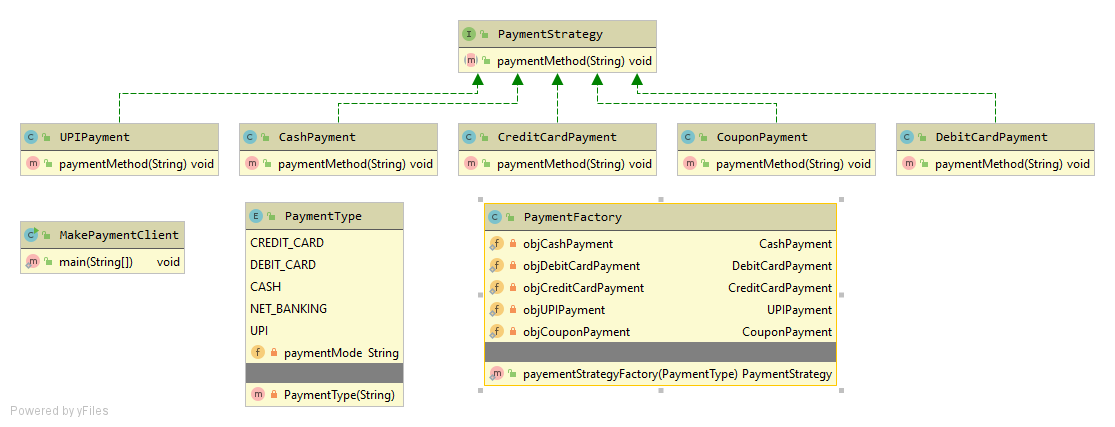
PaymentFactory.java
public class PaymentFactory {
    private static CashPayment objCashPayment =  new CashPayment();
    private static DebitCardPayment objDebitCardPayment =  new DebitCardPayment();
    private static CreditCardPayment objCreditCardPayment =  new CreditCardPayment();
    private static UPIPayment objUPIPayment =  new UPIPayment();
    private static CouponPayment objCouponPayment =  new CouponPayment();

    public static PaymentStrategy  payementStrategyFactory(PaymentType paymentType){
        if(paymentType.equals(PaymentType.CASH)){
            return objCashPayment;
        }else if(paymentType.equals(PaymentType.UPI)){
            return objUPIPayment;
        }else if(paymentType.equals(PaymentType.DEBIT_CARD)){
            return objDebitCardPayment;
        }else if(paymentType.equals(PaymentType.CREDIT_CARD)){
            return objCreditCardPayment;
        }else{
            return objCouponPayment;
        }
    }
}
MakePaymentClient.java
public class MakePaymentClient {
    public static void main(String[] args) {
        PaymentStrategy objPaymentStrategy = PaymentFactory.payementStrategyFactory(PaymentType.CREDIT_CARD);
        objPaymentStrategy.paymentMethod("300");
    }
}
300 paid in credit card
Reference to Factory Pattern