இருக்கிறான் என்று இறை-நம்பிக்கை உள்ளவர்களும், இல்லை என்று இறை-மறுப்பாளர்களும்,‘கடவுள் இருப்பதும், இல்லை என்பதும் கதைக்கு உதவாத வெறும் பேச்சு’ என்று உலகாதாயம் பேசுபவர்களும் மூன்று விதத்தில் விடை சொல்வார்கள்.
ஆனால், ‘உயிர்கள்’ உண்டா என்று யாரும் ஐயம் எழுப்புவது இல்லை!
உடல்களில் இயங்கும்போது, பல பெயர்கள் கொண்டு விளங்கும் உயிருடல்கள், உயிர் நீங்கினால், அனைத்து மனித உடல்களுக்கும் ‘பிணம்’ என்ற ஒரே பெயர்தான்.
ஐயா, ஐயா என்று வாஞ்சையாக அழைத்தவர்கள், உயிருடலில் இருந்து, ‘ஐயா’ என்ற உயிர் நீங்கிவிட்டால், ‘ஐயாவை எப்போது எடுப்பார்கள்?’ என்று யாரும் கேட்பதில்லை;
மாறாக, “பிணத்தை எப்போது எடுப்பார்கள்?” என்றுதான் கேள்வி வருவதை சாதாரணமாகக் காண்கிறோம்.
உயிர் நீங்கிய உடல் எரிக்கப்பட்டோ – புதைக்கப்பட்டோ சிதைவுறும்.
எனவே, உயிர் என்ற ஒன்றின் இருப்பை, எவரும் மறுப்பதில்லை. ஆயினும், உலகோர் அனைவரும், உடலை விட்டு நீங்கியதும்,
- ‘உயிர்’ என்னவாகிறது?
- எங்கே போகிறது?
- எப்படி உடலற்ற உயிரின் வாழ்வு அமையும்?
போன்ற வினாக்களை எழுப்பிக் கொண்டதால் வந்த விளைவுகள்தாம் கடவுள்கள் – மதங்கள் – சமயங்கள் – நம்பிக்கைகள் – சாமியார்கள் – பேய்கள் – செய்வினை – மந்திரங்கள் என்ற பலவும்.
உடல் வாழ்க்கைக்கு அப்புறம், உயிரின் நிலை என்ன என்ற கேள்வியின் விளைவே பல்வேறு சமயத் தத்துவங்கள்.
எனவே, உயிர்கள் என்றால் என்ன என்ற கேள்வி, மிகவும் பொருத்தமானதே! என்றாலும், உயிர்களுக்கும், இவ்வுலகத்துக்கும், இறைவன் என்னும் தத்துவப் பொருளுக்கும் உள்ள
தொடர்புக்கான விடை காண முயல்வதே, சமயங்கள் அல்லது மதங்கள் அனைத்துக்கும் இடையே இருக்கும் பொதுவான கூறு.
எனவே, உயிர் என்றால் என்ன? என்ற கேள்விக்கு,
- இறைவன் என்றால் என்ன?
- உயிர்-உலகம்-இறைவன் இவற்றிற்கான தொடர்பு என்ன?
இணைத்தே விடை காண முயலவேண்டும்.
இறைவன், உயிர்கள், உலகம் என்ற மூன்று பொருட்களையும், அவற்றிற்கு இடையேயான உறவுகளையும் அறுதியிட்டு, வரையறை செய்த சைவ சித்தாந்தம் என்னும் தத்துவத்தின் மூலம் உங்கள் கேள்விக்கு விடை தர முயற்சிக்கிறேன்.
இப்பிரபஞ்சத்தின் ‘முப்பெரும் உண்மைகள்’ என்று மூன்று பொருட்கள் சுட்டப்படுகின்றன.
- இறைவன்(பதி)
- உயிர்கள்(பசு)
- தளைகள்(பாசம்)
எனப்படும்.
அகன்று எல்லையில்லாமல் விரிந்துகொண்டே செல்லும் (ever expanding universe) பரவெளியின் அனைத்தும் இம்மூன்று பொருட்களில் அடக்கம் என்கிறது சைவசித்தாந்தம் என்னும் சிவனியத்தத்துவம்.
உயிர்கள்(பசுக்கள்) இயல்பு!
உயிர்கள் அறிவுப்பொருட்கள்!
உயிர்கள் சார்ந்தவண்ணம் ஆதல் தன்மை கொண்டவை!(உயிரைப் பச்சோந்தி என்கிறீர்களா? ஆம், கிட்டத்தட்ட அப்படித்தான். உடலைச் சார்ந்து இருப்பதால், தான் என்பது உடலே என்று உணரும் உயிர்; உடலுக்கு நோய் வரும்போது, உயிர் அந்நோய் தனக்கே வந்தது என்று மயங்கும்.உடல்-மனம் மகிழ்வாக/சோகமாக இருக்கும்போது, உலகமே மகிழ்வாக /சோகமாக இருப்பதுபோல் எண்ணும்.அப்படியானால், உயிர் வேறு-உடல் வேறா? ஆம், என் கை, என் கால், என் உடலுக்கு முடியவில்லை என்று சொல்வதெல்லாம் என்னவாம்? உயிர் வேறு, உடல் வேறு என்பதால்தானே என் உடம்புக்கு முடியவில்லை என்கிறோம்!)
உயிர்கள் அறிவித்தால் மட்டுமே அறிபவை! (அப்படியா? சரியாகத்தான் படுகிறது. உயிர் அறிந்ததெல்லாம், கண்டும், கேட்டும், சுவைத்தும்,நுகர்ந்தும், தொட்டுஉணர்ந்தும் அறிந்தவை அல்லவா? அப்படியானால், எனது அறிவுக்கு, என் உடல்தான் மூலக்கருவியா? புரிந்தால் சரிதான். உடல் சார்ந்த மனம், புத்தி, சித்தம், அகங்காரம் என்றெல்லாம் இன்னும் சில உண்டு. பின்னர் குழம்பி, விளக்கித் தெளியலாம்.)
உயிர்கள் என்றும் உள்ளவை! (அப்படியானால், உயிர் போகிறது; சாவு வருகிறது எப்படி? பின்னர் விளக்குவோம்);
உயிர்கள் யாராலும் படைக்கப்படாதவை ! (கடவுள் படைக்காததா உயிர்கள்? தந்தை பெரியார் பேச்சை வைத்து காமெடி ஒன்றும் செய்யவில்லையே? உறுதியாக இல்லை. சைவசித்தாந்தத் தத்துவம் சொல்வதைத்தான் சொல்கிறேன்);
- உயிர்கள் எண்ணற்றவை! (infinity – முடிவிலி என்று கணிதத்தில் சொல்வோமே, அதேதான். -∞ to +∞)
- இதுவரை எத்தனை உயிர்கள் உடல்பிறவிகள் பிறந்து-இறந்துள்ளன? எண்ணற்றவை. (minus infinity: -∞)
- இன்னும் எத்தனை உயிர்கள் பிறக்க இருக்கின்றன? எண்ணற்றவை. (plus infinity:+∞)
- ஒரு உயிர் எத்தனை உடல் பிறவிகள் எடுக்கவேண்டும்? அந்தந்த உயிரின் வினைப்பயன்களைப் பொறுத்தது. (அப்ப, ஏழு பிறவி என்பதெல்லாம் பொய்யா? அது ஏழு பிறவி இல்லை. எழு பிறவி! அதாவது, வினைப்பயன்களுக்கு ஏற்றவாறு எழுகின்ற பல பிறவிகள். )
- உயிர்கள், தன் இயல்பில், அறியாமை(ஆணவம்) என்னும் நுண்ணிய சடப்பொருளால் மறைக்கப்பட்டு, எங்கும் நிறையும் தன்மை இல்லாமல், கட்டுப்பட்டு மயங்கிக் கிடக்கும் குற்றம் உடையவை; அறிவித்தால் அறிபவை.
இறைவனால் என்கிறது சைவ சித்தாந்தம். இயற்கையால் என்கிறது அறிவியல்.
இனி, இறைவன் குறித்த கேள்விக்குச் செல்லலாம்.
இறைவன்(பதி) இயல்பு
இறைவன் (பதி) – ஒருவனே – என்றும் உள்ளவன் – தன் இயல்பில், யாரும் அறிவிக்காமல் அறியும் ஆற்றல் கொண்ட அறிவே வடிவானவன் – எல்லையற்ற ஆற்றல் கொண்டவன்.
கருணையே வடிவானவன் – வேண்டும்போது, வேண்டும் உருவம் கொள்ளும் ஆற்றல் கொண்டவன் – பொறிகள் புலன்கள் கொண்ட உடல்பிறவிக்கு வாராதவன் – எங்கும் நிறைந்தவன் –
தளைகள்(பாசம்) என்றும் உள்ள அறிவற்ற சடப்பொருளாகிய குற்றம் ஆகும்.
பாசம் என்ற தளை, ஆணவம், கன்மம், மாயை என்ற மூன்று வடிவங்களில் காணப்படும் – செம்புக்குக் களிம்பு போல் தன்னியல்பில், ஆணவம் உயிர்களைக் கட்டுவிக்கும் ஆற்றல் கொண்டவை.
உடலால் கட்டப்பட்ட உயிர், தன் உடலே தான் என்று கருதுவதை முன்னரே பார்த்தோம்.
இறைவன் அணுகினால், தளைகள்(பாசங்கள்) உயிர்களை விட்டு நீங்கும் இயல்பின.(ஆணவம், கன்மம், மாயை என்னும் மூவகைத் தளைகள் (பாசங்கள்-3) குறித்துப் பிற்பகுதியில் விரிவாக விளக்கியுள்ளேன்)
எல்லையற்ற கருணையாளன் இறைவன்,
• அறியாமையால் கட்டுண்ட உயிர்கள் மீது கொண்ட அன்பால், அவற்றைப் பிடித்த அறியாமை (ஆணவம்) நீங்க,
• உலகங்களைப் படைத்து, உலகங்களில் இயங்கும் உடல்களைப் படைத்து,
• அவ்வுடல்களில் உயிர்கள், தாமே இயங்கி, உடல்களில் பொருந்தியுள்ள பொறி-புலன்கள் வாயிலாக,
• புற உலகையும், பின்னர், தன்னை அறியும் அக-உலகையும் அறியும்படி
வாய்ப்புகள் வழங்குகிறான்.
திரோதான சக்தியும், அருட்சக்தியும்!
இப்படியான வாழ்க்கை முறையில், இறைவன் உயிர்களுடன் மறைந்து இருப்பது திரோதானம்(மறைப்புச்சக்தி) எனப்படும்.
தன்னை அறியும் உயிர்கள், தம் தலைவனாம் இறைவனை அறிதல் வேண்டித் தொழும்போது, இறைவன் வெளிப்பட்டுத் தோன்றி, உயிர்களின் இயல்பான முற்றறிவு என்னும் ஞானத்தை அருள்வான்; சீவன் என்னும் உயிர் சிவமாகும் வேளையில், அதற்கு, உடல் கருவி தேவை நீங்கும். சிவமாகும்.
அவ்வாறு,இறைவனால் அறியாமை நீங்கப் பெற்ற உயிர்கள், தம் தலைவன் இறைவனை அறிந்து, எங்கும் நிறையும் (வியாபகம்) சிவமாம் தன்மை பெற்று, சிவத்துடன் இரண்டறக் கலக்கும்.
இறைவன், உயிர்கள், உலகம்(இயற்கை-பேரண்டம் அனைத்தையும் உள்ளடக்கியது) என்ற மூன்று பொருட்களையும், அவற்றிற்கு இடையேயான உறவுகளையும் அறுதியிட்டு, வரையறை செய்த தத்துவமே சைவ சித்தாந்தம் எனப்படும்.
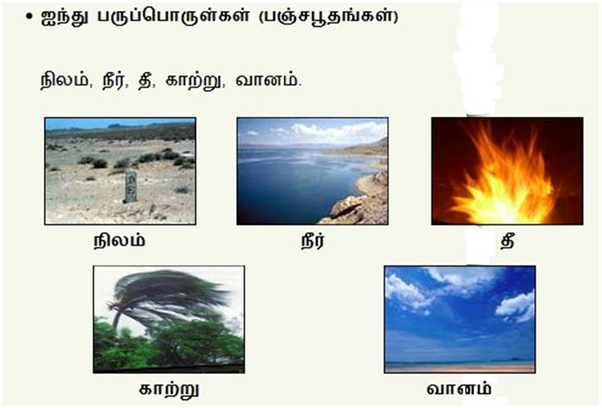
முதலாவது செய்தி: உயிரற்ற சடப்பொருள் உலகம் என்பது, நிலம், நீர், தீ, காற்று, வெளி (வானம்) என்ற ஐந்து பொருட்களும் கொண்ட கலவை. ‘பஞ்ச பூதங்கள்’
உயிர் என்ற அறிவுப்பொருளுக்கு, அறிவு கொடுக்கும் கருவியாக, இறைவனால் கொடுக்கப்பட்ட கருவி(Gadget)தான் நம் உடம்பு என்னும் உடல் – அதில், Five sensors-களும், Five senses-களும் உண்டு. (உடல்(மெய்) -touch sensor(தொட்டால் உணர்தல் கருவி, touch sense), வாய்-நாக்கு -taste sensor(சுவை உணரும் கருவி, taste sense), கண் – vision sensor(ஒளி பார்க்கும் பார்வைக் கருவி, vision sense), மூக்கு – sniffing sensor(மோப்பக் கருவி, sniffing sense), செவி – hearing sensor(ஒலி கேட்கும் கருவி, hearing sense)
நன்றாக சிந்தித்துப் பாருங்கள்! நமது அறிவு-என்பது இந்த ஐந்து அறியும் கருவிகள் – புலன்கள் இல்லாமல் நடக்குமா-என்று.
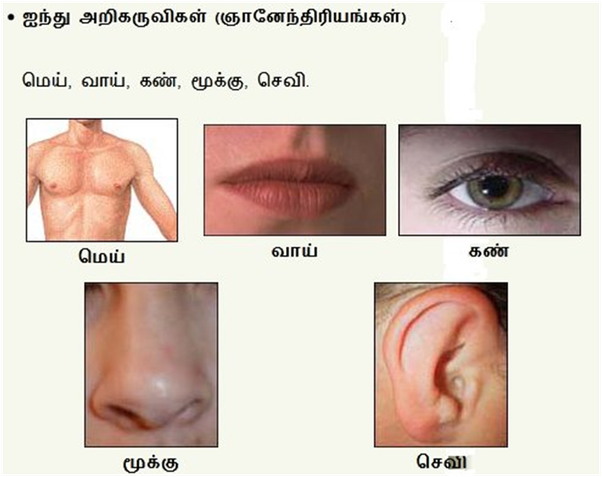
இந்த ஐந்து அறியும் கருவிகளான மெய், வாய், கண், மூக்கு, செவி என்ற பொறிகளுக்கும், சுவை(த்தல்), ஒளி(பார்த்தல்), ஊறு(உணர்தல்), நாற்றம்(நுகர்தல்), ஓசை(கேட்டல்) என்னும் ஐந்து நுட்பமான புலன்கள் உண்டு.
ஐந்து தொழிற் கருவிகள் (கன்மேந்திரியங்கள்)
வாய் (பேச்சு/வாக்கு), கை(பாணி), கால்(பாதம்), எருவாய்(பாயு), கருவாய்(உபத்தம்) மனம் – புத்தி – சித்தம் -அகங்காரம்!
இந்த ஐந்து அறிகருவிகளையும், ஐந்து புலன்களையும் ஒருங்கிணைத்து செயலாற்றும் மனம் என்னும் கருவி, தகவல்களை மூளைக்கு அனுப்புகிறது.
மூளைக்குள் வந்த தகவல்கள் யாவை என்று ஏற்கனவே மூளையில் உள்ள தகவல்களுடன் ஒப்பிட்டு அறியும் கருவி ‘புத்தி’ எனப்படும். (இதுவும் வடமொழி சொல்லே!)
தீ எரிவதை, கண் என்ற பொறி கொண்டு பார்த்த மனம் தந்த தகவலை, ஏற்கனவே மூளையில் பதிந்துள்ள தகவலுடன் ஒப்பிட்டு, தீதான் என்று புத்தி சொல்லியதும்,
- தீயை நீரைக் கொண்டு அணைக்கும் செயலைச் செய்யலாம் என்று பரிந்துரை செய்கிறது, சித்தம் என்னும் கருவி;
- ‘ஆம், நான் தீயை நீரைக் கொண்டு அணைக்கப் போகிறேன் என்று ‘முடிவு செய்கிறது’ அகங்காரம் என்னும் கருவி;
- ‘நீர் இருக்கும் தொட்டியை நோக்கி ஓடு’ என்று காலுக்குக் கட்டளை இடுகிறது; ‘வாளியை எடுத்து, நீரை முகர்ந்து ஊற்று’ என்று கைகளுக்குக் கட்டளை இடுகின்றது.
- ‘சேகர், நீயும் இன்னொரு வாளியில் நீரை எடுத்து ஊற்று’ என்று வாய்க்குக் கட்டளை இடுகின்றது;
- இப்படி, இரண்டு கைகள், இரண்டு கால்கள், ஒரு வாய், கழிவுகளை வெளியேற்றும் எருவாய், விந்து-நாதம் கருவாய் ஆகிய ஐந்தும் ஏவல் வேலை செய்யும் இயந்திரங்கள் என்பதால்,வேலை-இயந்திரங்கள் – தொழிற்கருவிகள் ஐந்து என்கிறோம். (வடமொழியில், கர்மேந்திரியங்கள் ஐந்து)
இவ்றோடு மனம், புத்தி, சித்தம், அகங்காரம் (அந்தகரணங்கள்)என்னும் நான்கு தத்துவங்கள்.
ஐந்து பருப்பொருட்கள்(பூதங்கள்), ஐந்து அறி-கருவிகள், ஐந்து அறி-புலன்கள், ஐந்து தொழிற்கருவிகள், நான்கு அந்தகரணங்கள் என்னும் இந்த இருபத்துநான்கு தத்துவங்களோடு வித்தியா தத்துவங்கள் 7, சிவதத்துவங்கள் 5 கூட்டி வரும் 12 தத்துவங்களையும் (பின்னர் விளக்குகிறேன்; இப்போதைக்கு, பதி,பசு,பாசம் அறிவோம்) சேர்த்து 36 தத்துவங்கள் என்பது சைவ சமய, சைவ சித்தாந்தத்தின் முடிபு ஆகும். (நாம் அறிந்து கொண்ட முடிபு – கொண்முடிபு)
ஆணவம், கன்மம், மாயை என்ற மூன்று வகைப் பாசங்கள்-பாசம்!
- உயிர்களை இயல்பாகப் பற்றியுள்ள அறியாமை (ஆணவம்),
- உயிர்களின் அறியாமையை(ஆணவத்தை) அகற்ற இறைவன் தந்த அறிவுக் கருவிகளான 24 தத்துவங்கள் வழியாக உயிர்கள் வினைகள் செய்து செயலாற்றுவதால், விளையும் வினைப் பயன்கள் (கன்மம்/கருமம்),
- அறியாமை நீக்கவே, இறைவன் மாயை வழியாக, உலகம் என்னும் University-யில், உடல்-என்னும் Hostel-லில், வாழ்க்கை என்னும் 100 ஆண்டு Course படிக்க அனுப்புகிறான்.
வந்த வேலையை விட்டுவிட்டு, உழைப்பதெல்லாம் உணவின் பொருட்டே-என்று உழல்கிறோம்!
- University-ல சேர்ந்தோமா, hostel-லுக்குப் போனோமா, படிச்சு முடிச்சு, Degree என்ற ஞானத்தைப் பெற்று, இறைவனுடன் இரண்டறக் கலத்தல் என்னும் நிலையான வேலைக்கு முயற்சி செய்யாமல்,
- Hostel சாப்பாட்டையே ருசிச்சுச் சாப்பிட்டுவிட்டு,
- hostel என்னும் உடலிலேயே வாழ என்ன வழின்னு யோசிச்சு, வாழ்க்கையை வீணாக்கி, வினையை சம்பாதிச்சு,
- fail-ஆகி, கருமவினைகளைத் தீர்க்க மீண்டும், மீண்டும் University என்னும் உலகத்துக்கு வந்து,
- Hostel-என்னும் உடலில் மீண்டும் நுழைந்து, மீண்டும் fail ஆகி, சுத்திக்கிட்டே இருக்கோம்.
நாம இந்த உலகத்துக்கு வந்த வேலையைப் பார்க்காமல், அறியாமை என்னும் ஆணவத்தால், வினைகளை ஈட்டி, மீண்டும், மாயையால், பிறந்து, இறந்து உழல்கிறோம்.
இறைவனை அறியும்முழுமையான அறிவே முழு விடுதலை!
இந்த அறியாமை(ஆணவம்), வினைகள்(கன்மம்) காரணங்களாக,
- மீண்டும் பாசம் என்னும் ஆணவம், கன்மம், மாயையில் சிக்காமல் விடுபட,
- மனிதன் முயற்சி செய்து, இறைவனிடம் அடைக்கலம் புகவேண்டும்;
சக உயிர்களுக்கும், மனிதர்களுக்கும், கருணையும், தொண்டும் செய்வோருக்கு, இறைவன் அருள்கிறான்.
இறைவனுடன் கலத்தலே பாசத்திலிருந்து விடுதலை பெற வழி!
அறியாமை,(ஆணவம்), நல்வினை-தீவினைகள்(கன்மம்), மாயை ஆகிய பாசத்திலிருந்து உயிர்கள் விடுதலை பெற, இறைவனை அடைவது ஒன்றே ஒரே வழி என்பதைத் திருமந்திரம் அழகாக விளக்குகிறது.
பதி பசு பாசம் எனப் பகர் மூன்றில்
பதியினைப் போல், பசு பாசம் அநாதி!
பதியினைச் சென்று அணுகாப் பதிபாசம்
பதி அணுகில் பசுபாசம் நில்லாவே!
– திருமந்திரம்.
இறைவனைப்போல் உயிர்களும் ஆதி-அந்தம் இல்லாதவை!
இறைவன்(பதி), உயிர்கள்(பசு), தளைகள்(பாசம்) என்ற மூன்றையும் குறித்துச் சொல்வதானால், இறைவனைப் போலவே, உயிர்களும், தளைகளும், தொடக்கம், முடிவு இல்லாதவை!
உயிர்கள் இறைவனுக்குச் சமமா?
- பாருங்கள்! இறைவனைப்போல், உயிருக்கும் தொடக்கம்-முடிவே இல்லை!
- அப்படியானால், நமக்கும், இறைவனுக்கும் வித்தியாசம் இல்லை என்று கருதலாம் அல்லவா?
- நாமும், இறைவனும் சமம்தானோ என்று தவறாகக் கருத வேண்டாம்!
- இதைத்தானே வேதாந்தியும் சொல்லிக் குழப்பினார் என்று நினைக்க வேண்டாம்.
அடுத்த வரியில் அழகாக விளக்குகிறார் பாருங்கள்.
இறைவனை பாசங்கள் அணுகாது!
• ஆனால், பாசம் என்னும் தளைகள், இறைவனை (என்னும் பதியினைச் சென்று) அணுகக் கூட இயலாது.
• இறைவன் பாசங்கள் அணுக முடியாத தூய முழுமையான அறிவினைக் கொண்டவன்.
(முற்றுமான அறிவைக் கொண்டவன் என்ற பொருளில், முற்றறிவன் – வாலறிவன் என்று இறைவனைச் சொல்லுவோம். அவனுக்கு, ஐம்பொறி-புலன்கள் கொண்ட உடல் தேவையற்றவன்; அனைத்தையும் உடல் இல்லாமலேயே அறிபவன்; எங்கும் நிறைந்தவன்; உங்கள் உள்ளும், என்னுள்ளும் நிறைந்தவன்)
உயிர்களின் அறியாமை மலங்கள்(பாசம்) நீக்கவே உடல்-பிறவி!
எனவே, இயல்பாகவே,
- அறியாமை(ஆணவம்) என்ற பாசம் பிடித்தே இருக்கும் உயிர்களின் அறியாமையைப் போக்கவே,
- உடல்கள் கருவிகளைத் தந்து,
- உலகம் என்னும் அறிவுக்கூடத்தில், உலவ விடுகிறான்;
- டல்கள் மூலம் அறிவு பெற்று, உடல்களை விட்டு நீங்கும்போது, முற்றறிவன் இறைவனுடன் கலந்தால், உயிர்களுக்கும் உடல்-அறிவு தேவைகள் நீங்கிவிடும்;
பிறவிகள் நீங்கிவிடும்!
பிறவி-வினை-பிறவி சுழல் நீக்கும் இறைவன்!
பிறவிகள் வினைகளால் வருகின்றன.
- பிறவிகளால், வினைகளை ஈட்டுகிறோம்.
- முட்டையிலிருந்து கோழி, கோழியிலிருந்து முட்டை என்பதுபோல், வினையால் பிறவிகள், பிறவியால் வினைகள் என்ற சுழலை உடைக்கும் வல்லமை
இறைவனை அணுகினால் மட்டுமே கிடைக்கும் என்று அறிவோம்!
இறைவன்தான் நமக்குள்ளேயே இருக்கானே! அப்ப எப்படி மும்மலங்கள் என்னும் ஆணவம், கன்மம், மாயை நம்மைப் பிடித்தன?
- இறைவன் எங்கும் இருப்பதுபோல், நம்முள்ளும் இருக்கிறான்;
- நம்முள்ளே அவன் இருந்தாலும், அவனுள்ளே நாம் கலக்கவில்லையே?
- அப்படி ஒருவன் நம்ப கூட இருக்கிறான்-னு நாம்தான் கண்டு கொள்வதே இல்லையே!
- மனிதன் எப்பவாது நம்பளக் கண்டுக்குவான்; அப்பத்தான், மனிதனை நாம் ஆட்கொள்வோம் என்று இறைவன் காத்துக்கொண்டே இருக்கிறான்.
நம்முள் இருந்தாலும், தூய உடம்பினனான இறைவனை மலங்கள் பிடிக்காது.
- ஆக, மும்மலங்கள்(ஆணவம், கன்மம், மாயை) என்னும் தளைகளை ஒழிக்க ஒரே வழி, இறைவனை நாம் நினைந்து அணுகினால் போதும்.
- இறைவனின் சந்நிதானத்தில், உயிர்களைப்(பசு) பிடித்துள்ள பசு-பாசம் நில்லாமல் ஓடிப்போகும் என்கிறார் திருமூலர்.
உயிருக்கான விளக்கத்தை சரியாக விளக்கிவிட்டேனா என்று அன்பர்கள்தான் கூற வேண்டும்!
![\[1<arr[i]<10^9\]](https://codethataint.com/blog/wp-content/ql-cache/quicklatex.com-83c987b36d9aa35ebe4b8959adb7e0d7_l3.png "Rendered by QuickLaTeX.com")
![\[1<candles[i]<10^7\]](https://codethataint.com/blog/wp-content/ql-cache/quicklatex.com-272ea8f947d07ad873b85cc10ac2a88d_l3.png "Rendered by QuickLaTeX.com")