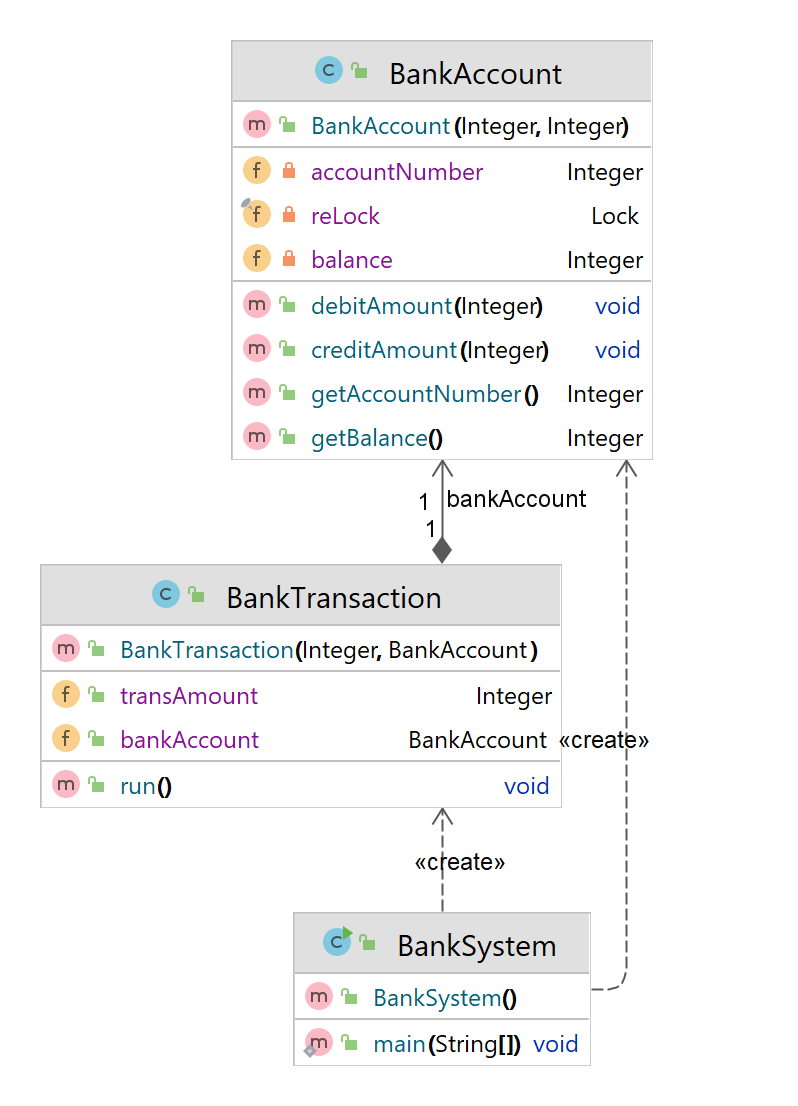
The Observer Pattern defines a one-to-many dependency between objects so that when one object changes state, all of its dependents are notified and updated automatically. The observer pattern is a behavioral design pattern that defines a one-to-many relationship between objects. It allows an object, called the subject, to notify other objects, called observers, about any changes in its state. The observers can then react to these changes according to their own logic.
Why Observer Design Pattern
The subject and the observers are loosely coupled, meaning that they do not depend on each other’s implementation details. The subject only knows that it has a list of observers, and the observers only know that they can update themselves when the subject changes.
When Observer Design Pattern
The observer pattern is especially useful in event-driven systems, where the system reacts to events that occur asynchronously. An event is a change in the state of the system or its components, such as a user input, a network request, or a timer. Use the pattern when some objects in your app must observe others, but only for a limited time or in specific cases. Use the Observer pattern when changes to the state of one object may require changing other objects, and the actual set of objects is unknown beforehand or changes dynamically.
How Observer Design Pattern
- Declare the subscriber interface(IObserver.java). At a bare minimum, it should declare a single update method.
- Declare the publisher interface(Observable.java) and describe a pair of methods for adding a subscriber(Observer) object to and removing it from the list. Remember that publishers must work with subscribers only via the subscriber interface.
- Create concrete publisher classes. Each time something important happens inside a publisher, it must notify all its subscribers.
- Implement the update notification methods in concrete subscriber classes. Most subscribers would need some context data about the event. It can be passed as an argument of the notification method.
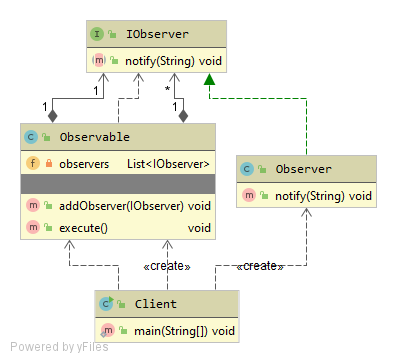
IObserver.java
public interface IObserver {
    public void notify(String serviceName);
}
Observer.java
public class Observer implements IObserver {
    @Override
    public void notify(String serviceName) {
            System.out.println("Notification from " + serviceName);
    }
}
Observable.java
public class Observable {
    private List<IObserver> observers = new ArrayList<IObserver>();

    public void addObserver(IObserver observer){
        this.observers.add(observer);
    }

    public void execute(){
        for (IObserver observer : observers) {
            observer.notify("Email Service");
        }
    }
}
Client.java
public class Client {
    public static void main(String[] args) {
        Observable observable = new Observable();
        observable.addObserver(new Observer());
        observable.execute();
    }
}
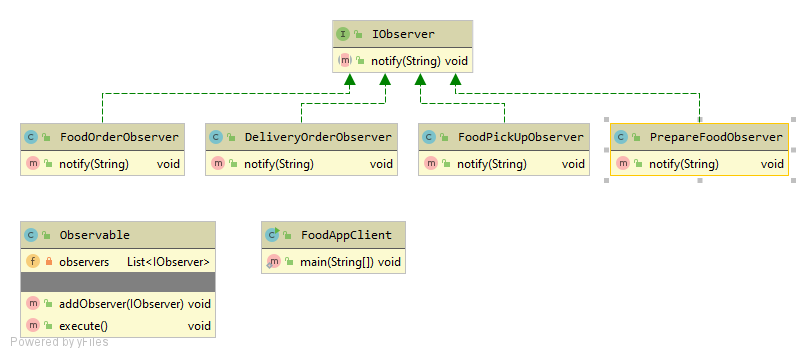
IObserver.java
public interface IObserver {
    public void notify(String foodItem);
}
DeliveryOrderObserver.java
public class DeliveryOrderObserver implements IObserver {
    @Override
    public void notify(String foodItem) {
        System.out.println("Ready for Pickup - "+ foodItem);
    }
}
FoodOrderObserver.java
public class FoodOrderObserver implements IObserver {
    @Override
    public void notify(String foodItem) {
        System.out.println(" Order received - "+ foodItem);
    }
}
FoodPickUpObserver.java
public class FoodPickUpObserver implements IObserver {
    @Override
    public void notify(String foodItem) {
        System.out.println("Parcel - "+ foodItem);
    }
}
PrepareFoodObserver.java
public class PrepareFoodObserver implements IObserver {
    @Override
    public void notify(String foodItem) {
        System.out.println("Preparing - "+ foodItem);
    }
}
Observable.java
public class Observable {
    private List<IObserver> observers = new ArrayList<IObserver>();

    public void addObserver(IObserver observer){
        this.observers.add(observer);
    }

    public void execute(){
            for(IObserver observer: observers){
                observer.notify("Egg Biryani");
        }
    }
}
FoodAppClient.java
public class FoodAppClient {
    public static void main(String[] args) {
        Observable observable = new Observable();

        observable.addObserver(new FoodOrderObserver());
        observable.addObserver(new PrepareFoodObserver());
        observable.addObserver(new FoodPickUpObserver());
        observable.addObserver(new DeliveryOrderObserver());
        observable.execute();
    }
}
Order received - Egg Biryani
Preparing - Egg Biryani
Parcel - Egg Biryani
Ready for Pickup - Egg Biryani
Advantages of Observer Pattern
- The subject and the observers can be reused in different contexts, as long as they implement the common interface. The subject does not need to know the details of the observers, and the observers do not need to know the details of the subject. The subject and the observers can be added, removed, or changed at runtime, without affecting the rest of the system.
- The subject can notify the observers asynchronously, without waiting for their responses. The observers can process the events in parallel, without blocking the subject. This allows for the subject and the observers to adapt to changing requirements and scenarios.