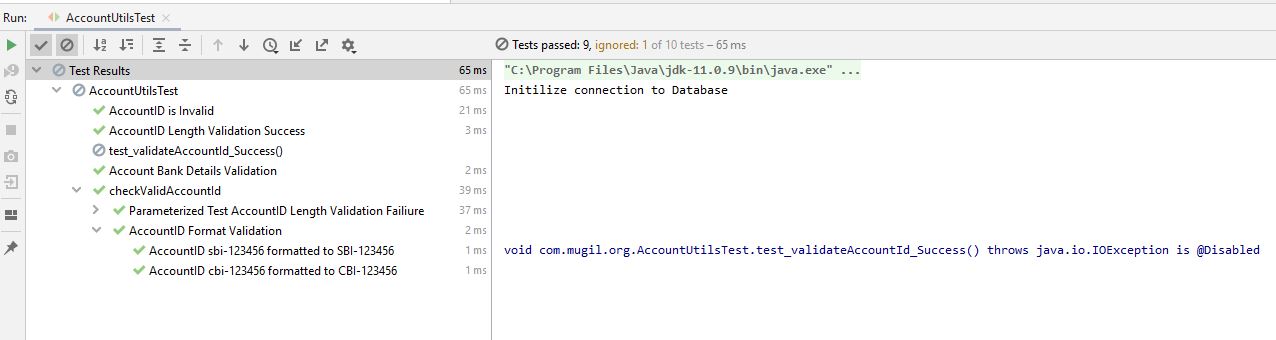
Stream is a Wrapper class around a data structure with some additional methods such as filter, map, reduce. When you create a stream out of array or list, copy of data in array exist as it is in stack. only wrapper is created around the reference of array or list. Converting an array to a stream doesn’t copy data, it just wraps the array in a stream object for functional-style processing.
The stream does not modify the original array. It’s a read-only view. It wraps the existing array in a Spliterator.
. The elements are not duplicated or moved. The stream just holds a reference to the array and knows how to iterate over it.
A Spliterator in Java is a special type of iterator introduced in Java 8 that can both traverse and partition elements of a data source. It’s designed to efficiently split data into chunks so multiple threads can process them concurrently
When not to use Streams?
When you create a stream, Java allocates a Stream pipeline object and a Spliterator wrapper around the source. These objects add overhead compared to a raw loop, but they enable functional-style operations and parallelism. Spliterator doesn’t always split. In sequential streams, it just traverses. Splitting only happens when parallel streams are used, where trySplit() divides the source into chunks for concurrent processing.
Collection → Spliterator → Stream → Consumer
- Create a Spliterator wrapper
- Create a Stream pipeline object
- Use Spliterator to walk the backing array and feed elements into the lambda consumer
In for loop
Collection → Index/Iterator → Consumer
The for loop skips the extra object creation (Stream + Spliterator wrappers) and directly feeds elements to the consumer, which is why it’s faster and lighter for simple tasks.
What is Spliterator?
A Spliterator is a special type of iterator that is designed to traverse and partition elements of a data source. The name itself comes from “Split + Iterator”.
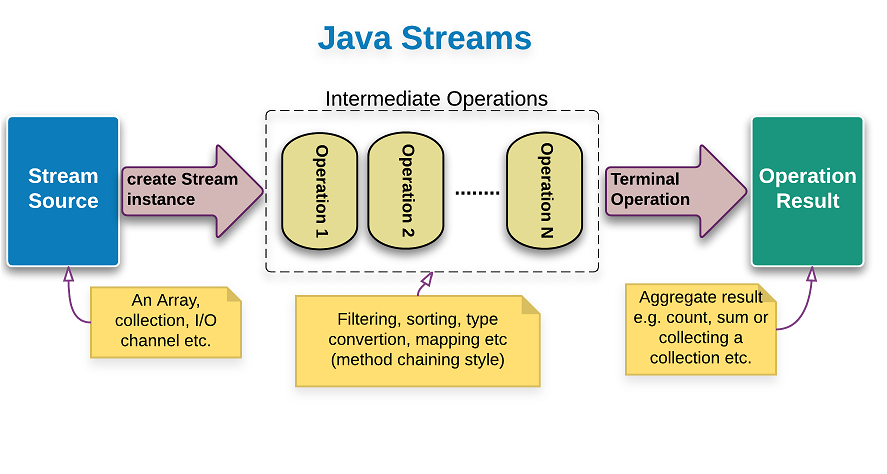
- Intermediate Operations returns Stream as output. methods like map(), sorted(), distinct() would return stream as output
- Terminal Operations returns something other than Stream. Collect() returns collection. Reduce() returns one element
Converting list to a stream and print them
List<Integer> arrNumbers = List.of(10,27,31, 35, 40, 44, 48, 50);
//Convert list to stream
Stream objStream = arrNumbers.stream();

//Static Method Reference
objStream.forEach(System.out::println);
Both Map and Filter returns Streams.
Filter takes predicate as input and adds element to stream based on result of predicate(I.E. True or false).
Map takes function as input and adds transformed object value to stream.
Reduce takes function as input and returns a single value that is computed going over the entire rows in stream.
Filter is used for filtering the data, it always returns the boolean value. If it returns true, the item is added to list else it is filtered out (ignored)
- Filter takes a predicate as argument. Predicate returns boolean. The Output of Filter is a Stream
- Predicate object which is technically a function to convert an object to boolean. We pass an object and it will return true or false.
- filter() method is lazy like map, it wont be evaluated until you call a reduction method, like collect
import java.util.*;
import java.util.stream.Stream;

List<String> arrNames = List.of("Mugil", "Mani", "Madhu");
arrNames.stream()
        .filter(name -> name.equals("Mugil"))
        .forEach(System.out::println);
List<Integer> arrNumbers = List.of(10,27,31, 35, 40, 44, 48, 50);
List<String> arrSkills = List.of("Spring Boot", "Spring Security", "Java 8", "Microservices", "Spring MVC");

//Printing Even Numbers
System.out.println("------Even Numbers-------");
arrNumbers.stream().filter(FilterEgs::isEven).forEach(System.out::println);

//Printing Even Numbers
System.out.println("------Even Numbers-------");
arrNumbers.stream().filter(no -> no%2==0).forEach(System.out::println);

//Printing Odd Numbers
System.out.println("------Odd Numbers-------");
arrNumbers.stream().filter(no -> no%2==1).forEach(System.out::println);

//Printing Odd Numbers
System.out.println("------Print Spring Skills-------");
arrSkills.stream().filter(skill -> skill.toLowerCase().contains("spring"))
.forEach(System.out::println);

private static boolean isEven(int no){
        return no%2==0;
}
Output
------Even Numbers-------
10
40
44
48
50
------Odd Numbers-------
27
31
35
------Print Spring  Skills-------
Spring Boot
Spring Security
Spring MVC
By using map, you transform the object values. the map returns the transformed object value as Stream.
- Map takes a function as a argument and performs transform action on elements. The Output of Map is a Stream
- map() is used to transform one object into another by applying a function.
- Stream.map(Function mapper) takes a function as an argument.
- mapping function converts one object to the other. Then, the map() function will do the transformation for you. It is also an intermediate Stream operation, which means you can call other Stream methods, like a filter, or collect on this to create a chain of transformations.
List<Integer> arrNum = List.of(5,6,8,57,4,1,26,84,15);
List<String> arrSkills = List.of("Spring Boot", "Spring Security", "Java 8", "Microservices", "Spring MVC");


//Printing Square of Numbers whose value less than 15
System.out.println("------Square of Numbers-------");
arrNum.stream()
      .filter(num -> num<15)
      .map(num -> num*num)
      .forEach(System.out::println);


//Print Total Characters in String
System.out.println("------Print Total Characters in String-------");
arrSkills.stream()
		.map(skill -> skill + " contains "+ skill.length()+ " Characters")
		.forEach(System.out::println);
Output
------Square of Numbers-------
25
36
64
16
1
------Print Total Characters in String-------
Spring Boot Contains 11 Characters
Spring Security Contains 4 Characters
Java 8 Contains 5 Characters
- Stream.reduce() takes function as Parameter
- Reduction stream operations allow us to produce one single result from a sequence of elements, by repeatedly applying a combining operation to the elements in the sequence.
- Stream.reduce() operation Contains Identity, Accumulator and Combiner
- Identity – an element that is the initial value of the reduction operation and the default result if the stream is empty
- Accumulator – a function that takes two parameters: a partial result of the reduction operation and the next element of the stream
- Combiner – a function used to combine the partial result of the reduction operation when the reduction is parallelized or when there’s a mismatch between the types of the accumulator arguments and the types of the accumulator implementation
ReduceEgs.java
import java.util.Arrays;
import java.util.List;

public class ReduceEgs {
    public static void main(String[] args) {
        List<Integer> arrNumbers =  Arrays.asList(1,2,3,4,5,6,7,8,9);

        System.out.println(arrNumbers.stream().reduce(0, ReduceEgs::sumNos));
    }

    public static Integer sumNos(int x, int y){
        System.out.println("a -"+ x + " b - "+  y);

        return x+y;
    }
}
Output
a -0 b - 1
a -1 b - 2
a -3 b - 3
a -6 b - 4
a -10 b - 5
a -15 b - 6
a -21 b - 7
a -28 b - 8
a -36 b - 9
45
In the above example
- the Integer value 0 is the identity. It stores the initial value of the reduction operation and also the default result when the stream of Integer values is empty.
- the lambda expression x+y represented by function sumNos is the accumulator since it takes the partial sum of Integer values and the next element in the stream.
- When a stream executes in parallel, the Java runtime splits the stream into multiple substreams. In such cases, we need to use a function to combine the results of the substreams into a single one. This is the role of the combiner
Role of combiner would be visibile only in parallelStream with output as below. It would be hard to interpret the output response in console.
ReduceEgs.java
.
.
 System.out.println(arrNumbers.parallelStream().reduce(0, ReduceEgs::sumNos));
.
.
Output
a -0 b - 6
a -0 b - 5
a -5 b - 6
a -0 b - 1
a -0 b - 7
a -0 b - 9
a -0 b - 2
a -1 b - 2
a -0 b - 3
a -0 b - 8
a -8 b - 9
a -0 b - 4
a -3 b - 4
a -3 b - 7
a -7 b - 17
a -11 b - 24
a -10 b - 35
45
Alternate ways to Sum Nos
public static void main(String[] args) {
 List<Integer> arrNumbers =  Arrays.asList(1,2,3,4,5,6,7,8,9);

 Integer sum = arrNumbers.stream().reduce(0, Integer::sum);
 Integer sum2 = arrNumbers.stream().reduce(0, (x,y)->x+y);

 System.out.println(sum);
 System.out.println(sum2);
}
Once you get the values in stream then it should be typecast to its original type before calling its methods as values are stored as Objects in stream
Below you could see the name is typecast to String before calling lowerCase method
List<String> arrNames = Arrays.asList("Mugil", "Mani", "Vinu");
Stream arrNameStream = arrNames.stream();
arrNameStream.forEach(name -> System.out.println(((String)name).toLowerCase()));