- New methods to the String class: isBlank, lines, strip, stripLeading, stripTrailing, and repeat.
- readString and writeString static methods from the Files class
Path filePath = Files.writeString(Files.createTempFile(tempDir, "demo", ".txt"), "Sample text"); String fileContent = Files.readString(filePath); assertThat(fileContent).isEqualTo("Sample text"); - java.util.Collection interface contains a new default toArray method
List sampleList = Arrays.asList("Java", "Kotlin"); String[] sampleArray = sampleList.toArray(String[]::new); assertThat(sampleArray).containsExactly("Java", "Kotlin"); - A static not method has been added to the Predicate interface. Predicate.not(String::isBlank)
- The new HTTP client from the java.net.http package was introduced in Java 9. It has now become a standard feature in Java 11.The new HTTP API improves overall performance and provides support for both HTTP/1.1 and HTTP/2:
HttpClient httpClient = HttpClient.newBuilder() .version(HttpClient.Version.HTTP_2) .connectTimeout(Duration.ofSeconds(20)) .build(); HttpRequest httpRequest = HttpRequest.newBuilder() .GET() .uri(URI.create("http://localhost:" + port)) .build(); HttpResponse httpResponse = httpClient.send(httpRequest, HttpResponse.BodyHandlers.ofString()); assertThat(httpResponse.body()).isEqualTo("Hello from the server!"); - A major change in this version is that we don’t need to compile the Java source files with javac explicitly anymore:
Before Java 11Version$ javac HelloWorld.java $ java HelloWorld Hello Java 8!
New Version
$ java HelloWorld.java
Hello Java 11!
Author Archives: admin
New Features in Spring Boot 3
Minimal Requirment
- Java 17 or higher
- Jakarta EE 10
- Spring Framework 6
- Works on Maven 3.5+
- Tomcat 10.0
- Improved observability with Micrometer and Micrometer Tracing
Improvements
Performance enhancements and optimizations to boost application responsiveness and efficiency.These improvements focus on reducing startup times, minimizing memory footprint, and optimizing resource utilization.
Changes in Code
- When we wanted to configure the Security settings, we had to extend the WebSecurityConfigurerAdapter class.This class has been deprecated and removed in Spring Security 6.
Instead, we should now take a more component-based approach and create a bean of type SecurityFilterChain.@Configuration @EnableWebSecurity public class WebSecurityConfig { @Bean public SecurityFilterChain configure(HttpSecurity http) throws Exception { http .authorizeHttpRequests(requests -> requests .requestMatchers(new AntPathRequestMatcher("/openapi/openapi.yml")).permitAll() .anyRequest().authenticated()) .httpBasic(); return http.build(); } } - Instead of using authorizeRequests, which has been deprecated, we should now use authorizeHttpRequests.This method is part of the HttpSecurity configuration and allows you to configure fine-grained request matching for access control.
- Spring Security 6, AntMatcher, MvcMatcher, and RegexMatcher have been depreciated and replaced by requestMatchers or securityMatchers for path-based access control. This allows us to match requests based on patterns or other criteria without relying on specific matchers.
Writing Custom Exception in Java
Why we need Custom Exception
Exceptions are technical causes which should be wrapped in a presentable way with a specific business logic and workflow. adding a higher abstraction layer for the exception handling, which results in more meaningful and readable API
How to write Custom Exception
All you need to do is create a new class and have it extend Exception. If you want an Exception that is unchecked, you need to extend RuntimeException.
Note: A checked Exception is one that requires you to either surround the Exception in a try/catch block or have a ‘throws’ clause on the method declaration. (like IOException) Unchecked Exceptions may be thrown just like checked Exceptions, but you aren’t required to explicitly handle them in any way (IndexOutOfBoundsException).
Exception, if you want your exception to be checked (i.e: required in a throws clause).RuntimeException, if you want your exception to be unchecked.
Creating Custom Checked Exception
Note:constructor takes a Throwable’s subclass which is the origin (cause) of the current exception
public class StudentStoreException extends Exception {
     public StudentStoreException(String message, Throwable cause) {
        super(message, cause);
    }
}
Creating Custom Unchecked Exception
public class IncorrectFileExtensionException
  extends RuntimeException {
    public IncorrectFileExtensionException(String errorMessage, Throwable err) {
        super(errorMessage, err);
    }
}
Methods in Custom Exception
public class MyOwnException extends Exception {
    public MyOwnException() {

    }

    public MyOwnException(String message) {
        super(message);
    }

    public MyOwnException(Throwable cause) {
        super(cause);
    }

    public MyOwnException(String message, Throwable cause) {
        super(message, cause);
    }
}
Basics of Threads
Thread – direction or path that is taken while a program is executed
- Below code would explain how dirty read happens when multiple thread(2 threads) tries to access Instance variable at once from two different class objects
- Below we have 3 classes, One for Printing Report and Other for removing the report printed. Third for tracking the report status
- The Output of the code would be Consistently 0 every time which is expected when the number of reports to be printed is in range of less than 100. However the output changes with more the no of reports to be printed. I.E. totalReportsToBePrinted = 10000000
- This happens because for lower value of reports to be printed the thread executes fast with out context switching however for higher values other thread(RemovePrintedReports thread takes control before PrintExcelReports get completed) takes control which leads to inconsistency
- The Same code would return 0 every time if one thread(PrintExcelReports) completes before other(RemovePrintedReports) as below when we use join and didn’t start both the threads at once.
.
.
        t1.start();
        t1.join();

        t2.start();
        t2.join();

.
.
PrintExcelReports.java
public class PrintExcelReports implements Runnable {
    TotalReportCount totalReportCount;

    public PrintExcelReports(TotalReportCount totalReportCount) {
        this.totalReportCount = totalReportCount;
    }

    int totalReportsToBePrinted = 1000000;

    @Override
    public void run() {
        for(int i=0;i<totalReportsToBePrinted;i++){
            totalReportCount.totalReportsCntVal -= i;
        }
    }
}
RemovePrintedReports.java
public class RemovePrintedReports implements Runnable {
    TotalReportCount totalReportCount;

    public RemovePrintedReports(TotalReportCount totalReportCount) {
        this.totalReportCount = totalReportCount;
    }

    int totalReportsToBePrinted = 1000000;

    @Override
    public void run() {
        for(int i=0;i<totalReportsToBePrinted;i++){
            totalReportCount.totalReportsCntVal -= i;
        }
    }
}
ReportCurrentStatus.java
public class ReportCurrentStatus {
    public static void main(String[] args) throws InterruptedException {
        TotalReportCount objTotalReportCount = new TotalReportCount();
        objTotalReportCount.totalReportsCntVal = 0;

        PrintExcelReports objPrinter1 = new PrintExcelReports(objTotalReportCount);
        RemovePrintedReports objPrinter2 = new RemovePrintedReports(objTotalReportCount);

        Thread t1 = new Thread(objPrinter1);
        Thread t2 = new Thread(objPrinter2);

        t1.start();
        t2.start();
        t1.join();
        t2.join();

        System.out.println(objTotalReportCount.totalReportsCntVal);
    }
}
Output when totalReportsToBePrinted is greater than 1000
RANDOM NUMBER
Output when totalReportsToBePrinted is less than 100
0
All about Class Loading and initialization
What is Class Loading?
Loading is the process of finding the binary representation of a class or interface type with a particular name and creating a class or interface from that binary representation.
When Class is Loaded?
- Class loading done by Class Loaders may eagerly load a class or does lazy load
- Eager loading happens as soon as another class references it and lazy load happens when a need of class initialization occurs.
- If a Class is loaded before it’s actually being used, it can sit inside before being initialized which may vary from JVM to JVM.
- However, it’s guaranteed by JLS that a class will be loaded when there is a need of static initialization.
Whenever the JVM determines it needs a class (to use its static variables, to create a new object, to use its static methods etc) it will load the class and static initialization blocks will run, static variables are initialized etc. This is (at least under normal circumstances) done only once
SomeClass.someStaticMethod(); //SomeClass is loaded (if its not already)
SomeClass.someStaticVariable; //SomeClass is loaded (if its not already)
SomeClass var=new SomeClass(); //SomeClass is BOTH loaded (if its not already) AND instantiated
Class loader actually loads byte code into JVM , runs static initializers when you want to use static fields within class without creating an instance of it, class must be loaded by class loader first.Default classloader in java is java.lang.ClassLoader
Class Loading is mostly unpredictable
When Class is Initialized?
Class Initialization happens after class loading. A class is initialized in Java when
- An Instance of class is created using either new() keyword or using reflection using class.forName(), which may throw ClassNotFoundException in Java.
- an static method of Class is invoked.
- an static field of Class is assigned.
- an static field of class is used which is not a constant variable.
- if Class is a top level class and an assert statement lexically nested within class is
Which classes are Eagerly Loaded and Lazily Loaded
Eagerly Loaded Classes are those the JVM must be able to load JVM class files. The JVM class loader loads referenced JVM classes that have not already been linked to the runtime system. Classes are loaded implicitly because: The initial class file – the class file containing the public static void main(String args[]) method – must be loaded at startup. Depending on the class policy adopted by the JVM, classes referenced by this initial class can be loaded in either a lazy or eager manner.
An eager class loader loads all the classes comprising the application code at startup. Lazy class loaders wait until the first active use of a class before loading and linking its class file.
The first active use of a class occurs when one of the following occurs: • An instance of that class is created • An instance of one of its subclasses is initialized • One of its static fields is initialized. Certain classes, such as ClassNotFoundException, are loaded implicitly by the JVM to support execution. You may also load classes explicitly using the java.lang.Class.forName() method in the Java API, or through the creation of a user class loader.
Based on the above rules, lazy class loading can be forced on the system.
Use java -XX:+TraceClassLoading to trace the loading of classes.

Use java -XX:+PrintCompilation to trace when methods are JITed.
Builder Pattern
The intention is to abstract steps of construction of objects when there are lot of parameters and to provide thread safety at the time of object creation. You will have Class and ClassBuilder(static inner class) which has same parameters as Class, setters for parameters and a build method. The setter methods in ClassBuilder helps to carry validation over parameters before the object for Class gets created in build method
Why builder Pattern?
If there are many attributes in the class and object is created over several calls it may be in an inconsistent state partway through its construction. To address this builder pattern is introduced. If Object Creation should be delayed until all the validation of class attributes are performed builder pattern addresses the need.
If there are 2 attributes to a Class then we can create 2^N Constructor based on the two attributes. This Results in Boiler plate code. What if the number of attributes keeps increasing over a period of time.
Report.java
import java.util.InvalidPropertiesFormatException;

public class Report {
    private String reportName;
    private String reportFormat;

    private Report(){}

    public static ReportBuilder getReportBuilder(){
        return new ReportBuilder();
    }


    @Override
    public String toString() {
        return "Report{" +
                "reportName='" + reportName + '\'' +
                ", reportFormat='" + reportFormat + '\'' +
                '}';
    }

    public static class ReportBuilder {
        private String reportName;
        private String reportFormat;

        private ReportBuilder(){}

        public ReportBuilder setReportName(String reportName) {
            this.reportName = reportName;
            return this;
        }

        public ReportBuilder setReportFormat(String reportFormat) {
            this.reportFormat = reportFormat;
            return this;
        }

        public Report build() throws InvalidPropertiesFormatException {
            if(this.reportFormat == "CSV"){
                throw new InvalidPropertiesFormatException("Format Not Supported");
            }

            if(this.reportName.length() < 10){
                throw new InvalidPropertiesFormatException("Name should be greater than 10");
            }

            //Object for Report should not be created before validation is completed as above
            Report objReport = new Report();
            objReport.reportName = this.reportName;
            objReport.reportFormat = this.reportFormat;
            return objReport;
        }
    }
}
BuilderPatternClient.java
import java.util.InvalidPropertiesFormatException;

public class BuilderPatternClient {
    public static void main(String[] args) throws InvalidPropertiesFormatException {
        Report objReport = Report.getReportBuilder()
                .setReportFormat("PDF")
                .setReportName("Monthly Transactions")
                .build();

        System.out.println(objReport);
    }
}
Output
Report{reportName='Monthly Transactions', reportFormat='PDF'}
Telescoping Pattern
What is Telescoping Pattern
A telescoping constructor is a series of constructors where each one has a different number of parameters. Each constructor calls a more specific constructor in the hierarchy, providing a default value for the remaining parameters.
Disadvantage of Below Approach
- Constructors are hard to read when they have many parameters
- When adding new parameters, you have to add new constructors to the chain. This pattern can therefore not scale very well
- It becomes difficult to remember the required order of the parameters, especially when many of them are of the same type. Additionally, the code becomes less readable, and it’s not always clear what is being passed to the constructor. This is addressed by using Builder Pattern
Report
import java.util.Date;

public class Report {
    private String reportName;
    private Integer reportSize;
    private String  reportFormat;
    private Date reportDate;

    public Report() {
    }

    //Constructor1
    public Report(String reportName) {
        this.reportName = reportName;
    }

    public Report(String reportName, Integer reportSize) {
        this(reportName); //Call to before Constructor1
        this.reportSize = reportSize;
    }

    public Report(String reportName, Integer reportSize, String  reportFormat) {
        this(reportName, reportSize); //Call to before Constructor2
        this.reportFormat = reportFormat;
    }

    public Report(String reportName, Integer reportSize, String  reportFormat, Date reportDate) {
        this(reportName, reportSize, reportFormat); //Call to before Constructor3
        this.reportDate = reportDate;
    }
}
Prototype Pattern
What is prototype Pattern?
When object creation is costly and time-consuming, Pick an object that is configured for either the default or in the ballpark of some specific use case and then you clone this object and configure to your exact needs.
When to use prototype Pattern?
- Prototype patterns are required when object creation is a time-consuming, and costly operation, so we create objects with the existing object itself.
- The Prototype Design Pattern allows you to create new objects by cloning existing ones without being bound to the specific classes of the objects being cloned. This promotes decoupling between the client code and the concrete classes, making it easier to introduce new types of objects without modifying the client code.
Where to use prototype Pattern?
- If you want to create an object but do not want to go through the expensive object creation procedure where network or database calls are made, then use the prototype pattern. Just create a copy of the object and do your changes on it.
How prototype Pattern is acheived?
- Create a Interface with clone method
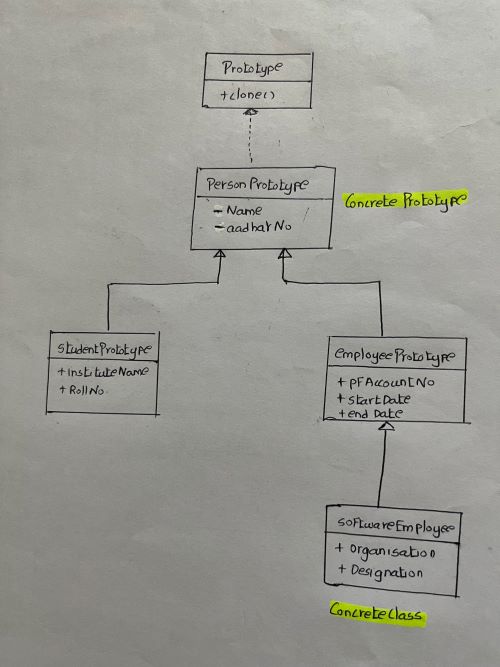
- Create a Concrete prototypes which implements the interface. In the below example it is PersonPrototype. This Concrete class would be DB classes which consume lot of resource and the one which you dont want to create again and again
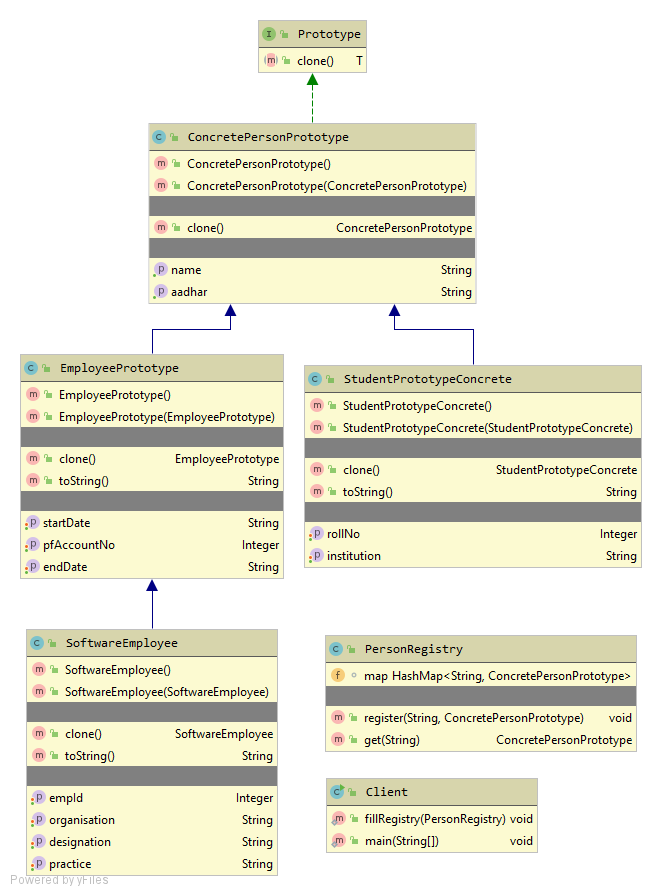
- Classes use the above Concrete prototype to add their own attributes and create new classes EmployeePrototype, StudentPrototype, SoftwareEmployee(Concrete Class)
- Prototypes are added to Registry which is nothing but an HashMap to Store String and Prototype classes
- Concrete classes which want to extend the Prototype uses the above hashmap registry to fetch the protype and add their custom attributes.
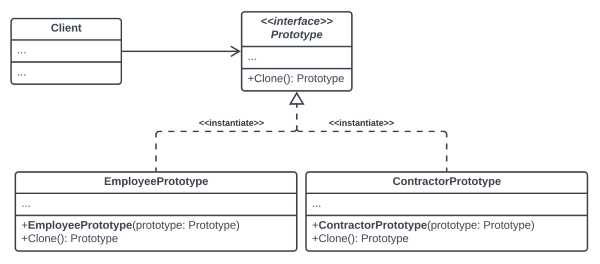
There are two things to note in code
- One is Clone method which makes the extending class mandatory to implement clone method. The same can be done by implementing Clone interface
- Second thing is how the Concrete Classes implements the clone and creates copy of itself at the same time calling the parent prototype class
. . public StudentPrototype(StudentPrototype studentPrototype) { super(studentPrototype); this.institution = studentPrototype.institution; this.rollNo = studentPrototype.rollNo; } . - PersonPrototype is Concrete Prototype which is costly to create
- We add Custom attributes at each level and create prototype and concrete class from PersonPrototype
Prototype.java
public interface Prototype<T> {
    T clone();
}
ConcretePersonPrototype.java
public class ConcretePersonPrototype implements Prototype<ConcretePersonPrototype>{
    private String name = "Mugilvannan G";
    private String aadhar = "1452-5874-5124-847";

    public ConcretePersonPrototype() {
    }

    @Override
    public ConcretePersonPrototype clone() {
        return new ConcretePersonPrototype(this);
    }

    public ConcretePersonPrototype(ConcretePersonPrototype concretePersonPrototype) {
        this.name = concretePersonPrototype.name;
        this.aadhar = concretePersonPrototype.aadhar;
    }

    public String getName() {
        return name;
    }

    public String getAadhar() {
        return aadhar;
    }
}
EmployeePrototype.java
public class EmployeePrototype extends ConcretePersonPrototype {
    private Integer pfAccountNo;
    private String startDate;
    private String endDate;

    public EmployeePrototype() {
    }

    public EmployeePrototype(EmployeePrototype employeePrototype) {
        super(employeePrototype);
        this.pfAccountNo = employeePrototype.pfAccountNo;
    }

    public EmployeePrototype clone() {
        return new EmployeePrototype(this);
    }

    public Integer getPfAccountNo() {
        return pfAccountNo;
    }

    public void setPfAccountNo(Integer pfAccountNo) {
        this.pfAccountNo = pfAccountNo;
    }

    public String getStartDate() {
        return startDate;
    }

    public void setStartDate(String startDate) {
        this.startDate = startDate;
    }

    public String getEndDate() {
        return endDate;
    }

    public void setEndDate(String endDate) {
        this.endDate = endDate;
    }

    @Override
    public String toString() {
        return "Career Details : {" + '\'' +
                " Employee Name ='" + super.getName() + '\'' +
                " Employee Aadhar ='" + super.getAadhar() + '\'' +
                " Employee pfAccountNo='" + this.getPfAccountNo() + '\'' +
                '}';
    }
}
StudentPrototype.java
public class StudentPrototypeConcrete extends ConcretePersonPrototype {
    private String institution;
    private  Integer rollNo;

    public StudentPrototypeConcrete() {
    }

    public StudentPrototypeConcrete(StudentPrototypeConcrete studentPrototype) {
        super(studentPrototype);
        this.institution = studentPrototype.institution;
        this.rollNo = studentPrototype.rollNo;
    }

    public Integer getRollNo() {
        return rollNo;
    }

    public void setRollNo(Integer rollNo) {
        this.rollNo = rollNo;
    }

    public String getInstitution() {
        return institution;
    }

    public void setInstitution(String institution) {
        this.institution = institution;
    }

    public StudentPrototypeConcrete clone(){
        return new StudentPrototypeConcrete(this);
    }

    @Override
    public String toString() {
        return "Education Details : {" +
                " Student Name='" + super.getName() + '\'' +
                " Student Aadhar='" + this.getAadhar() + '\'' +
                " Student Institution='" + this.getInstitution() + '\'' +
                " Student Rollno='" + this.getRollNo() + '\'' +
                '}';
    }
}
EmployeePrototype.java
public class EmployeePrototype extends PersonPrototype {
    private Integer pfAccountNo;
    private String startDate;
    private String endDate;

    public EmployeePrototype() {
    }

    public EmployeePrototype(EmployeePrototype employeePrototype) {
        super(employeePrototype);
        this.pfAccountNo = employeePrototype.pfAccountNo;
    }

    public EmployeePrototype clone() {
        return new EmployeePrototype(this);
    }

    public Integer getPfAccountNo() {
        return pfAccountNo;
    }

    public void setPfAccountNo(Integer pfAccountNo) {
        this.pfAccountNo = pfAccountNo;
    }

    public String getStartDate() {
        return startDate;
    }

    public void setStartDate(String startDate) {
        this.startDate = startDate;
    }

    public String getEndDate() {
        return endDate;
    }

    public void setEndDate(String endDate) {
        this.endDate = endDate;
    }

    @Override
    public String toString() {
        return "Career Details : {" + '\'' +
                " Employee Name ='" + super.getName() + '\'' +
                " Employee Aadhar ='" + super.getAadhar() + '\'' +
                " Employee pfAccountNo='" + this.getPfAccountNo() + '\'' +
                '}';
    }
}
SoftwareEmployee.java
public class SoftwareEmployee extends EmployeePrototype {
    public Integer empId;
    public String designation;
    public String practice;
    public String organisation;

    public SoftwareEmployee() {
    }

    public SoftwareEmployee(SoftwareEmployee softwareEmployee) {
        super(softwareEmployee);
        this.empId = softwareEmployee.empId;
        this.designation = softwareEmployee.designation;
        this.practice = softwareEmployee.practice;
        this.organisation = softwareEmployee.organisation;
    }

    public SoftwareEmployee clone(){
        return new SoftwareEmployee(this);
    }

    public Integer getEmpId() {
        return empId;
    }

    public void setEmpId(Integer empId) {
        this.empId = empId;
    }

    public String getDesignation() {
        return designation;
    }

    public void setDesignation(String designation) {
        this.designation = designation;
    }

    public String getPractice() {
        return practice;
    }

    public void setPractice(String practice) {
        this.practice = practice;
    }

    public String getOrganisation() {
        return organisation;
    }

    public void setOrganisation(String organisation) {
        this.organisation = organisation;
    }

    @Override
    public String toString() {
        return "Present Work Details: {" +
                "Software Engineer Name ='" + super.getName() + '\'' +
                " Aadhar No ='" + super.getAadhar() + '\'' +
                " EmpId ='" + this.empId + '\'' +
                " Designation='" + this.designation + '\'' +
                " Organisation='" + this.organisation + '\'' +
                " Practice='" + this.practice + '\'' +
                '}';
    }
}
Client.java
public class Client {
    public static void fillRegistry(PersonRegistry registry) {
        StudentPrototype objStudPrototype = new StudentPrototype();
        objStudPrototype.setRollNo(15462);
        objStudPrototype.setInstitution("Mowbarys");
        registry.register("StudentPerson", objStudPrototype);

        EmployeePrototype objEmpPrototype = new EmployeePrototype();
        objEmpPrototype.setPfAccountNo(4151542);
        objEmpPrototype.setStartDate("2012");
        objEmpPrototype.setEndDate("NA");
        registry.register("EmployeePerson", objEmpPrototype);

        SoftwareEmployee objSoftwareEmployee = new SoftwareEmployee();
        objSoftwareEmployee.setPfAccountNo(4151542);
        registry.register("SoftwareEmployee", objSoftwareEmployee);
    }

    public static void main(String[] args) {
        PersonRegistry registry = new PersonRegistry();
        fillRegistry(registry);

        EmployeePrototype objEmployee = (EmployeePrototype) registry.get("EmployeePerson").clone();

        StudentPrototype objStudent = (StudentPrototype)registry.get("StudentPerson").clone();
        objStudent.setRollNo(15425);
        objStudent.setInstitution("Mowbarys");

        SoftwareEmployee objSoftEmployee1 = (SoftwareEmployee) registry.get("SoftwareEmployee").clone();
        objSoftEmployee1.setStartDate("2011");
        objSoftEmployee1.setEndDate("2012");
        objSoftEmployee1.setEmpId(1001);
        objSoftEmployee1.setOrganisation("Fuchsia Software");
        objSoftEmployee1.designation = "Programmer";
        objSoftEmployee1.practice = "Classic ASP, HTML, CSS";

        SoftwareEmployee objSoftEmployee2 = (SoftwareEmployee) registry.get("SoftwareEmployee").clone();
        objSoftEmployee2.setStartDate("2012");
        objSoftEmployee2.setEndDate("2015");
        objSoftEmployee2.setEmpId(754185);
        objSoftEmployee2.setOrganisation("Infosys");
        objSoftEmployee2.designation = "Technology Analyst";
        objSoftEmployee2.practice = "Java, Spring Boot";

        SoftwareEmployee objSoftEmployee3 = (SoftwareEmployee) registry.get("SoftwareEmployee").clone();
        objSoftEmployee3.setStartDate("2018");
        objSoftEmployee3.setEndDate("NA");
        objSoftEmployee3.setEmpId(152);
        objSoftEmployee3.setOrganisation("Cognizant");
        objSoftEmployee3.designation = "Technology Lead";
        objSoftEmployee3.practice = "Java, Devops";


        System.out.println(objStudent);
        System.out.println(objEmployee);
        System.out.println(objSoftEmployee1);
        System.out.println(objSoftEmployee2);
        System.out.println(objSoftEmployee3);
    }
}
Output
Education Details : { Student Name='Mugilvannan G' Student Aadhar='1452-5874-5124-847' Student Institution='Mowbarys' Student Rollno='15425'}
Career Details : {' Employee Name ='Mugilvannan G' Employee Aadhar ='1452-5874-5124-847' Employee pfAccountNo='4151542'}
Present Work Details: {Software Engineer Name ='Mugilvannan G' Aadhar No ='1452-5874-5124-847' EmpId ='1001' Designation='Programmer' Organisation='Fuchsia Software' Practice='Classic ASP, HTML, CSS'}
Present Work Details: {Software Engineer Name ='Mugilvannan G' Aadhar No ='1452-5874-5124-847' EmpId ='754185' Designation='Technology Analyst' Organisation='Infosys' Practice='Java, Spring Boot'}
Present Work Details: {Software Engineer Name ='Mugilvannan G' Aadhar No ='1452-5874-5124-847' EmpId ='152' Designation='Technology Lead' Organisation='Cognizant' Practice='Java, Devops'}
Another example using prototype pattern
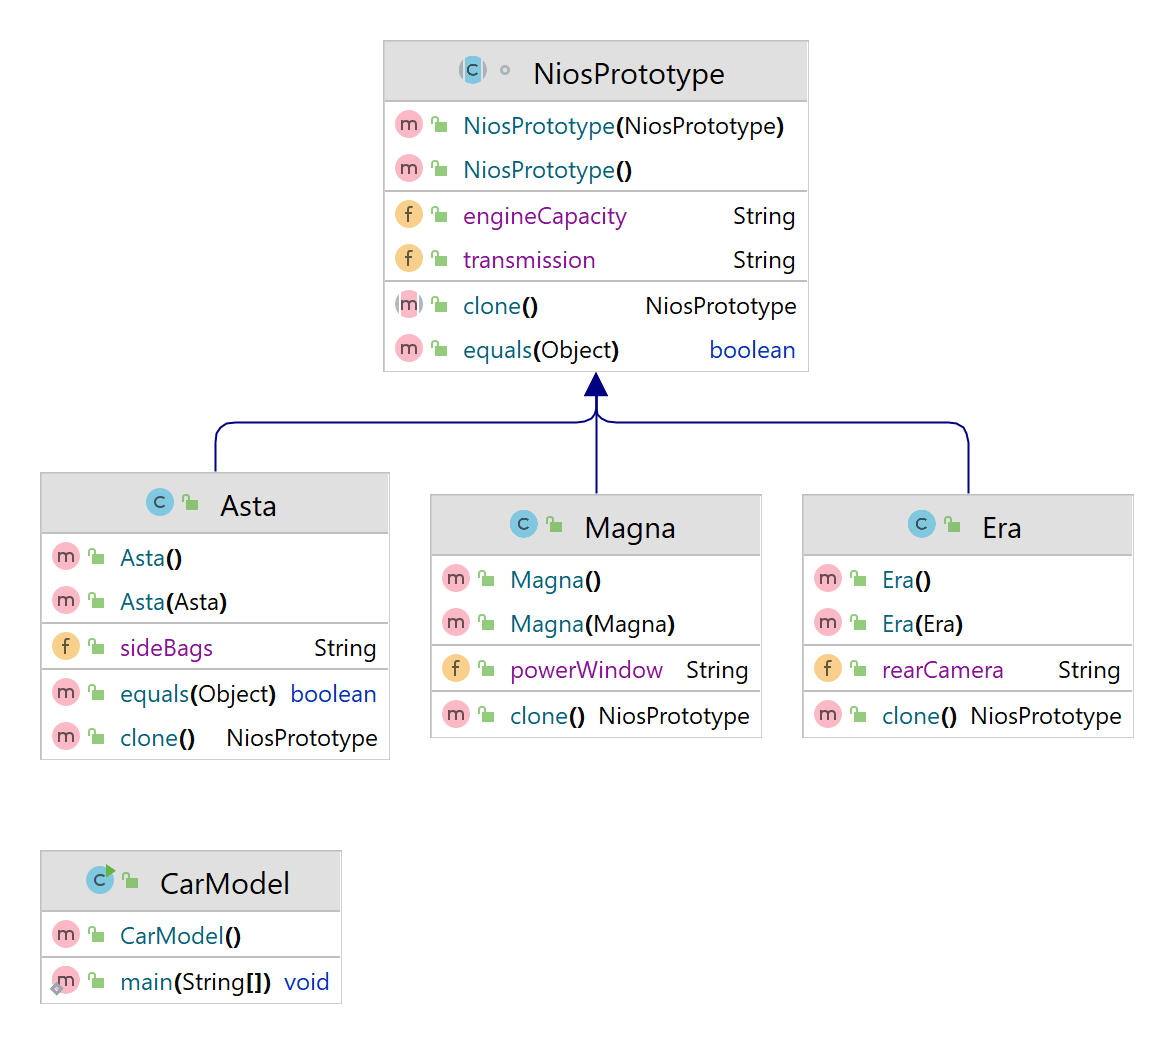
NiosPrototype.java
import java.util.Objects;

//1.Create a Interface or abstract class with clone method
abstract class NiosPrototype {
    public String engineCapacity;
    public String transmission;

    public NiosPrototype() {
    }

    public NiosPrototype(NiosPrototype niosPrototype) {
        if(niosPrototype != null) {
            this.engineCapacity = niosPrototype.engineCapacity;
            this.transmission = niosPrototype.transmission;
        }
    }

    public abstract NiosPrototype clone();

    @Override
    public boolean equals(Object o) {
        if (this == o) return true;
        if (o == null || getClass() != o.getClass()) return false;
        NiosPrototype that = (NiosPrototype) o;
        return Objects.equals(engineCapacity, that.engineCapacity) && Objects.equals(transmission, that.transmission);
    }

}
Asta.java
//2.Create Concrete prototype which  implements the interface.This class is resource intensive which you dont want
//to use new operator again and again rather call clone method to create it
public class Asta extends NiosPrototype{
    public String sideBags;

    @Override
    public NiosPrototype clone() {
        return new Asta(this);
    }

    public Asta() {
    }

    public Asta(Asta target) {
        super(target);

        if(target != null){
            this.sideBags = target.sideBags;
        }
    }

    @Override
    public boolean equals(Object o) {
        if (this == o) return true;
        if (o == null || getClass() != o.getClass()) return false;
        if (!super.equals(o)) return false;
        Asta asta = (Asta) o;
        return Objects.equals(sideBags, asta.sideBags);
    }
}
CarModel.java
public class CarModel {
    public static void main(String[] args) {
        Asta objAsta1 = new Asta();
        objAsta1.engineCapacity = "1196";
        objAsta1.transmission = "Manual";
        objAsta1.sideBags ="Available";

        Asta objAsta2 = (Asta)objAsta1.clone();

        if(objAsta1 == objAsta2){
            System.out.println("Both objects are same");
        }


        if(objAsta1.equals(objAsta2)){
            System.out.println("Both objects are different but has same value");
        }
    }
}
Note:
- To create a copy of you the best person who can tell about you is none other than you, just like autobiography. So constructor takes instance of itself as parameter arguments
- There would be two constructor. Default constructor and cloning constructor
- Default constructor would be called first time object is created and cloning constructor would be called from clone method when the created object needs to be cloned
- There wont be any person who can tell your ancestral origin, likewise constructor would call super constructor at time of cloning
- The cloning constructor itself would be called from clone method
Adapter Pattern
Adapter Pattern help in changing the third party integration without making much changes to the Core code.
Three main components:
Target: This is the interface that the client expects to use.
Adaptee: This is the existing interface that needs to be adapted to work with the client.
Adapter: This is the class that adapts the Adaptee to the Target interface.

Why to use Adapter Pattern?
- It Allows Incompatible interfaces between classes to work together without modifying their source code.
- It acts as a bridge between two interfaces, making them compatible so that they can collaborate and interact seamlessly.
- This pattern is useful when integrating existing or third-party code into an application without modifying the existing codebase.
When to use Adapter Pattern?
You can use the Adapter design pattern when you have to deal with different interfaces with similar behavior (which usually means classes with similar behavior but with different methods).
- Legacy code integration: When we need to integrate legacy code into a new system
- Data format conversion: When we receive data from a third-party system, we may find that the data is in a format that is incompatible with our system.
- Third-party library integration: When we use a third-party library in our code, we may find that the library uses an interface that is incompatible with our code.
How to implement Adapter Pattern?
In your code instead of hard coding the method calls of each vendor (or Adaptee), you could then create a generic interface to wrap these similar behaviors and work with only one type of object. The Adapters will then implement the Target interface delegating its method calls to the Adaptees that are passed to the Adapters via constructor.
Code Example:
- Below we have PhonePay implementing BankAPI methods
- If Phonepay directly tries to use the classes of hdfcAPI or Any other bank api the code would become tightly coupled and would become difficult to change
- To get rid of tight coupling what we do in adaptor is we override the methods in the BankAPI and in method definition we call respective banks which the phone pay application has tie ups
- In case there is a need tomorrow for the phonepay application to change the Bank Gateway the only place to change is where the Adapter is called.
- The transferAmount of the bank API interface is overridden in the corresponding adapter classes and the definition is changed based on the way the corresponding way Bank APIs are getting called
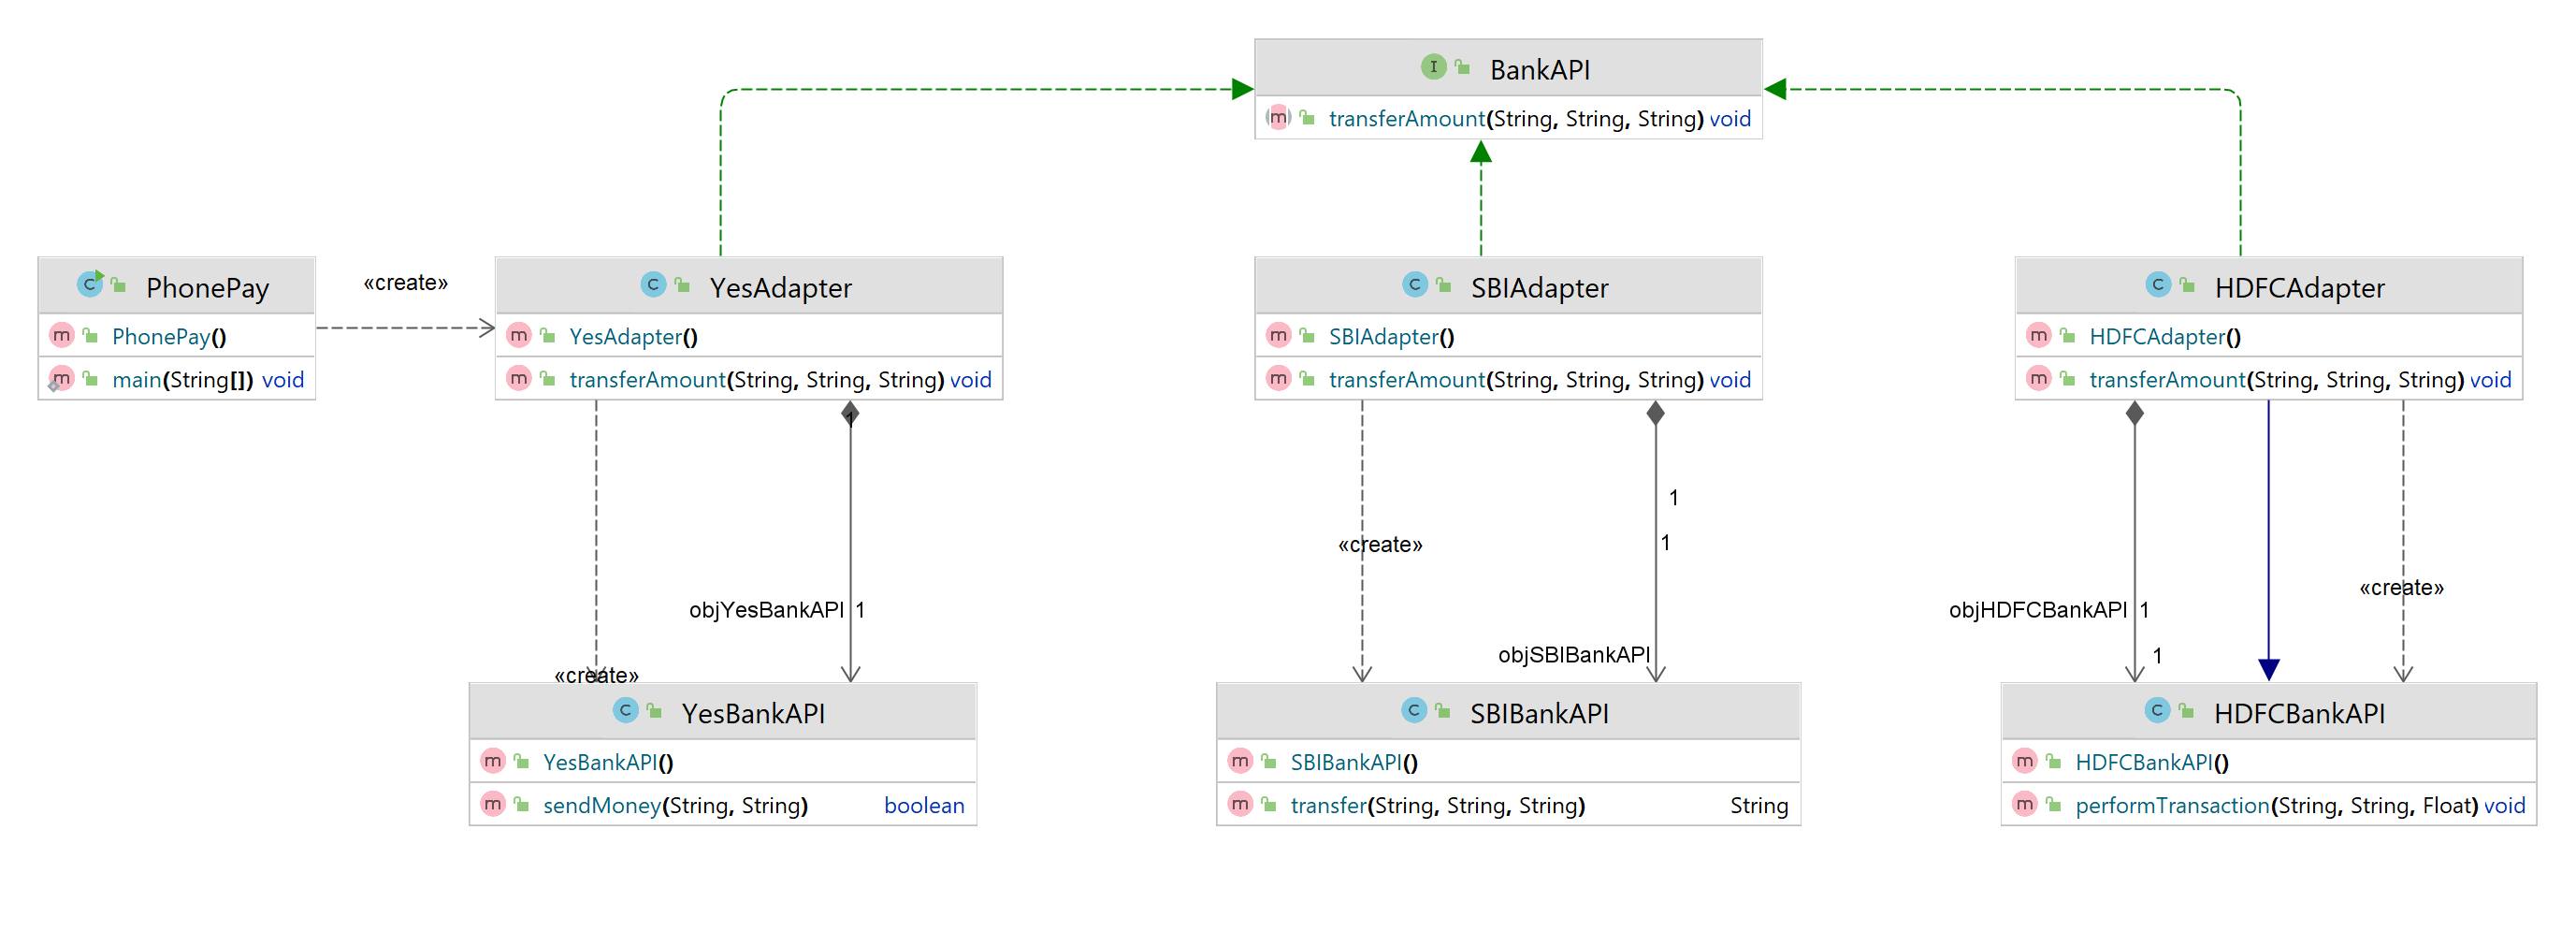
Target : BankAPI
Adapters : HDFCAdapter, YesAdapter, SBIAdapter
Adaptees : HDFCBankAPI, YesBankAPI, SBIBankAPI
Client : PhonePay
BankAPI.java
public interface BankAPI {
    public void transferAmount(String fromAcc, String toAcc, String amount);
}
HDFCAdapter.java
public class HDFCAdapter implements BankAPI {
    HDFCBankAPI objHDFCBankAPI = new HDFCBankAPI();

    @Override
    public void transferAmount(String fromAcc, String toAcc, String amount) {
        objHDFCBankAPI.performTransaction(fromAcc, toAcc, Float.valueOf(amount));
    }
}
HDFCBankAPI.java
public class HDFCBankAPI {
    public void performTransaction(String creditorAcc, String debitorAcc, Float Amount){
        System.out.println("Transfering Funds");
    }
}
YesAdapter.java
public class YesAdapter implements BankAPI {
    YesBankAPI objYesBankAPI = new YesBankAPI();

    @Override
    public void transferAmount(String fromAcc, String toAcc, String amount) {
        objYesBankAPI.sendMoney(fromAcc, toAcc);
    }
}
YesBankAPI.java
public class YesBankAPI {
    public boolean sendMoney(String creditAcc, String debitAcc){
        System.out.println("Transaction Steps.....");
        return true;
    }
}
SBIAdapter.java
public class SBIAdapter implements BankAPI {
    SBIBankAPI objSBIBankAPI = new SBIBankAPI();

    @Override
    public void transferAmount(String fromAcc, String toAcc, String amount) {
        objSBIBankAPI.transfer(fromAcc, toAcc, amount);
    }
}
SBIBankAPI.java
public class SBIBankAPI {
    public String transfer(String account1, String account2, String Amount){
        System.out.println("Transaction from Account1 to Account2");
        return "Transaction Successful";
    }
}
PhonePay.java
public class PhonePay {
    public static void main(String[] args) {
        //Incase you want to change the Bank Gateway tomorrow you can change the Adapter Alone
        BankAPI objBankAPI = new YesAdapter();
        objBankAPI.transferAmount("AccNo 154264", "AccNo 4264755", "452");
    }
}
Facade Pattern
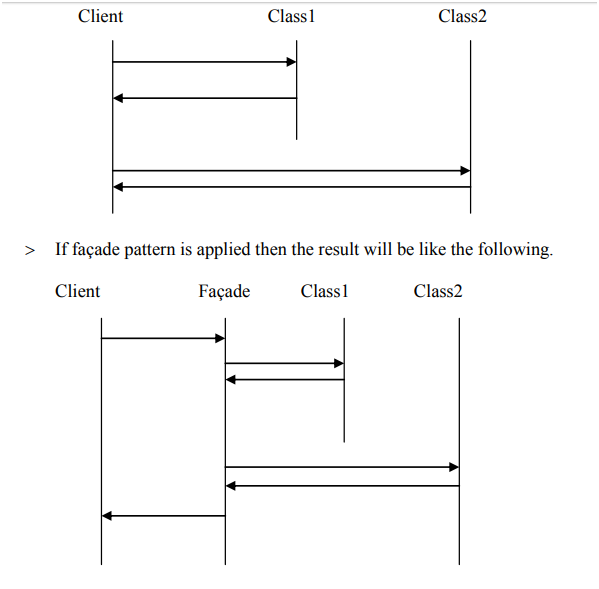
Facade design pattern simplifies the interface to a complex system. In Facade Pattern, the facade class does all the required tasks instead of allowing the client app to them.
Imagine walking to a self service restaurant, McDonalds where diner need to select food from UI, Pay the amount and wait in counter, check the screen for token no, collect the food and find a table before eating. Now in a Dine-In restaurant instead of diner doing all these steps we make the waiter do all these and get the food. Waiter is the Facade and Diner is the Client
Why to use Facade Pattern?
Classes in all design patterns are just normal classes. What is important is how they are structured and how they work together to solve a given problem in the best possible way.
The Facade design pattern simplifies the interface to a complex system; because it is usually composed of all the classes which make up the subsystems of the complex system.
A Facade shields the user from the complex details of the system and provides them with a simplified view of it which is easy to use. It also decouples the code that uses the system from the details of the subsystems, making it easier to modify the system later.
When to use Facade Pattern?
To provide higher-level interface that makes the subsystem easier to use.
How to implement Facade Pattern?
Instead of exposing the complex code logic we wrap the complex code in a separate class facade class and call the method of Facade Class.
Code Implementation
- OnlineApp has many code logic which includes Creating Order, Inventory Updation, Payment Tracking, Seller Buyer Notification and Shipment
- Instead of writing all the code in onlineApp we can move the code to FacadeClass(OrderFacade.java) and call the method of OrderFacade
Code without Facade Pattern

OnlineApp.java
public class OnlineApp {
    public static void main(String[] args) {
        System.out.println("Step 1: Order Created");
        Order objOrder = new Order();
        objOrder.placeOrder();
        System.out.println("------------------------");

        System.out.println("Step 2: Inventory Updated");
        Inventory objInventory = new Inventory();
        objInventory.checkInventory("Iphone 13");
        System.out.println("------------------------");

        System.out.println("Step 3: Payment Succesful");
        Payment objPayment = new Payment();
        objPayment.checkPaymentStatus("873901");
        System.out.println("------------------------");

        System.out.println("Step 4: Seller and Buyer Notified");
        Notifications objNotification = new Notifications();
        objNotification.notifyBuyer("873901");
        objNotification.notifySeller("873901");
        System.out.println("------------------------");

        System.out.println("Step 5: Shipment Done");
        Shipment objShipment = new Shipment();
        objShipment.shipProduct("Road Name, Location");
        System.out.println("------------------------");

    }
}
Code with Facade Pattern
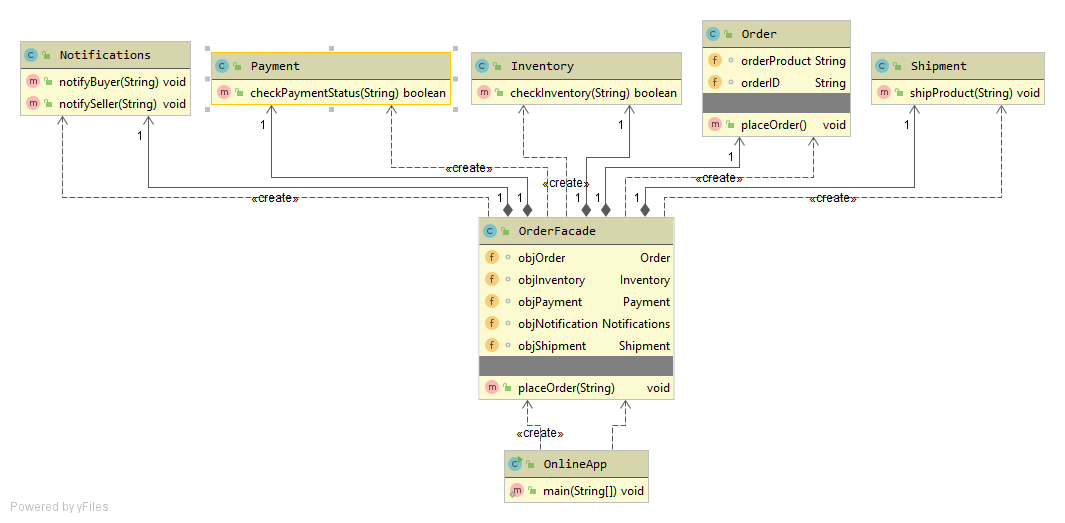
OrderFacade.java
public class OrderFacade {
    Order objOrder = new Order();
    Inventory objInventory = new Inventory();
    Payment objPayment = new Payment();
    Notifications objNotification = new Notifications();
    Shipment objShipment = new Shipment();

    public void placeOrder(String orderId) {
        System.out.println("Step 1: Order Created");
        objOrder.placeOrder();
        System.out.println("------------------------");

        System.out.println("Step 2: Inventory Updated");
        objInventory.checkInventory("Iphone 13");
        System.out.println("------------------------");

        System.out.println("Step 3: Payment Succesful");
        objPayment.checkPaymentStatus(orderId);
        System.out.println("------------------------");

        System.out.println("Step 4: Seller and Buyer Notified");
        objNotification.notifyBuyer(orderId);
        objNotification.notifySeller(orderId);
        System.out.println("------------------------");

        System.out.println("Step 5: Shipment Done");
        objShipment.shipProduct("Road Name, Location");
        System.out.println("------------------------");
    }
}
OnlineApp.java
public class OnlineApp {
    public static void main(String[] args) {
        OrderFacade objOrderFacade = new OrderFacade();
        objOrderFacade.placeOrder("873901");
    }
}
Output
Step 1: Order Created
Display Cart Order
------------------------
Step 2: Inventory Updated
------------------------
Step 3: Payment Succesful
------------------------
Step 4: Seller and Buyer Notified
Order placed by Buyer
Order Received by Seller
------------------------
Step 5: Shipment Done
Shipping toRoad Name, Location
------------------------