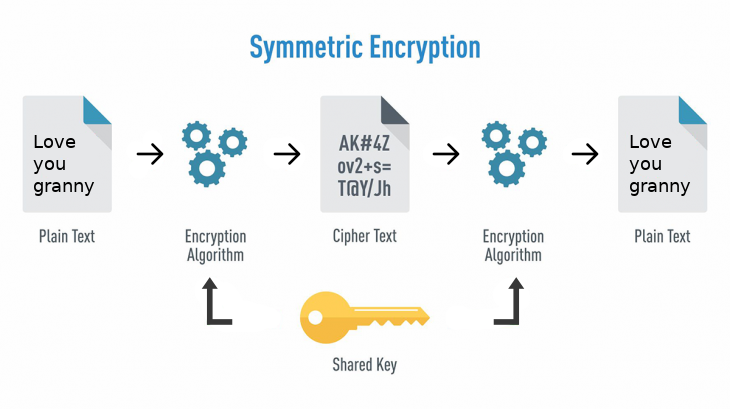
Symmetric Key Encryption (Private key Encryption)

  1. Same key is used between client and server to encryt and decrypt message
  2. Copy of key exist at both ends
  3. First time the copy of key generated should be sent securely to otherside.
  4. Public Key Encryption(Asymmetric Encrytion) is used to get the copy of the symmetric key for the first time
  5. Thoughts may arise if I could share key securely for the first time why don’t I use the same methodology but it is resource-intensive
  6. Advantage is The Encrytion and Decrytion is faster compared to Asymmetric Key Encryption
  7. Disadvantage is Key needs to be transferred for the first time and Key should be stored securely
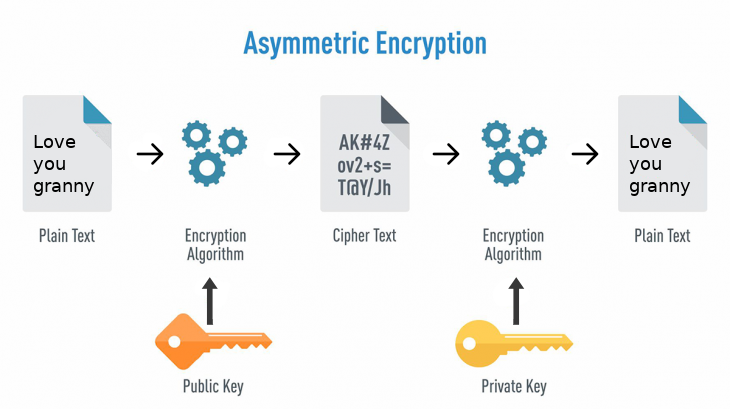
Asymmetric Key Encryption (Public key Encryption)

  1. Uses Public and Private Key
  2. Encrypted with one key and decrypted with other key. The Client uses public key to Encryt and Server uses private key to decrypt.
  3. Public key would be shared and to recieve encrypted message from client by public key
  4. This similar to Safe(Public Key) and Key(Private Key), When you send data it would be encrypted using public key similar to
    safe which doesnot needs a key to lock. The Private key in server could unlock using the key it holds.
Man-In-Middle-Attack

  1. Man in middle generates his own public key which is available to client
  2. Client used public key provided by man in middle and sends his data
  3. Man in middle decrypts using his private key and makes a genuine request by encryting public key to server
  4. To address this issue certificates were used

Certificates

  1. The main purpose of the digital certificate is to ensure that the public key contained in the certificate belongs to the entity to which the
    certificate was issued, in other words, to verify that a person sending a message is who he or she claims to be, and to then provide the message
    receiver with the means to encode a reply back to the sender.
  2. This certificate could be cross checked and confirmed with certificate authoritiy

Certificate Authoritiy(CA)

  1. A CERTIFICATE AUTHORITY (CA) is a trusted entity that issues digital certificates, which are data files used to cryptographically link
    an entity with a public key. Certificate authorities are a critical part of the internet’s public key infrastructure (PKI) because
    they issue the Secure Sockets Layer (SSL) certificates that web browsers use to authenticate content sent from web servers.
  2. The role of the certificate authority is to bind a public key of Server to a name which could be verified by browser to make sure the response is from genuine server
    Certificate Authority validates the identity of the certificate owner. The role of CA is trust.
  3. Certificates must contain Public Key which could be cross-checked with Certificate Authority(CA)
  4. CA would be mostly big companies like Symantec, google which acts as thirdparty to reassure trust.
  5. Self-Signed Certificate where you uses your own server and client to generate certificate. CA doesnot comes in play in Self-Signed Certificate
    The above method may open door to man in middle attack
  6. Root Certificate is something which you would get when you use Self-Signed Certificate with your custom CA. Root Certificate would be available in
    all client system which access data with server

Communication over HTTPS(HTTP over Secure Socket Layer)

  1. SSL is web servers digital certificate offered by third party.Third party verifies the identity of the web server and its public key
  2. When you make a request to HTTPS website, the sites server sends a public key which is digitally signed certificate by third party or
    Certificate Authority(CA)
  3. On receiving the certificate the browser sends the Certificate with public key to third party to check whether the certificate is valid
  4. After verifiying the certificate the browser creates a 2 symmetric keys, one is kept for browser and other for server. The key is sent by
    encrypting using webservers public key. This encryted symmetric key is sent to server
  5. Web server uses its private key to decrypt. Now the communication happens using shared symetric key.

Typically, an applicant for a digital certificate will generate a key pair consisting of a private key and a public key, along with a certificate signing request (CSR)(Step1). A CSR is an encoded text file that includes the public key and other information that will be included in the certificate (e.g. domain name, organization, email address, etc.). Key pair and CSR generation are usually done on the server or workstation where the certificate will be installed, and the type of information included in the CSR varies depending on the validation level and intended use of the certificate. Unlike the public key, the applicant’s private key is kept secure and should never be shown to the CA (or anyone else).

After generating the CSR, the applicant sends it to a CA(Step2), who independently verifies that the information it contains is correct(Step3) and, if so, digitally signs the certificate with an issuing private key and sends it to the applicant.

When the signed certificate is presented to a third party (such as when that person accesses the certificate holder’s website), the recipient can cryptographically confirm the CA’s digital signature via the CA’s public key. Additionally, the recipient can use the certificate to confirm that signed content was sent by someone in possession of the corresponding private key, and that the information has not been altered since it was signed.

KeyStore and TrustStore

  1. Technically a KeyStore and a TrustStore are of same. They just serve different purposes based on what they contain.
  2. A KeyStore is simply a database or repository or a collection of Certificates or Secret Keys or key pairs. When a KeyStore contains only certificates, you call it a TrustStore.
  3. When you also have Private Keys associated with their corresponding Certificate chain (Key Pair or asymmetric keys), it is called a KeyStore.
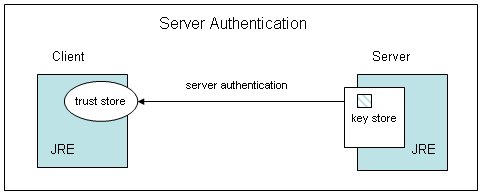
  4. Your truststore will be in your JAVA_HOME—> JRE –>lib—> security–> cacerts
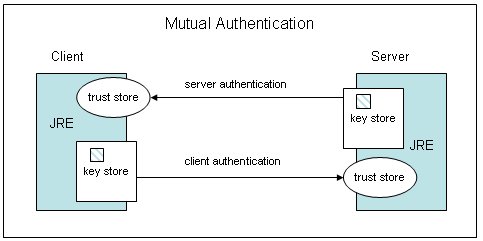
  5. ‘cacerts’ is a truststore. A trust store is used to authenticate peers. A keystore is used to authenticate yourself in mutual authentication
  6. cacerts is where Java stores public certificates of root CAs. Java uses cacerts to authenticate the servers.
    Keystore is where Java stores the private keys of the clients so that it can share it to the server when the server requests client authentication.
  7. Keystore is used to store private key and identity certificates that a specific program should present to both parties (server or client) for verification.
    Truststore is used to store certificates from Certified Authorities (CA) that verify the certificate presented by the server in SSL connection.
  8. Mutual authentication requires Keystore and Truststore whereas Server-Client authentication requires truststore to store Certificates from CA.


List the content of your keystore file

keytool -v -list -keystore .keystore

specific alias, you can also specify it in the command

keytool -list -keystore .keystore -alias foo

Importing Certificate to Truststore

keytool -import -trustcacerts -keystore $JAVA_HOME/jre/lib/security/cacerts -storepass changeit -alias Root -import -file Trustedcaroot.txt

Killing Application by Command

netstat -aon | find /i "listening"
netstat -aon | find /i "listening" | find "8080"

taskkill /F / PID ProcessId

i.e. taskkill /F / PID 189

Copy Multiple files from location using command

#command Line
for /f "delims=" %i in (C:\list.txt) do (xcopy "%i" "C:\CopyFolder" /i /z /y)

#batch file
for /f "delims=" %%i in (C:\list.txt) do (xcopy "%%i" "C:\CopyFolder" /i /z /y)

Any checkout that is not the name of one of your branches will get you a detached HEAD.

The above scenario could be reproduced as below

  1. lists the remote branches
    git branch -r
        origin/Feature/f1234
        origin/master
    
  2. I want to checkout one locally, so I cut paste:
    git checkout origin/Feature/f1234
    
  3. Detached HEAD state
    You are in 'detached HEAD' state. [...])
    

Solution #1:
Do not include origin/ at the front of my branch spec when checking it out:

git checkout Feature/f1234

Solution #2:
Add -b parameter which creates a local branch from the remote

git checkout -b origin/Feature/f1234
git checkout -b Feature/f1234  #it will fall back to origin automatically

But, you have started making changes in the detached branch and you encounter that later. In such case commits will work but changes
won’t be reflected in branch in remote since it is detached. To address such an issue

  1. commit changes in detached local branch
  2. create a new branch
  3. checkout the branch you are already working so the connection with remote would be again established
  4. Now the new branch created in local contains your changes and checkout will fetch the original remote branch without changes
  5. Do git merge between two and push the code to remote now
git commit -m "....."
git branch my-temporary-work
git checkout master
git merge my-temporary-work
Posted in git.

Angular 6 – NullInjectorError: No provider for HttpClient in unit tests
If you don’t import HttpClientModule (or HttpClientTestingModule) there, HttpClient won’t work because Angular doesn’t know about it. It doesn’t matter that you added HttpClientModule to, say, AppModule. It needs to be in TestBed.configureTestingModule.

import { TestBed } from '@angular/core/testing';
import { HttpClientTestingModule, HttpTestingController } from '@angular/common/http/testing';
import {HttpClientModule} from '@angular/common/http';

describe('myService', () => {
.
.
.
});
  1. How to Execute and Disable particular testgroup or testcase in jasmine?
    //Disable particular test group and case
    xDescribe -  @ignore testgroup
    xit - @ignore testcase
    
    //Enable particular test group and case
    fdescribe - Enable Particular Test Group
    fit - Enable Particular Test Case
    
  2. What is Arrange-Act-Assert Pattern
    • Arrange – Creating Object, Initilizing and Mocking Data
    • Act – Act on your unit testcase, execute necessary functionality and methods to be unit tested
    • Assert – Verifying code functionality is given output as expected
  3. What is difference between toBe vs toEqual?
    toBe compares value where as toEqual compares object.toEqual performs deep copy comparison.
  4. Difference between spyOn – returnValue and callFake?
    If we just want a return value when a service method is called then we can use any of and.callFake or and.returnValue. But incase if the service method takes
    some argument and the output of service method changes based on the argument, we use callFake with output logic in callback function. Though the same could be done
    using withargs in spyOn it requires redeclaring of multiple spyOn for multiple arguments.
  5. debugElement vs nativeElement
    NativeElement provides exactlty same API methods provided by Javascript for DOM Manipulation.So whatever methods was available while working in Javascript, the same methods would be available by using instance of nativeElement. debugElement, on the other hand, is a wrapper over native element with some additional methods. Using debugElement you could access rootElement which inturn calls nativeElement to get handle of DOM object. In otherwords debugElement is again going to call nativeElement to access the DOM objects. The additional advantage of using debugElement is accessing directive and component instance which is not possible in nativeElement.


Before start testing method in components we initialize few things as below

  1. beforeEach method helps in initializing the values needed for testing
  2. describe are similar to JUnit class and it are similar to junit class methods which tests particular method in src code
  3. TestBed is needed while testing both component and html.You need to configure the TestBed before each test, adding any components, modules and services you need for the test. It’s just like configuring an regular @NgModule from scratch, but you just add what you need.
    import { async, TestBed } from '@angular/core/testing';
    
    beforeEach(async(() => {
      TestBed.configureTestingModule({
        declarations: [ AppComponent ],
        providers: [],
        imports: []
      })
      .compileComponents();
    }));
    
  4. Using TestBed.createComponent create component instance returns componentFixture Interface. componentFixture is a wrapper over component with additional methods needed for testing. fixture.componentInstance returns instance of component.
    beforeEach(() => {
    .
    //Returns Component Fixture
    let fixture = TestBed.createComponent(EmployeeComponent);
    
    //Get Instance of Component
    component = fixture.componentInstance;
    .
    .
    });
    
  5. fixture.detectChanges() would allow to check for change in DOM elements before expect or whenever it is referenced for value
  6. DebugElement, an interface which wraps native element instead of HTML element in idle scenario
  7. schemas:[NO_ERRORS_SCHEMAS] lets angular testing module to ignore unknown tags in html during testing. Suppose you have used router tags in html
    and angular could not recognize the router tag since routerTestingModule is not imported you can use this tag as below to avoid errors.

    beforeEach(() => {
         TestBed.configureTestingModule({
          declarations: [ EmployeeComponent]
          schemas:[NO_ERRORS_SCHEMAS]
         }).compileComponents();
    
        //Testbed to create fixture for component
        fixture = TestBed.createComponent(EmployeeComponent);
    
        //Using fixture to create component and service 
        component = fixture.componentInstance;
        empService = TestBed.inject(EmpserviceService);    
     });


Simple testing with matchers

  1. toBeTruthy tells the component is created successfully
  2. toBe checks for equality of value
  3. toEqual method does object comparison
  4. toContain method checks whether value is available in array
fit('Simple component testing', ()=>{
  //Checks whether component has been created
  expect(component).toBeTruthy();

  //Checks whether value returned by function are same
  expect(component.getGender(true)).toBe('Male');

  //Checks objects are equal and array contain that element
  var Names = ['Name1', 'Name2', 'Name3'];
  expect(Names).toEqual(['Name1', 'Name2', 'Name3']);
  expect(Names).toContain('Name2');
});

Checking DOM Elements

  1. nativeElement – provides the access to DOM element.This is same as Javascript DOM Element we use for DOM Manipulation.Using nativeElement you can
    access all the API methods provided vy Javascript for DOM manipulation like QuerySelector
  2. fixture.detectChanges() – updates the DOM Element after setting the value from testing component. This is similar to refresh once the component value is set the html should be refreshed.
  3. debugElement– debugElement is similar to nativeElement which has wrapper with some additional methods.It has query, queryAll, queryNode methods
    debugElement inturn calls nativeElement to get the values.fixture.debugElement returns the root debugElement from which we query for the nativeElement.

    .
    .
    fixture.debugElement.query(By.css('a')).nativeElement.textContent)
    fixture.debugElement.query(By.css('#ContactUsId')).nativeElement.textContent)
    fixture.debugElement.query(By.css('.ContactUsId')).nativeElement.textContent)
    .
    .
    .
    
  4. The below statement end up the same anchor tag
    .
    
    fixture.debugElement.query(By.css('a')).nativeElement.textContent)
    fixture.nativeElement.querySelector('a').textContent
    .
    

Using spyOn with different Options

  1. Using spyon with callThrough would make the call to actual service
  2. spyOn with returnValue returns the value specified without making call to real function
  3. spyOn withArgs does the same but takes arguments incase there is somelogic needs to change when using along callthrough
  4. spyOn callFake would run anonymous function withits own logic rather than calling original function to act on logic
spyOn(empService, 'authenticateEmp').withArgs('Admin').and.callThrough();

spyOn(empService, 'authenticateEmp').and.returnValue(true);

spyOn(empService, 'authenticateEmp').withArgs('Admin').and.returnValue(true);

spyOn(empService, 'authenticateEmp').and.callFake(function(name, args){
   return true;
});

What is difference between returnValue and callFake?
If we just want a return value when a service method is called then we can use any of and.callFake or and.returnValue. Lets take below example

component file:

@Component(...)
export class DependencyComponent {
  constructor(private service: RandomService){....}
  .....
  sampleMethod() {
   return this.service.randomMethod();
  }
  .....
}

unit test case for above component:

it('test callFake vs returnValue', () => {
  let randomService= new RandomService();
  let component = new DependencyComponent(randomService);
  spyOn(randomService, 'randomMethod').and.callFake(() => 4)
  expect(component.sampleMethod()).toBe(4)
  spyOn(randomService, 'randomMethod').and.returnValue(10);
  expect(component.sampleMethod()).toBe(10)
})

in above case both the ways are correct.

Suppose we are passing a parameter to service method to perform its logic then in that case we have to use and.callFake((param) => {…}). Here param parameter will be the argument passed to the spied method.

component file:

@Component(...)
export class DependencyComponent {
  constructor(private service: RandomService){....}
  .....
  sampleMethod(val) {
  return this.service.randomMethod(val);
  }
  .....
}

unit test case for above component:

it('test callFake vs returnValue', () => {
  let randomService= new RandomService();
  let component = new DependencyComponent(randomService);
  spyOn(randomService, 'randomMethod').and.callFake((param) => param+4)
  expect(component.sampleMethod(4)).toBe(8);
  expect(component.sampleMethod(12)).toBe(16)
})

when component.sampleMethod(4) is executed it will call this.service.randomMethod(4). As randomMethod() is being spied using and.callFake therefore 4 will be passed as argument of call back function of and.callFake.

One obvious question is can i use returnValue instead of callFake? You can still use but you need to define multiple returnValue methods based on total arguments needs to be tested.