Remove Nth Node from Linked List

Remove 3rd node from below list
Input

Anbu -> Arul -> Arasu-> Bharath-> Catherine -> Davidson

Output

Anbu -> Arul -> Bharath-> Catherine -> Davidson

Idea: Traverse to the Kth Position and point the reference of temp to one next to it. We need to handle one edge case which is when the Kth position is first node then in such case the head should be changed to point temp next position.

public class RemoveNthNodeFromLL {
    public static void main(String[] args) {
        SimpleLinkedList simpleLinkedList = new SimpleLinkedList();

        simpleLinkedList.insertNodeAtEnd("Anbu");
        simpleLinkedList.insertNodeAtEnd("Arul");
        simpleLinkedList.insertNodeAtEnd("Arasu");
        simpleLinkedList.insertNodeAtEnd("Bharath");
        simpleLinkedList.insertNodeAtEnd("Catherine");
        simpleLinkedList.insertNodeAtEnd("Davidson");

        simpleLinkedList.printLinkedList();

        System.out.println("--------------After Removing 3rd Node--------------");

        removeNthNode(simpleLinkedList, 3);

        simpleLinkedList.printLinkedList();
    }


     public static void removeNthNode(SimpleLinkedList simpleLinkedList, Integer indexOfNodeToBeRemoved){
        Node temp = simpleLinkedList.head;

        //Edgecase1 : If Kth index is 1
        if(indexOfNodeToBeRemoved == 1){
            simpleLinkedList.head = temp.next;
            return;
        }

        for(int idx=1;idx<indexOfNodeToBeRemoved-1;idx++){
            temp = temp.next;
        }

        temp.next = temp.next.next;
    }
}

Output

Anbu
Arul
Arasu
Bharath
Catherine
Davidson
--------------After Removing 3rd Node--------------
Anbu
Arul
Bharath
Catherine
Davidson

Reverse a Linked List
Input

1 -> 2 -> 3 -> 4 -> 5 -> NULL 

Output

5 -> 4 -> 3 -> 2 -> 1 -> NULL 

Idea1: Using bruteforce copy the list in to Array and traverse the array backward and create new node
Idea2:

  1. Use 3 Variables. Prev, Curr, Temp and traverse through list items
  2. Start with Curr in Head and Prev as null
  3. Move forward by making Temp to Curr.next, Curr.next to Prev
  4. Prev should be set to Curr and Curr should be set to Temp

Refer Adv DSA 3 Note 5 Page 9

Previous -> Current -> Temp

Node.java

package com.mugil.org;
class Node{
	String content;
	Node next;
	Node head;
    public Node(String content){
	 this.content = content;
	}	
}

SimpleLinkedList.java

package com.mugil.org;

public class SimpleLinkedList {
    Node head;

    public void printLinkedList() {
        Node current = head;
        while (current != null) {
            System.out.println(current.content);
            current = current.next;
        }
    }
}

ReverseLinkedList.java

public class ReverseLinkedList {
    public static void main(String[] args) {
        SimpleLinkedList simpleLinkedList = new SimpleLinkedList();

        simpleLinkedList.insertNodeAtEnd("Anbu");
        simpleLinkedList.insertNodeAtEnd("Arul");
        simpleLinkedList.insertNodeAtEnd("Arasu");
        simpleLinkedList.insertNodeAtEnd("Bharath");
        simpleLinkedList.insertNodeAtEnd("Catherine");
        simpleLinkedList.insertNodeAtEnd("Davidson");

        simpleLinkedList.printLinkedList();

        reverseLinkedList(simpleLinkedList);
    }

    public static void reverseLinkedList(SimpleLinkedList simpleLinkedList){
        Node temp = simpleLinkedList.head;
        Node curr = temp;
        Node prev = null;


        while(temp != null){
            temp = curr.next;
            curr.next = prev;
            prev = curr;
            curr = temp;
        }

        simpleLinkedList.head = prev;

        System.out.println("-----------------------------------");
        simpleLinkedList.printLinkedList();
    }
}

Output

Anbu
Arul
Arasu
Bharath
Catherine
Davidson
-----------------------------------
Davidson
Catherine
Bharath
Arasu
Arul
Anbu
  1. Linked List is made of combination of Node
  2. The smallest unit of linked list is Node
  3. Node contains two things the content of the node And reference to next node
  4. If a linked list has only one element then it would have only one node

Node.java

class Node{
	String content;
	Node next;

        public Node(String content){
 	 this.content = content;
	}	
}
  1. To traverse linked list we should always start at the head
  2. After printing the content we should move to next node as mentioned in next variable in current node

Traversing a LL
LL node next always points to reference of next node if any or else would be null if only one element is present. While Traversing we always start with head position

public class Main{
	public static void main(String args[]){
		Node node1 = new Node("Anbu");
				
		Node node2 = new Node("Arul");
		node1.next = node2;

		Node node3 = new Node("Arasu");
		node2.next = node3;

		printLinkedList(node1);
	}

	public static void printLinkedList(Node startingNode){
		while(startingNode.next !=null){
			System.out.println(startingNode.content);
			startingNode = startingNode.next;
		}

		if(startingNode.next == null){
			System.out.println(startingNode.content);
		}
	}
}

The above code can be refactored as below using recursion calling same function again and again

public class Main{
	public static void main(String args[]){
		Node node1 = new Node("Anbu");
				
		Node node2 = new Node("Arul");
		node1.next = node2;

		Node node3 = new Node("Arasu");
		node2.next = node3;

		printLinkedList(node1.head);
	}
        
        public static void printLinkedList(Node startingNode){
		//Note: We are traversing to next null node before exit without this last element wont be printed
		if(startingNode == null){ 			
		  return;
		}

		System.out.println(startingNode.content);
		printLinkedList(startingNode.next);
	}
}

Output

Anbu
Arul
Arasu

Now let’s move the linked list methods to a separate class called SimpleLinkedList.java

SimpleLinkedList.java

public class SimpleLinkedList {
    Node head;

    public static void traverseLinkedList(Node startingNode){
        //Note: We are traversing to next null node before exit without this last element wont be printed
        if(startingNode == null){
            return;
        }

        System.out.println(startingNode.content);
        printLinkedList(startingNode.next);
    }
}

Simple Shedlock Code

pom.xml

	<dependency>
			<groupId>net.javacrumbs.shedlock</groupId>
			<artifactId>shedlock-spring</artifactId>
			<version>5.13.0</version>
		</dependency>
		<dependency>
			<groupId>net.javacrumbs.shedlock</groupId>
			<artifactId>shedlock-provider-jdbc-template</artifactId>
			<version>5.13.0</version>
		</dependency>

ShedLockConfig.java

import net.javacrumbs.shedlock.core.LockProvider;
import net.javacrumbs.shedlock.provider.jdbctemplate.JdbcTemplateLockProvider;
import org.springframework.context.annotation.Bean;
import org.springframework.context.annotation.Configuration;
import org.springframework.jdbc.core.JdbcTemplate;

import javax.sql.DataSource;

@Configuration
public class ShedLockConfig {

    @Bean
    public LockProvider lockProvider(DataSource dataSource) {
        return new JdbcTemplateLockProvider(
                JdbcTemplateLockProvider.Configuration.builder()
                        .withJdbcTemplate(new JdbcTemplate(dataSource))
                        .withTableName("empmgmt.shedlock")
                        .build()

        );
    }
}

ShedlockDemoApplication.java

import net.javacrumbs.shedlock.spring.annotation.EnableSchedulerLock;
import org.springframework.boot.SpringApplication;
import org.springframework.boot.autoconfigure.SpringBootApplication;
import org.springframework.scheduling.annotation.EnableScheduling;

@SpringBootApplication
@EnableScheduling
@EnableSchedulerLock(defaultLockAtMostFor = "PT4M")
public class ShedlockDemoApplication {
    public static void main(String[] args) {
        SpringApplication.run(ShedlockDemoApplication.class, args);
    }
}

PostFetchScheduler.java
fetchPosts method is called every minute

@Component
class PostFetchScheduler {

    final PostFetchService postFetchService;

    PostFetchScheduler(PostFetchService postFetchService) {
        this.postFetchService = postFetchService;
    }

    @Scheduled(cron = "0 */1 * ? * *")
    @SchedulerLock(name = "fetchPosts", lockAtMostFor = "PT2M", lockAtLeastFor = "PT1M")
    void fetchPosts() {
        postFetchService.fetchPosts();
    }
}

How to run the code

  1. Shedlock table should be created manually in database
      CREATE TABLE shedlock (
        name VARCHAR(64) NOT NULL,         -- lock name
        lock_until TIMESTAMP NOT NULL,     -- time until lock is valid
        locked_at TIMESTAMP NOT NULL,      -- time when lock was acquired
        locked_by VARCHAR(255) NOT NULL,   -- identifier of the node that holds the lock
        PRIMARY KEY (name)
    );
      
  2. Start multiple instance by supplying server.port and instance name as parameter
  3. First instance would create table in DB for posts for code in repo

Output

FAQ
Why we are defining lock timing at 2 places?

@EnableSchedulerLock(defaultLockAtMostFor = "PT4M") 
 

vs

  @SchedulerLock(name = "fetchPosts", lockAtMostFor = "PT2M", lockAtLeastFor = "PT1M")
 

@EnableSchedulerLock sets defaults for all tasks. A fallback setting for all tasks.

@SchedulerLock gives per-task overrides with more precise control. Fine-grained control, overriding the default for specific jobs.

Repo Link

Why to use Liquibase?
Liquibase simplifies – Database Version Control and Automation of Database Migrations

pom.xml

<dependency>
   <groupId>org.liquibase</groupId>
   <artifactId>liquibase-core</artifactId>
</dependency>

Simple Liquibase Script Example?
db.changelog-master.xml

<?xml version="1.0" encoding="UTF-8"?>
<databaseChangeLog
        xmlns="http://www.liquibase.org/xml/ns/dbchangelog"
        xmlns:xsi="http://www.w3.org/2001/XMLSchema-instance"
        xsi:schemaLocation="http://www.liquibase.org/xml/ns/dbchangelog
        http://www.liquibase.org/xml/ns/dbchangelog/dbchangelog-4.15.xsd">
    <include file="/db/changelog/1-createtable-changeset.xml"/>
    <include file="/db/changelog/2-altertable-changeset.xml"/>
    <include file="/db/changelog/3-inserttable-changeset.xml"/>
    <include file="/db/changelog/4-storedprocedure-changeset.xml"/>
    <include file="/db/changelog/5-createtable-address-changeset.xml"/>
</databaseChangeLog>

1-createtable-changeset.xml

<databaseChangeLog
        xmlns="http://www.liquibase.org/xml/ns/dbchangelog"
        xmlns:xsi="http://www.w3.org/2001/XMLSchema-instance"
        xsi:schemaLocation="http://www.liquibase.org/xml/ns/dbchangelog
        http://www.liquibase.org/xml/ns/dbchangelog/dbchangelog-4.15.xsd">

    <!-- Create schema -->
    <changeSet id="create-table" author="mugil">
        <createTable tableName="employee" schemaName="empmgmt">
            <column name="id" type="INT" autoIncrement="true">
                <constraints primaryKey="true" nullable="false"/>
            </column>
            <column name="emp_name" type="VARCHAR(50)"/>
        </createTable>
    </changeSet>
</databaseChangeLog>

Does the whole script runs everytime in liquibase?
No. liquibase does not run the whole script all the time. liquibase maintains a databasechangelog table internally. This table keeps track of the new scripts and already executed scripts in form of history table.

How liquibase distinguish between script which is already executed and script which needs to be executed?
liquibase ID, Author and Chanelog file name to uniquely generate a MD5 Checksum value. This unique value helps in distinguish between old script which is already executed a new script to be executed


Is there a way I could run the script again in liquibase?
Yes. There is a way by deleting the MD5sum value in the database which makes the liquibase engine to run script again. You can also delete all the rows in the liquibase change log table which makes the script to get executed one more time.

Is there a way to confirm changelog files executed when the application starts?
2 Ways

You can confirm from server log displayed at the time of server startup.

You can also confirm from database change log table

How to run a script again and again in liquibase?
By using runAlways=”true” in changeset. Liquibase ignores the DATABASECHANGELOG execution history for that changeset. Every run applies the SQL, even if identical.

<changeSet id="insert_seed_data" author="dev" runAlways="true">
    <insert tableName="config">
        <column name="key" value="last_updated"/>
        <column name="value" value="NOW()"/>
    </insert>
</changeSet>

When to use runOnChange parameter in changeset?
If you are making changes to view or stored procedure then use runOnChange set to true. Liquibase ignores the DATABASECHANGELOG execution history for that changeset. Every run applies the SQL, even if identical.

When to use runOnChange parameter in changeset?
If you are making changes to view or stored procedure then use runOnChange set to true. Liquibase ignores the DATABASECHANGELOG execution history for that changeset. Every run applies the SQL, even if identical.

Other Notes:
You can confirm scripts that would be executed by using liquibase:updateSQL which generates list of scripts to be executed.

Code Repo

Why Shedlock?
Shedlock prevents concurrent execution of scheduled tasks in distributed systems. In a server where multiple instance of same JAR running, shedlock prevents simultaneous execution of task by different instance at the same time. By this shedlock prevents race conditions and prevents multiple nodes from executing the same task simultaneously, which can lead to data corruption or duplication

Before Shedlock

Application Schedule Job
└─▶ PCF Inst A: tries to gets lock → runs job
└─▶ PCF Inst B: tries to gets lock → runs job
└─▶ PCF Inst C: tries to gets lock → runs job

Post Shedlock

Application Schedule Job
└─▶ PCF Inst A: tries to gets lock → runs job
└─▶ PCF Inst B: Waits for lock release → runs job
└─▶ PCF Inst C: Waits for lock release → runs job

When to use Shedlock?
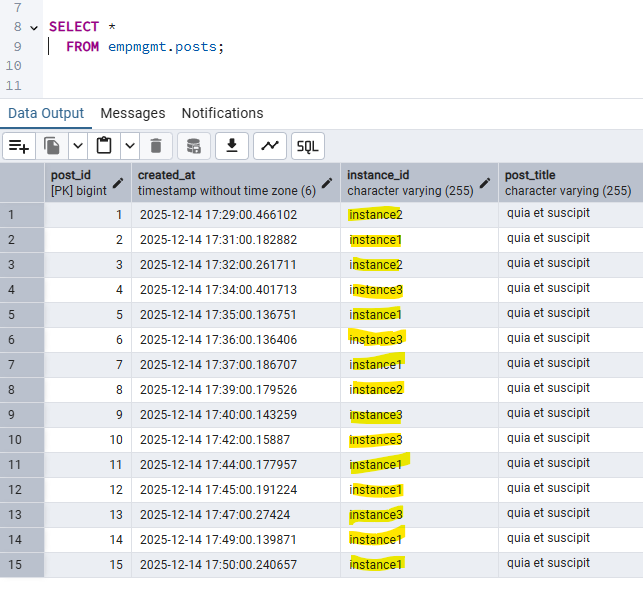
If you have same scheduled job running in more than one instance.

How Shedlock Works?

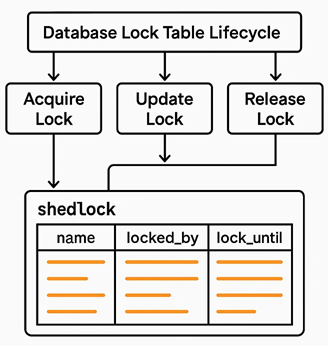
  1. When a scheduled task is triggered, ShedLock checks a shared lock (e.g., in a database table).
  2. If the lock is free, it acquires it and runs the task.
  3. If another instance already holds the lock, the task is skipped.
  4. The lock has an expiration time to handle crashes or failures gracefully.

Use cases
Sending emails or notifications, Generating reports, Cleaning up expired sessions or data, Syncing data with external systems

FAQ
atLeast and atMost Lock time in shedlock?
In ShedLock, atLeast and atMost are parameters used to control the duration of the lock for scheduled tasks. They help ensure that tasks are executed safely and efficiently in distributed environments.

Example:

atLeast = 5m means the lock will stay held for at least 5 minutes, even if the task finishes in 1 minute. this prevents other instances from immediately picking up the task again, useful for throttling or spacing out executions.

atMost = 10m means the lock will automatically release after 10 minutes, even if the task hasn’t finished. atMost is needed incase the task fails and to prevent resource from holding for long time.

The @SchedulerLock annotation in ShedLock is used to control distributed locking for scheduled tasks

@Scheduled(cron = "0 0 * * * *") // every hour
@SchedulerLock(name = "hourlyTask", atLeast = "30m", atMost = "1h")
public void hourlyTask() {
    // task logic here
}
  1. The task runs only once per hour across all instances.
  2. The lock is held for at least 30 minutes, even if the task finishes early.
  3. The lock is released after 1 hour, even if the task hangs.

Can another instance Instance2 can execute the job, if Instance1 job is completed within 30 Minutes(atleast Time)?
No. The atLeast duration is a guaranteed lock time, not tied to actual job execution. Instance2 cannot start the job during this 30-minute window because the lock is still active. Even when the instance1 job is completed within 30 minutes instance2 job cannot be started unless the lock is released.

What happens when atLeastTime is more than Schedule Interval of Job
Lets say we have a job which runs every 4 minutes. We have a Shedlock which has minimum lock time of 5 Minutes and max of 10 Minutes. Now in this scenario job would run in 8th, 16th, 28th, 36th Minute the job would run

               |-------------|-------------|-------------|-------------|-------------|-------------|-------------|
TimeLine       0-------------5-------------10------------15------------20------------25------------30------------35
Lock Time      <------L----->|<-----NL---->|<-----L----->|<-----NL---->|<-----L----->|<-----NL---->|<-----L----->|
Job Exe Inter  0----------4----------8----------12----------16---------20---------24---------28---------32--------

L -> Resource Locked
NL -> Resource Unavailable

In the above Job Execution would work when the Lock Time is NL

What if there is a Negative Scenario as below

  1. Where the resource is locked and shedlock releases the resource
  2. The Time of Release of Resource and Job Execution Interval are same

Lets have a scenario where the atmost Time is 5 Minutes and Job Execution Interval is also 5 Minutes. In this case the Job may or may not run as expected.

The Job runs at 00:05:00 When Lock is released on 00:05:00
The Job wont run at 00:05:00 When Lock is released on 00:05:01

Its a good practice to have atmost time less than schedule interval time. I.E. 00:04:50 in the above case

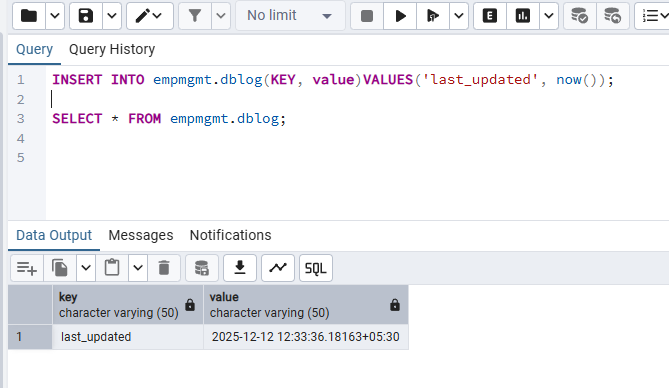
Should I use Shedlock while updating db tables?
If updating database tables as part of a scheduled task in a distributed system using shedlock would be good option. this prevents Duplicate Execution and Data Integrity

Why we are defining lock timing at 2 places?

@EnableSchedulerLock(defaultLockAtMostFor = "PT4M") 
 

vs

  @SchedulerLock(name = "fetchPosts", lockAtMostFor = "PT2M", lockAtLeastFor = "PT1M")
 

@EnableSchedulerLock sets defaults for all tasks. A fallback setting for all tasks.

@SchedulerLock gives per-task overrides with more precise control. Fine-grained control, overriding the default for specific jobs.

What is Race Condition?

# Initial balance = 100
Thread A: balance += 50 # Expected: 150
Thread B: balance -= 30 # Expected: 70

If both threads read the balance at the same time (100), and then write their results, the final balance could be either 120, 150, or 70, depending on timing

Why we need CustomThreadPoolExecutor when we can use ExecutorService Framework to create and manage Threads?

ExecutorService executor = Executors.newFixedThreadPool(20);

is nothing but

return new ThreadPoolExecutor(20, 20,
                                  0L, TimeUnit.MILLISECONDS,
                                  new LinkedBlockingQueue<Runnable>());

under the hoods.

ThreadPoolExecutor would be more effective if you have customized many or all of below parameters.

ThreadPoolExecutor(int corePoolSize, 
               int maximumPoolSize, 
               long keepAliveTime, 
               TimeUnit unit, 
               BlockingQueue<Runnable> workQueue, 
               ThreadFactory threadFactory,
               RejectedExecutionHandler handler)

How it works?

  1. If fewer than corePoolSize threads are running, try to start a new thread with the given command as its first task. The call to addWorker atomically checks runState and workerCount, and so prevents false alarms that would add threads when it shouldn’t, by returning false.
  2. If a task can be successfully queued, then we still need to double-check whether we should have added a thread (because existing ones died since last checking) or that the pool shut down since entry into this method. So we recheck state and if necessary roll back the enqueuing if stopped, or start a new thread if there are none.
  3. If we cannot queue task, then we try to add a new thread. If it fails, we know we are shut down or saturated and so reject the task.

CustomThreadPoolExecutor.java

import java.util.concurrent.*;

public class CustomThreadPoolExecutor extends ThreadPoolExecutor {
    public CustomThreadPoolExecutor(int corePoolSize, int maximumPoolSize, long keepAliveTime,
                                    TimeUnit unit, BlockingQueue<Runnable> workQueue,
                                    ThreadFactory threadFactory,
                                    RejectedExecutionHandler handler) {
        super(corePoolSize, maximumPoolSize, keepAliveTime, unit, workQueue, threadFactory, handler);
    }
}

CustomThreadFactory.java

import java.util.concurrent.ThreadFactory;

public class CustomThreadFactory implements ThreadFactory {
    @Override
    public Thread newThread(Runnable r) {
        Thread th = new Thread(r);
        th.setPriority(Thread.NORM_PRIORITY);
        th.setDaemon(false);
        return th;
    }
}

CustomRejectHandler.java

import java.util.concurrent.RejectedExecutionHandler;
import java.util.concurrent.ThreadPoolExecutor;

public class CustomRejectHandler implements RejectedExecutionHandler {
    @Override
    public void rejectedExecution(Runnable r, ThreadPoolExecutor executor) {
        System.out.println("Task Rejected: "+ r.toString());
    }
}

Task.java

import java.util.concurrent.ThreadPoolExecutor;

public class Task implements Runnable{

    String taskName;
    ThreadPoolExecutor executor;
    Long timeInMilliSeconds;


    public Task(String taskName, ThreadPoolExecutor executor, Long timeInMilliSeconds) {
        this.taskName = taskName;
        this.executor = executor;
        this.timeInMilliSeconds = timeInMilliSeconds;
    }

    @Override
    public void run() {
        try{
            Thread.sleep(this.timeInMilliSeconds);

            System.out.print("Tasks in Blocking Queue "+ this.executor.getQueue().stream().toList() + ", ");
            System.out.print(this.taskName + " completed by " +  Thread.currentThread().getName() + " after running "+ timeInMilliSeconds +"ms" );
            System.out.println(", Active Threads available "+ executor.getPoolSize());
        }catch (Exception e){
        }
    }

    @Override
    public String toString() {
        return "Task{" +
                "taskName='" + taskName + '\'' +
                '}';
    }
}

BatchProcessor.java

public class BatchProcessor {
    public static void main(String[] args) throws InterruptedException {

        ThreadPoolExecutor executor = new CustomThreadPoolExecutor(2,4, 10, TimeUnit.MINUTES,
                                                                    new ArrayBlockingQueue<>(2),
                                                                    new CustomThreadFactory(),
                                                                    new CustomRejectHandler());

        System.out.println("Active Threads  available for processing at start "+  executor.getPoolSize());

        executor.submit( new Task("task1", executor, 2500L)); //Directly dealt by CorePool Thread
        executor.submit( new Task("task2", executor, 500L)); //Directly dealt by CorePool Thread
        Thread.sleep(2000L);
        System.out.println("Slept for 2000 Millisecond");
        executor.submit( new Task("task3", executor, 200L)); //Directly dealt by CorePool Thread
        executor.submit( new Task("task4", executor, 1000L)); //Directly dealt by CorePool Thread
        executor.submit( new Task("task5", executor, 300L)); //Dealt by extra thread within Maximum Pool Size
        executor.submit( new Task("task6",executor, 300L)); //Directly dealt by CorePool Thread

        executor.shutdown();
    }
}

Output

Active Threads  available for processing at start 0
Tasks in Blocking Queue [], task2 completed by Thread-1 after running 500ms, Active Threads available 2
Slept for 2000 Millisecond
Tasks in Blocking Queue Task{'task4','task6'}, task3 completed by Thread-1 after running 200ms, Active Threads available 3
Tasks in Blocking Queue Task{'task6'}, task5 completed by Thread-2 after running 300ms, Active Threads available 3
Tasks in Blocking Queue [], task1 completed by Thread-0 after running 2500ms, Active Threads available 3
Tasks in Blocking Queue [], task6 completed by Thread-2 after running 300ms, Active Threads available 2
Tasks in Blocking Queue [], task4 completed by Thread-1 after running 1000ms, Active Threads available 1

What is BlockingQueue?

  1. BlockingQueue is a Interface which has 4 Implementations – LinkedBlockingQueue, ArrayBlockingQueue, PriorityBlockingQueue, SynchronousQueue
  2. Thread Safe: BlockingQueue implementations are thread-safe, with all methods being atomic.
  3. Blocking Operation: Has blocking behavior if the queue is full (for producers) or empty (for consumers).
  4. No Null Elements: Attempts to insert a null will result in a NullPointerException.

Two Types of BlockingQueue

  • Bounded BlockingQueue: Fixed capacity, blocking producers when full.
  • Unbounded BlockingQueue: Expands as needed (e.g., backed by a LinkedList), though subject to memory constraints.

Simple Producer Consumer Implementation using BlockingQueue?

  1. We have a queBuffer which take max of 10 printing task at a time
  2. The printing Task are added from PrintProducer whereas it is polled at PrintConsumer end
  3. When you start the thread for producer you should use start() method rather than run() as run executes by taking control of main thread whereas start() spawns two new thread which makes producer and consumer run at same time in two different threads.

PrintProducer.java

import java.util.concurrent.BlockingQueue;
import java.util.concurrent.ThreadLocalRandom;

public class PrintProducer extends Thread {
    private BlockingQueue queBuffer;

    public PrintProducer(BlockingQueue queBuffer) {
        this.queBuffer = queBuffer;
    }

    @Override
    public void run() {
        while(true){
            try {
                Integer randomNo = ThreadLocalRandom.current().nextInt(100);
                queBuffer.put(randomNo);
                System.out.println("Added Task No " + String.valueOf(randomNo));
                Thread.sleep(500);
            } catch (InterruptedException e) {
                throw new RuntimeException(e);
            }
        }
    }
}

PrintConsumer.java

import java.util.concurrent.BlockingQueue;

public class PrintConsumer extends Thread{
    private BlockingQueue queBuffer;

    public PrintConsumer(BlockingQueue queBuffer) {
        this.queBuffer = queBuffer;
    }

    @Override
    public void run() {
        while(true){
            try {
                System.out.println("Polled Task No " + queBuffer.take());
                Thread.sleep(1500);
            } catch (InterruptedException e) {

            }
        }
    }
}

ProcessPrints.java

import java.util.concurrent.ArrayBlockingQueue;
import java.util.concurrent.BlockingQueue;

public class ProcessPrints {
    static BlockingQueue queBuffer = new ArrayBlockingQueue(10);

    public static void main(String[] args) {
        PrintProducer objPrintProducer = new PrintProducer(queBuffer);
        PrintConsumer objPrintConsumer = new PrintConsumer(queBuffer);

        objPrintProducer.start();
        objPrintConsumer.start();
    }
}

Output

Polled Task No 61
Added Task No 61
Added Task No 33
Added Task No 0
Polled Task No 33
Added Task No 29
Added Task No 93
Added Task No 20
Polled Task No 0
Added Task No 24
Added Task No 2
Added Task No 31
.
.
.
.

The above code can be implemented as below as Thread takes Runnable as argument with run() method definition in lambda expression

ProcessPrints.java

public class ProcessPrints {
    static BlockingQueue queBuffer = new ArrayBlockingQueue(10);

    public static void main(String[] args) {
        //Producer Implementation
        new Thread(()->{
            while(true){
                try {
                    Integer randomNo = ThreadLocalRandom.current().nextInt(100);
                    queBuffer.put(randomNo);
                    System.out.println("Added Task No " + String.valueOf(randomNo));
                    Thread.sleep(500);
                } catch (InterruptedException e) {
                    throw new RuntimeException(e);
                }
            }
        }).start();

        //Consumer Implementation
        new Thread(()->{
            while(true){
                try {
                    System.out.println("Polled Task No " + queBuffer.poll());
                    Thread.sleep(1500);
                } catch (InterruptedException e) {

                }
            }
        }).start();
    }
}

Simple Program to print numbers using threads
NumberPrinter.java

public class NumberPrinter implements Runnable{
    int number;
    public NumberPrinter(int number){
        this.number = number;
    }

    public void run(){
        System.out.println("Printing Number from Thread "+ this.number);
    }
}

Main.java

public class Main {
    public static void main(String[] args) {
        for (int idx=1;idx<=5;idx++){
            Thread objthread = new Thread(new NumberPrinter(idx));
            objthread.start();
        }
    }
}

Output

Printing Number from Thread 5
Printing Number from Thread 1
Printing Number from Thread 4
Printing Number from Thread 3
Printing Number from Thread 2

Simple Program using Executor Service taking Runnable as Argument

ExecutorService is a framework which allows to create thread. Threads can be created from FixedThreadPool, CachedThreadPool and ScheduledThreadPool. submit() method takes runnable or callable object (Functional Interface Type) as argument. The Same code above can be rewritten as below
Main.java

public class Main {
    public static void main(String[] args) throws Exception {
        ExecutorService objExecService = Executors.newFixedThreadPool(2);

        //Lambda Expresssion passed as Argument as Runnable is FI
        objExecService.submit(() -> {
            System.out.println(Thread.currentThread().getName());
        });

        objExecService.shutdown();
    }
}

Output

pool-1-thread-1

Same code with Runnable instance passed as argument to submit

  .
  . 
  //Instance of Runnable passed as argument
  HelloThread1 objHT1 = new HelloThread1();
  objExecService.submit(objHT1);
  .
  .

Output

Hello World from Thread Name (pool-1-thread-1) using Runnable 

Same code with Runnable as Anonymous Class passed as argument

ExecutorService exec = Executors.newFixedThreadPool(2);

//Instance of Runnable passed as Anonymous class
exec.execute(new Runnable() {
  public void run() {
    System.out.println("Hello world");
  }
});

exec.shutdown();

Simple Program using Executor Service taking Callable as Argument

public class Main {
    public static void main(String[] args) throws Exception {
        ExecutorService objExecService = Executors.newFixedThreadPool(2);
        Future<String> objFuture = objExecService.submit(new HelloThread2());
        System.out.println(objFuture.get());
        objExecService.shutdown();
    }
}

Output

Hello World from Thread Name (pool-1-thread-1) using Callable

Using Lambda Expression as Submi

.
.
ExecutorService objExecService = Executors.newFixedThreadPool(2);

Future<String> objFuture = objExecService.submit(() -> {
  Thread.sleep(3000);
  return Thread.currentThread().getName();
});

System.out.println(objFuture.get());
.
.

The above could be rewritten in anonymous class as below

ExecutorService objExecService = Executors.newFixedThreadPool(2);

Future<String> objFuture = objExecService.submit(new Callable<String>() {
 @Override
 public String call() throws Exception {
   Thread.sleep(3000);
   return Thread.currentThread().getName();
 }
});

System.out.println(objFuture.get());
objExecService.shutdown();

Program for Creating Thread Pool and executing Task

ThreadPoolExample.java

public class ThreadPoolExample {
    public static void main(String args[]) {
       ExecutorService service = Executors.newFixedThreadPool(10); //create 10 worker threads in Thread Pool
       for (int i =0; i<100; i++){
           service.submit(new Task(i)); //submit that to be done 
       }
       service.shutdown();
    }  
}

Task.java

final class Task implements Runnable {
    private int taskId;  
    public Task(int id){
        this.taskId = id;
    }
  
    @Override
    public void run() {
        System.out.println("Task ID : " + this.taskId +" performed by " 
                           + Thread.currentThread().getName());
    }  
}
Task ID : 0 performed by pool-1-thread-1
Task ID : 3 performed by pool-1-thread-4
Task ID : 2 performed by pool-1-thread-3
Task ID : 1 performed by pool-1-thread-2
Task ID : 5 performed by pool-1-thread-6
Task ID : 4 performed by pool-1-thread-5

5 Core Concepts of Spring Security

  1. Authentication and Authorization
    – Authentication – Who are you – Answer by showing ID(Facebook, LinkedIn for ID which uniquely identifies you)
    – Authorization – What you want – State what you want

    Knowledge Based Authentication – Providing details you know about you to prove its you. Downside is details can be stolen.
    Possession Based Authentication – Key Cards for accessing Building Doors, Phone OTP. Authenticates by checking the user posses something which
    realuser should posses.

    Multi Factor Authentication – Enter password and enter OTP(KBA + PBA)

  2. Authorization – Checks whether the person is allowed to do something. For Authorization, Authentication is needed at first place.
  3. Principal
    – Person identified through process of Authentication
    – Person who has logged in. Currently logged in user (or) account.
    – App remembers the principal in context as currently loggedin user.
  4. Granted Authority
    – Authority includes whether the user is allowed to Read, Write, Update and Delete at permission level
  5. Role
    – Group of Authorities assigned together forms a role

Formbased Authentication
pom.xml

.
.
<dependency>
  <groupId>org.springframework.boot</groupId>
  <artifactId>spring-boot-starter-security</artifactId>
</dependency>
.
.

Basic Auth
null

  1. Client Sends a request without username and password and gets 401 Unauthorized as Response
  2. Now Client Sends a request with username and password with Base64 Encoding
  3. Server validates whether user exists in DB
  4. Server replies with 200 Ok if user authentication is successful
  5. Basic ENCODED-BASE64-USERIDPASSWORD is the one sent in header to server from client
  6. In postman basic auth can be done by adding Authorization and base64 encoded user and password to header
    Header : Authorization
    Value : Basic base64('YourOrgName:YourAPIKEY');
    
  7. Base64 encoded text can be got from JS Console in browser as below

    "username:password!" // Here I used basic Auth string format
    
    // Encode the plain string to base64
    btoa("username:password!"); // output: "dXNlcm5hbWU6cGFzc3dvcmQh"
    
    
    // Decode the base64 to plain string
    atob("dXNlcm5hbWU6cGFzc3dvcmQh"); // output: "username:password!"
    
  8. Using Authorization Tab in post man does the same thing of adding base64 encoded UserName and Password to Header prepending Basic

The Difference between FormAuth and BasicAuth is in BasicAuth UserName and Password would be sent everytime when making a request to the server in the header as base64 encoded character.

Form-based authentication
Form-based authentication is not formalized by any RFC.They don’t use the formal HTTP authentication techniques.They use the standard HTML form fields to pass the username and password values to the server.The server validates the credentials and then creates a “session” that is tied to a unique key that is passed between the client and server on each http put and get request.When the user clicks “log off” or the server logs the user off (for example after certain idle time), the server will invalidate the session key, which makes any subsequent communication between the client and server require re-validation

null

Basic Auth
null

Basic Auth with Authorization in Headers as seen in DevTool
null

Creating the below class in Spring Boot project would enable the Basic auth(httpAuth) instead of default formbased auth which we get after adding spring security starter dependency to pom.xml

ApplicationSecurityConfig.java
Using Custom Username and Password for Inmemory Authentication

@Configuration
@EnableWebSecurity
public class ApplicationSecurityConfig extends WebSecurityConfigurerAdapter {
    @Override
    protected void configure(HttpSecurity httpSecurity) throws Exception{
        httpSecurity.authorizeRequests()
                    .anyRequest()
                    .authenticated()
                    .and()
                    .httpBasic();
    }
}