Adapter Pattern help in changing the third party integration without making much changes to the Core code.

Three main components:

Target: This is the interface that the client expects to use.
Adaptee: This is the existing interface that needs to be adapted to work with the client.
Adapter: This is the class that adapts the Adaptee to the Target interface.
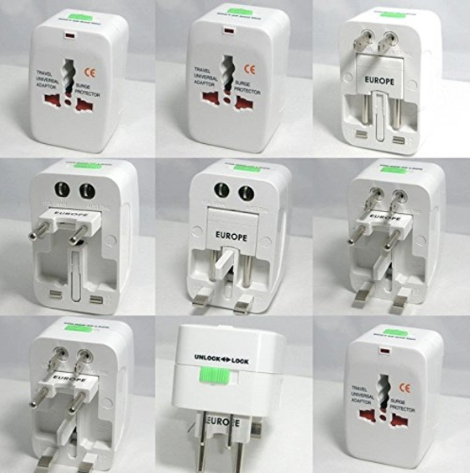
Why to use Adapter Pattern?

  1. It Allows Incompatible interfaces between classes to work together without modifying their source code.
  2. It acts as a bridge between two interfaces, making them compatible so that they can collaborate and interact seamlessly.
  3. This pattern is useful when integrating existing or third-party code into an application without modifying the existing codebase.

When to use Adapter Pattern?
You can use the Adapter design pattern when you have to deal with different interfaces with similar behavior (which usually means classes with similar behavior but with different methods).

  1. Legacy code integration: When we need to integrate legacy code into a new system
  2. Data format conversion: When we receive data from a third-party system, we may find that the data is in a format that is incompatible with our system.
  3. Third-party library integration: When we use a third-party library in our code, we may find that the library uses an interface that is incompatible with our code.

How to implement Adapter Pattern?
In your code instead of hard coding the method calls of each vendor (or Adaptee), you could then create a generic interface to wrap these similar behaviors and work with only one type of object. The Adapters will then implement the Target interface delegating its method calls to the Adaptees that are passed to the Adapters via constructor.

Code Example:

  1. Below we have PhonePay implementing BankAPI methods
  2. If Phonepay directly tries to use the classes of hdfcAPI or Any other bank api the code would become tightly coupled and would become difficult to change
  3. To get rid of tight coupling what we do in adaptor is we override the methods in the BankAPI and in method definition we call respective banks which the phone pay application has tie ups
  4. In case there is a need tomorrow for the phonepay application to change the Bank Gateway the only place to change is where the Adapter is called.
  5. The transferAmount of the bank API interface is overridden in the corresponding adapter classes and the definition is changed based on the way the corresponding way Bank APIs are getting called
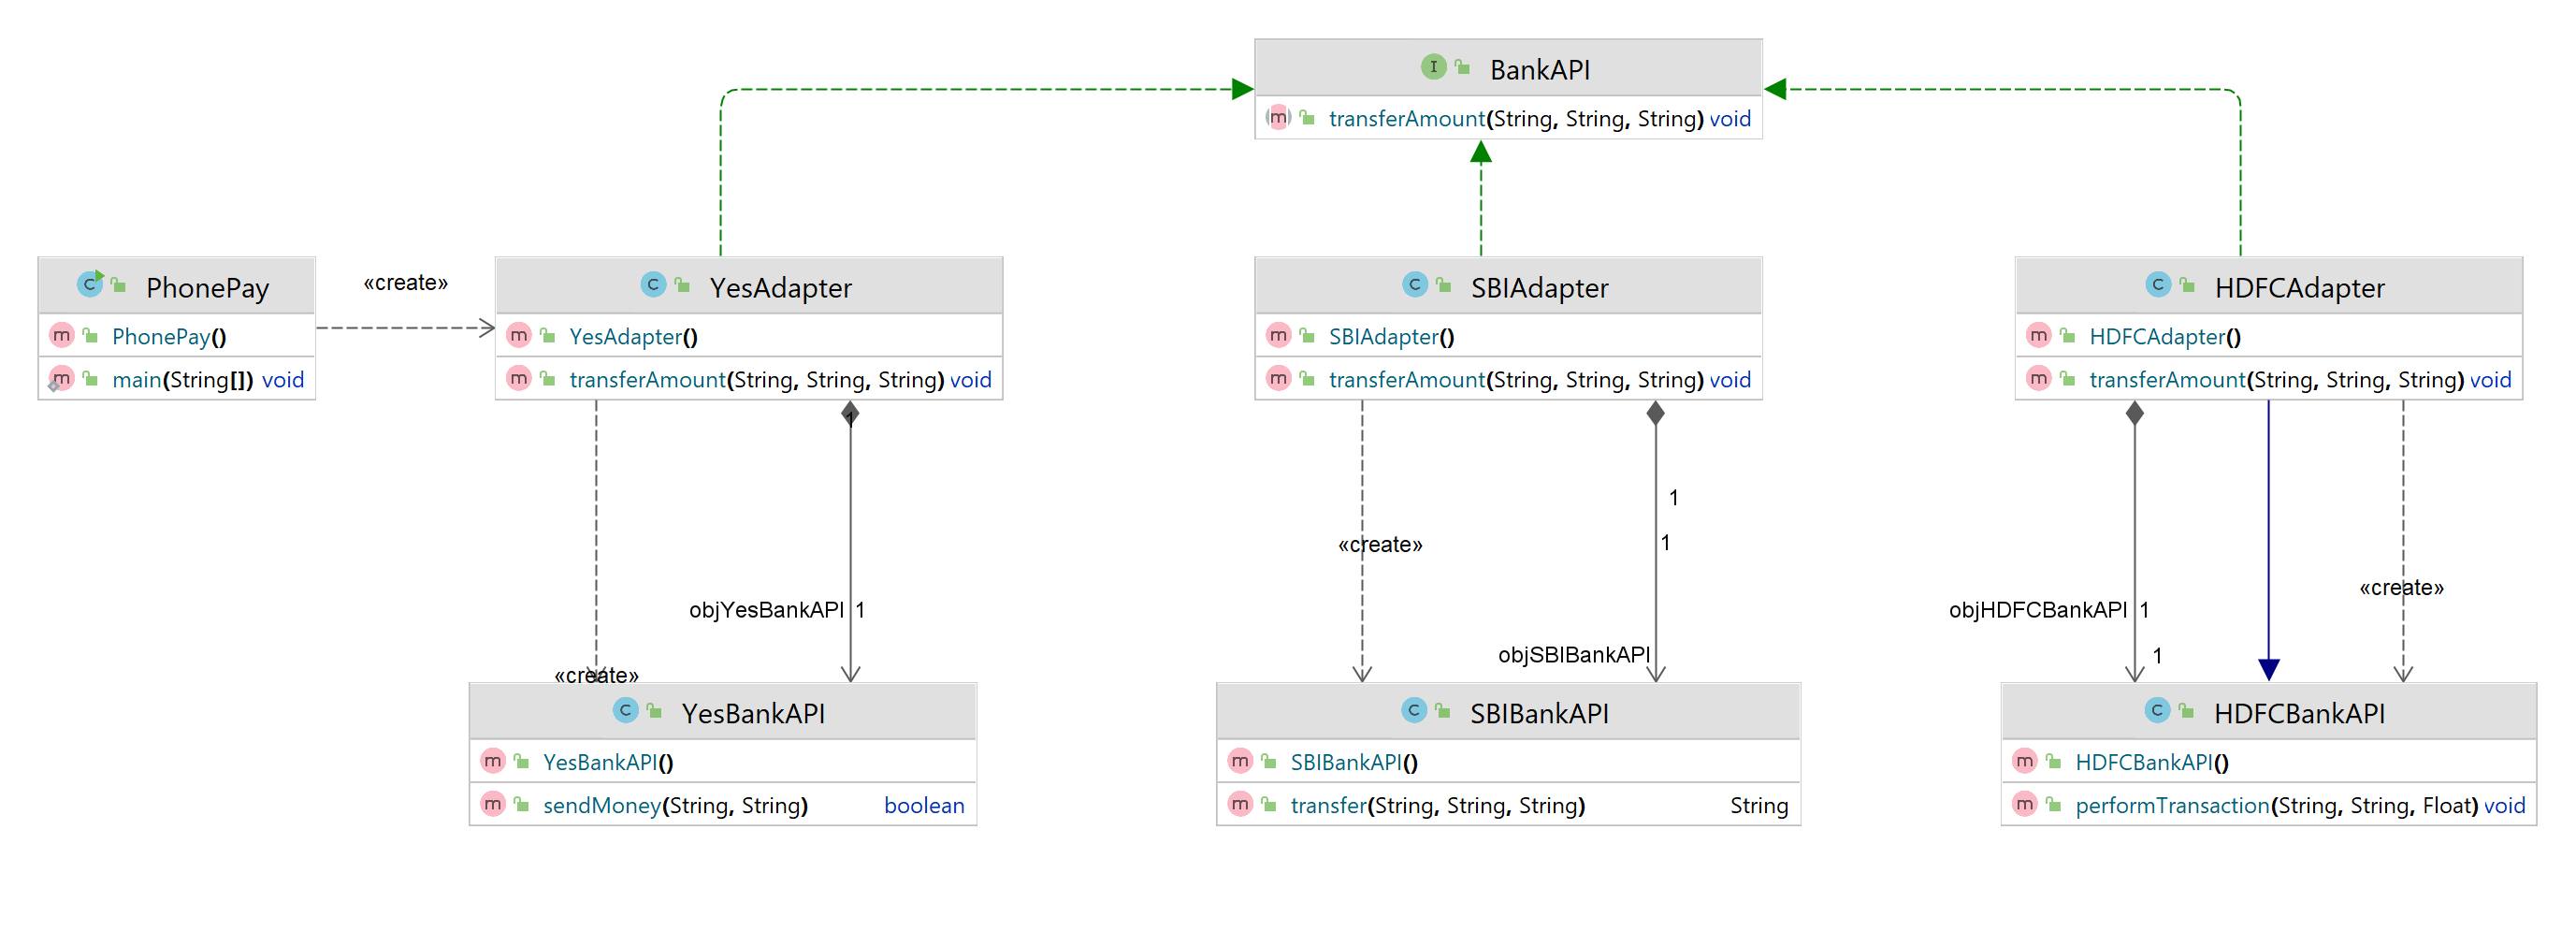
Target : BankAPI
Adapters : HDFCAdapter, YesAdapter, SBIAdapter
Adaptees : HDFCBankAPI, YesBankAPI, SBIBankAPI
Client : PhonePay

BankAPI.java

public interface BankAPI {
    public void transferAmount(String fromAcc, String toAcc, String amount);
}

HDFCAdapter.java

public class HDFCAdapter implements BankAPI {
    HDFCBankAPI objHDFCBankAPI = new HDFCBankAPI();

    @Override
    public void transferAmount(String fromAcc, String toAcc, String amount) {
        objHDFCBankAPI.performTransaction(fromAcc, toAcc, Float.valueOf(amount));
    }
}

HDFCBankAPI.java

public class HDFCBankAPI {
    public void performTransaction(String creditorAcc, String debitorAcc, Float Amount){
        System.out.println("Transfering Funds");
    }
}

YesAdapter.java

public class YesAdapter implements BankAPI {
    YesBankAPI objYesBankAPI = new YesBankAPI();

    @Override
    public void transferAmount(String fromAcc, String toAcc, String amount) {
        objYesBankAPI.sendMoney(fromAcc, toAcc);
    }
}

YesBankAPI.java

public class YesBankAPI {
    public boolean sendMoney(String creditAcc, String debitAcc){
        System.out.println("Transaction Steps.....");
        return true;
    }
}

SBIAdapter.java

public class SBIAdapter implements BankAPI {
    SBIBankAPI objSBIBankAPI = new SBIBankAPI();

    @Override
    public void transferAmount(String fromAcc, String toAcc, String amount) {
        objSBIBankAPI.transfer(fromAcc, toAcc, amount);
    }
}

SBIBankAPI.java

public class SBIBankAPI {
    public String transfer(String account1, String account2, String Amount){
        System.out.println("Transaction from Account1 to Account2");
        return "Transaction Successful";
    }
}

PhonePay.java

public class PhonePay {
    public static void main(String[] args) {
        //Incase you want to change the Bank Gateway tomorrow you can change the Adapter Alone
        BankAPI objBankAPI = new YesAdapter();
        objBankAPI.transferAmount("AccNo 154264", "AccNo 4264755", "452");
    }
}
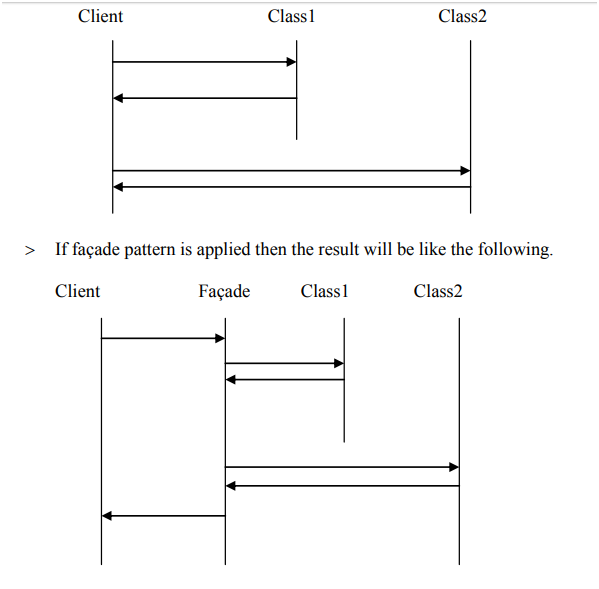
Facade design pattern simplifies the interface to a complex system. In Facade Pattern, the facade class does all the required tasks instead of allowing the client app to them.

Imagine walking to a self service restaurant, McDonalds where diner need to select food from UI, Pay the amount and wait in counter, check the screen for token no, collect the food and find a table before eating. Now in a Dine-In restaurant instead of diner doing all these steps we make the waiter do all these and get the food. Waiter is the Facade and Diner is the Client

Why to use Facade Pattern?
Classes in all design patterns are just normal classes. What is important is how they are structured and how they work together to solve a given problem in the best possible way.

The Facade design pattern simplifies the interface to a complex system; because it is usually composed of all the classes which make up the subsystems of the complex system.

A Facade shields the user from the complex details of the system and provides them with a simplified view of it which is easy to use. It also decouples the code that uses the system from the details of the subsystems, making it easier to modify the system later.

When to use Facade Pattern?
To provide higher-level interface that makes the subsystem easier to use.

How to implement Facade Pattern?
Instead of exposing the complex code logic we wrap the complex code in a separate class facade class and call the method of Facade Class.

Code Implementation

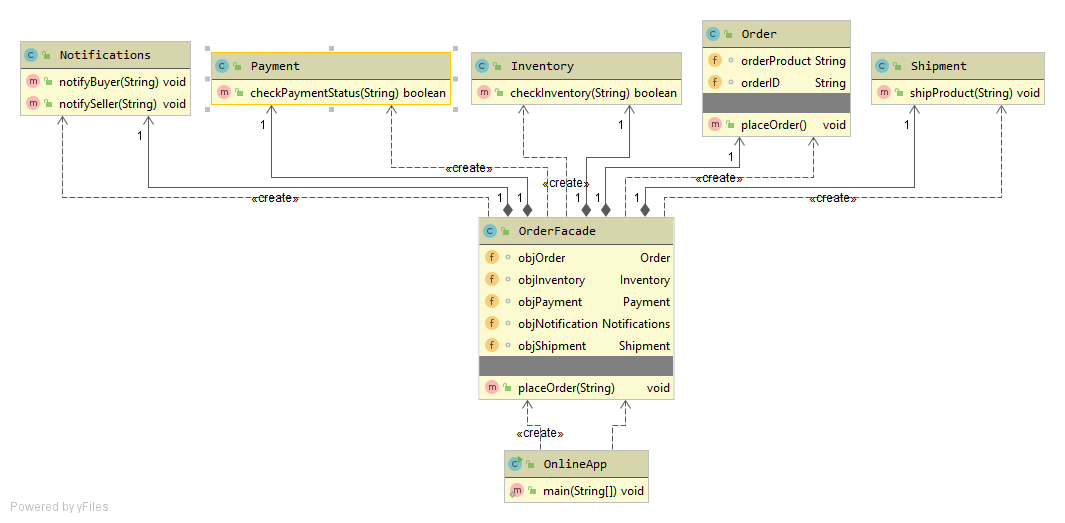
  1. OnlineApp has many code logic which includes Creating Order, Inventory Updation, Payment Tracking, Seller Buyer Notification and Shipment
  2. Instead of writing all the code in onlineApp we can move the code to FacadeClass(OrderFacade.java) and call the method of OrderFacade

Code without Facade Pattern

OnlineApp.java

public class OnlineApp {
    public static void main(String[] args) {
        System.out.println("Step 1: Order Created");
        Order objOrder = new Order();
        objOrder.placeOrder();
        System.out.println("------------------------");

        System.out.println("Step 2: Inventory Updated");
        Inventory objInventory = new Inventory();
        objInventory.checkInventory("Iphone 13");
        System.out.println("------------------------");

        System.out.println("Step 3: Payment Succesful");
        Payment objPayment = new Payment();
        objPayment.checkPaymentStatus("873901");
        System.out.println("------------------------");

        System.out.println("Step 4: Seller and Buyer Notified");
        Notifications objNotification = new Notifications();
        objNotification.notifyBuyer("873901");
        objNotification.notifySeller("873901");
        System.out.println("------------------------");

        System.out.println("Step 5: Shipment Done");
        Shipment objShipment = new Shipment();
        objShipment.shipProduct("Road Name, Location");
        System.out.println("------------------------");

    }
}

Code with Facade Pattern

OrderFacade.java

public class OrderFacade {
    Order objOrder = new Order();
    Inventory objInventory = new Inventory();
    Payment objPayment = new Payment();
    Notifications objNotification = new Notifications();
    Shipment objShipment = new Shipment();

    public void placeOrder(String orderId) {
        System.out.println("Step 1: Order Created");
        objOrder.placeOrder();
        System.out.println("------------------------");

        System.out.println("Step 2: Inventory Updated");
        objInventory.checkInventory("Iphone 13");
        System.out.println("------------------------");

        System.out.println("Step 3: Payment Succesful");
        objPayment.checkPaymentStatus(orderId);
        System.out.println("------------------------");

        System.out.println("Step 4: Seller and Buyer Notified");
        objNotification.notifyBuyer(orderId);
        objNotification.notifySeller(orderId);
        System.out.println("------------------------");

        System.out.println("Step 5: Shipment Done");
        objShipment.shipProduct("Road Name, Location");
        System.out.println("------------------------");
    }
}

OnlineApp.java

public class OnlineApp {
    public static void main(String[] args) {
        OrderFacade objOrderFacade = new OrderFacade();
        objOrderFacade.placeOrder("873901");
    }
}

Output

Step 1: Order Created
Display Cart Order
------------------------
Step 2: Inventory Updated
------------------------
Step 3: Payment Succesful
------------------------
Step 4: Seller and Buyer Notified
Order placed by Buyer
Order Received by Seller
------------------------
Step 5: Shipment Done
Shipping toRoad Name, Location
------------------------

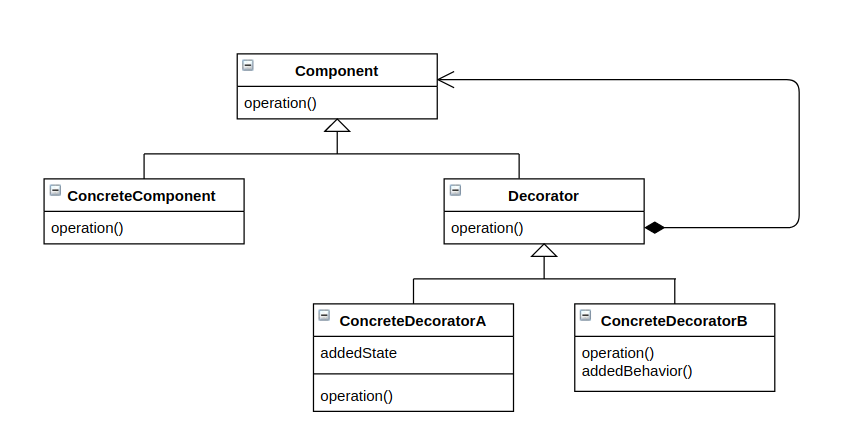
Decorator pattern dynamically changes the functionality of an object at run-time without creating new object rather by adding behavior and attribute to existing Object.

Why Decorator Pattern?

It allows adding new functionality to an existing object without altering its original class. This pattern involves wrapping the original object in a decorator class, which has the same interface as the object it decorates. The decorator class then adds its behavior to the object during runtime, allowing for increased flexibility and modularity in programming.

When Decorator Pattern?
If you want to add additional functionality to an existing object (i.e. already instantiated class at runtime), as opposed to object’s class and/or subclass then Decorator pattern should be used. It is easy to add functionality to an entire class of objects by subclassing an object’s class, but it is impossible to extend a single object this way. With the Decorator Pattern, you can add functionality to a single object and leave others like it unmodified.

How Decorator Pattern Implemented?

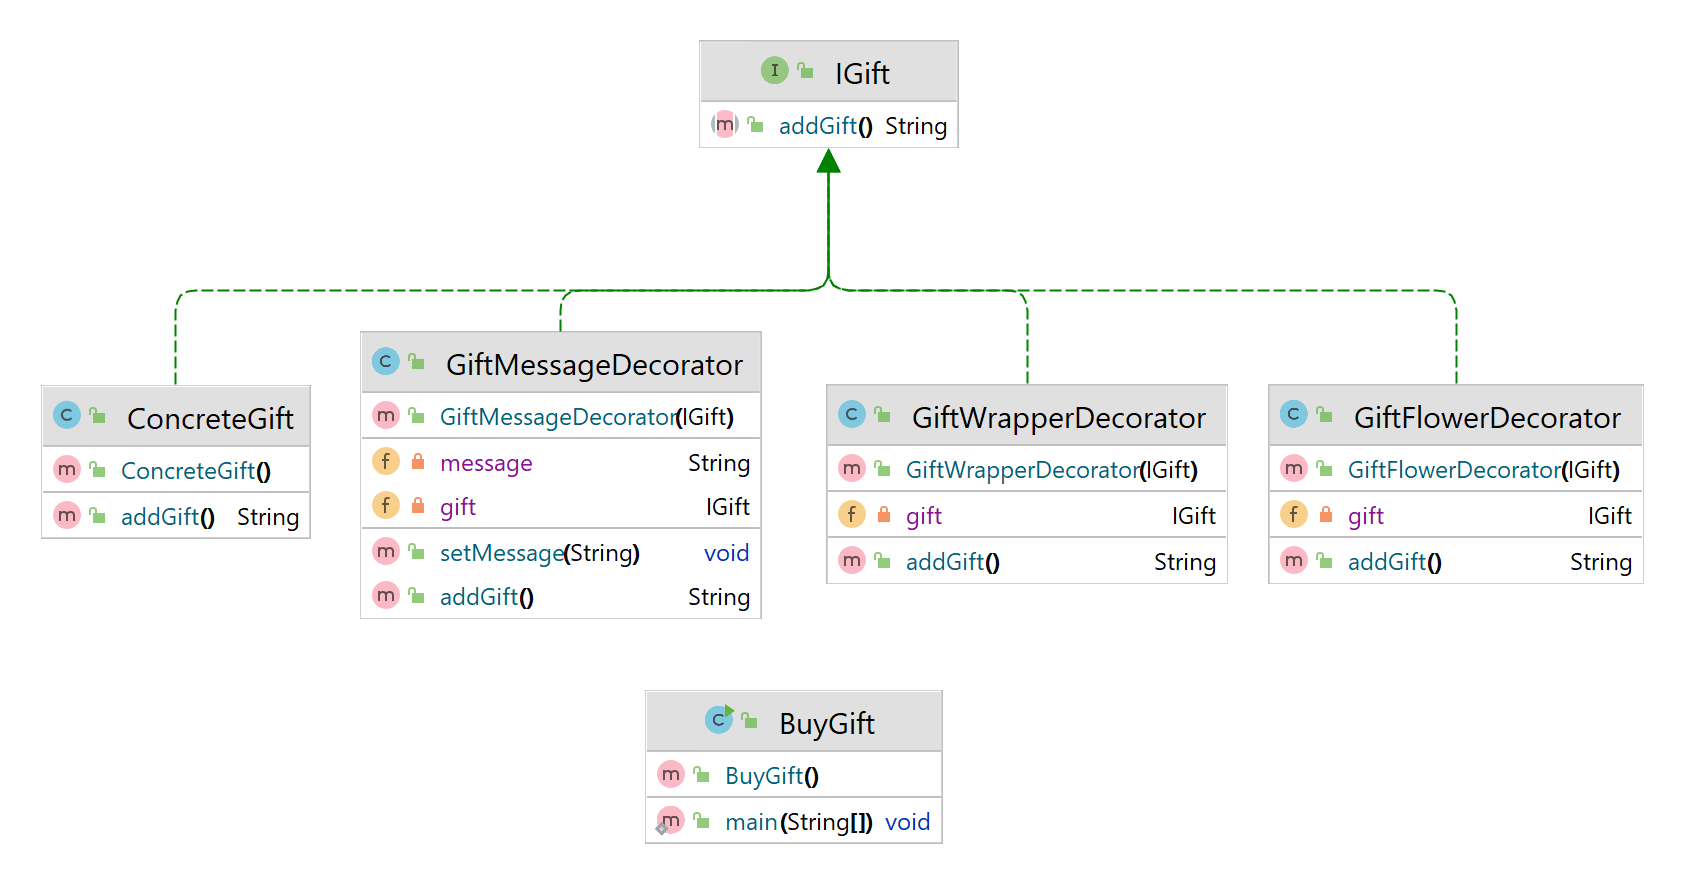
  1. Create a Interface and a concrete base class which implements Interface. This base class has only default constructor
  2. Create Concrete Decorator Classes which implements Interface. The Constructor of Decorator takes BaseDecorator class(vanilla Object) as argument
  3. The Decorator keeps appending the attributes and behavior to this Vanilla Object

IGift.java

public interface IGift {
    public String addGift();
}

ConcreteGift.java

public class ConcreteGift implements IGift{

    @Override
    public String addGift() {
        return "Gift Item to Cherish";
    }
}

GiftFlowerDecorator.java

public class GiftFlowerDecorator implements IGift{
    private IGift gift;

    public GiftFlowerDecorator(IGift gift) {
        this.gift = gift;
    }

    @Override
    public String addGift() {
        if(this.gift != null){
            return this.gift.addGift() + " with flowers";
        }

        return null;
    }
}

GiftMessageDecorator.java

public class GiftMessageDecorator implements IGift{
    private String message;
    private IGift gift;

    public GiftMessageDecorator(IGift gift){
        this.gift = gift;
    }

    public void setMessage(String message){
        this.message = message;
    }

    @Override
    public String addGift() {
        if (this.gift != null) {
            return this.gift.addGift() + this.message;
        }
        return null;
    }
}

GiftWrapperDecorator.java

public class GiftWrapperDecorator implements IGift{
    private IGift gift;

    public GiftWrapperDecorator(IGift gift) {
        this.gift = gift;
    }

    @Override
    public String addGift() {
        if(this.gift != null){
            return this.gift.addGift() + " and fully Wrapped";
        }

        return null;
    }
}

BuyGiftOnline.java

public class BuyGiftOnline {
    public static void main(String[] args) {
        IGift objGift = new ConcreteGift();
        System.out.println(objGift.addGift());

        GiftMessageDecorator objGiftMsgDec = new GiftMessageDecorator(objGift);
        objGiftMsgDec.setMessage(" with Message");
        System.out.println(objGiftMsgDec.addGift());

        GiftWrapperDecorator objWrapDec = new GiftWrapperDecorator(objGiftMsgDec);
        System.out.println(objWrapDec.addGift());

        GiftFlowerDecorator objFlowerDec = new GiftFlowerDecorator(objWrapDec);
        System.out.println(objFlowerDec.addGift());
    }
}

Output

Gift Item to Cherish
Gift Item to Cherish with Message
Gift Item to Cherish with Message and fully Wrapped
Gift Item to Cherish with Message and fully Wrapped with flowers

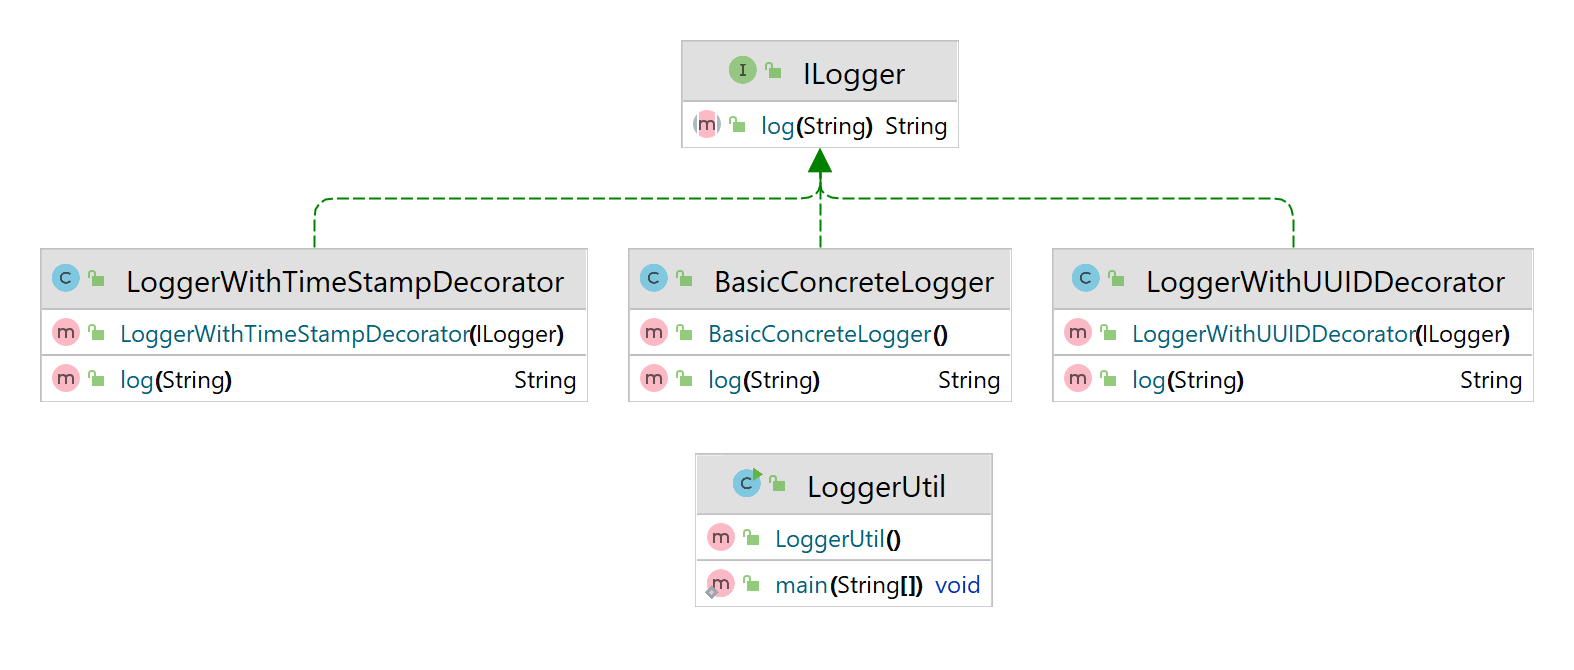
Below we have one more example of Decorator Pattern

ILogger.java

public interface ILogger {
    String log(String msg);
}

BasicConcreteLogger.java

public class BasicConcreteLogger implements ILogger{
    public BasicConcreteLogger() {
    }

    @Override
    public String log(String msg) {
        System.out.println(msg);
        return msg;
    }
}

LoggerWithTimeStampDecorator.java

public class LoggerWithTimeStampDecorator implements ILogger{
    ILogger logger;

    public LoggerWithTimeStampDecorator(ILogger logger) {
        this.logger = logger;
    }

    @Override
    public String log(String msg) {
        msg = msg + " TimeStamp:-"+ new java.util.Date();
        System.out.println(msg);
        return msg;
    }
}

LoggerWithUUIDDecorator.java

public class LoggerWithUUIDDecorator implements ILogger{
    ILogger logger;
    public LoggerWithUUIDDecorator(ILogger logger) {
        this.logger = logger;
    }

    @Override
    public String log(String msg) {
        msg = msg + " UUID:- "+ UUID.randomUUID().toString();
        System.out.println(msg);
        return msg;
    }
}

LoggerUtil.java

public class LoggerUtil {
    public static void main(String[] args) {
        BasicConcreteLogger objLogger = new BasicConcreteLogger();
        String msg = objLogger.log("Sample Log Message");

        LoggerWithTimeStampDecorator objLTS = new LoggerWithTimeStampDecorator(objLogger);
        msg = objLTS.log(msg);

        LoggerWithUUIDDecorator objUUID = new LoggerWithUUIDDecorator(objLogger);
        objUUID.log(msg);
    }
}

Output

Sample Log Message
Sample Log Message TimeStamp:-Sat Nov 09 13:44:31 IST 2024
Sample Log Message TimeStamp:-Sat Nov 09 13:44:31 IST 2024 UUID:- deacc0f1-8817-41c3-97d5-e05dd9909b57