| Annotation | Usage |
|---|---|
| @RequestMapping |
@RequestMapping(value = "/{name}",
                method = RequestMethod.GET,
                consumes="application/json"
                produces ="application/json",
                headers={"name=pankaj", "id=1"})
|
| path (or) (or) name (or) and value: which URL the method is mapped to method: compatible HTTP methods params: filters requests based on presence, absence, or value of HTTP parameters headers: filters requests based on presence, absence, or value of HTTP headers consumes: which media types the method can consume in the HTTP request body produces: which media types the method can produce in the HTTP response body |
|
| @RequestBody |
@RequestMapping(method = RequestMethod.POST)
@ResponseBody
public HttpStatus something(@RequestBody MyModel myModel)
{
    return HttpStatus.OK;
}
|
| with @RequestBody, Spring will bind the incoming HTTP request body(for the URL mentioned in @RequestMapping for that method) to that parameter. While doing that, Spring will [behind the scenes] use HTTP Message converters to convert the HTTP request body into domain object [deserialize request body to domain object], based on Accept header present in request. | |
| @ResponseBody |
@RequestMapping(value = "/user/all", method = RequestMethod.GET)
public @ResponseBody List<User> listAllUsers() {
    return userService.findAllUsers();
}
|
| with @ResponseBody, Spring will bind the return value to outgoing HTTP response body. While doing that, Spring will [behind the scenes] use HTTP Message converters to convert the return value to HTTP response body [serialize the object to response body], based on Content-Type present in request HTTP header | |
| @RequestParam |
http://localhost:8080/springmvc/hello/101?param1=10¶m2=20

public String getDetails(
    @RequestParam(value="param1", required=true) String param1,
        @RequestParam(value="param2", required=false) String param2){
...
}
|
| @RequestParam is to obtain an parameter from the URI as well.@RequestParam annotation used for accessing the query parameter values from the request defaultValue – This is the default value as a fallback mechanism if request is not having the value or it is empty. name – Name of the parameter to bind required – Whether the parameter is mandatory or not. If it is true, failing to send that parameter will fail. value – This is an alias for the name attribute |
|
| @PathVariable |
'http://localhost:8080/springmvc/hello/101?param1=10¶m2=20
@RequestMapping("/hello/{id}") public String getDetails(@PathVariable(value="id") String id,
@RequestParam(value="param1", required=true) String param1,
@RequestParam(value="param2", required=false) String param2){
.......
}
@GetMapping("/user/{firstName}/{lastName}")
@ResponseBody
public String handler(@MatrixVariable("firstName") String firstName,
@MatrixVariable("lastName") String lastName
) {
return "<br>Matxrix variable <br> "
+ "firstName =" + firstName +"<br>"
+ "lastName =" + lastName;
}
|
| @PathVariable is to obtain some placeholder from the URI @MatrixVariable – a name-value pair within a path segment is referred as matrix variable. Matrix variables can appear in any path segment, each variable separated with a semicolon (;) and multiple values are separated by comma (,) i.e. http://www.example.com/employee/Mike;salary=45000;dept=HR http://www.example.com/car/Audi;color=RED,BLACK,WHITE |
|
| @RequestHeader |
@Controller
public class HelloController {
 @RequestMapping(value = "/hello.htm")
 public String hello(
   @RequestHeader(value="Accept") String accept,
   @RequestHeader(value="Accept-Language") String acceptLanguage,
   @RequestHeader(value="User-Agent", defaultValue="foo") String userAgent,
   HttpServletResponse response) {

  System.out.println("accept: " + accept);
  System.out.println("acceptLanguage: " + acceptLanguage);
  System.out.println("userAgent: " + userAgent);

  return null;
 }
}
|
| Reading http requestheader is written in HelloController The advantage of using Spring @RequestHeader is that it will automatically throw an exception like HTTP Status 400 – Missing request header ‘X’ for method parameter of type, if the header is NOT sent in the input request (by setting required=true) @RequestHeader for facilitating use to get the header details easily in our controller class |
|
Author Archives: admin
Get vs Put vs Post vs Delete
GET
- GET is idempotent and can be requested any number of times
- GET requests can be cached, can be distributed & shared
- GET request is less secured compared to POST.
POST
- Used to Create a resource
- Post is not idempotent.x++ is not idempotent
- POST is NOT idempotent. So if you retry the request N times, you will end up having N resources with N different URIs created on server.
PUT
- Used to Create or Modify a resource
- PUT is idempotent, so if you PUT an object twice, it has no effect.
- x=5 is idempotent.You can PUT a resource whether it previously exists, or not (eg, to Create, or to Update)!
When to use Put and Post
You can use both PUT or POST for creating the resource until the client decides the resource location in the Server.But if the server decides the resource location using
POST /questions/HTTP/1.1 Host: www.example.com/
Note that the following is an error:
POST /questions/HTTP/1.1 Host: www.example.com/
If the URL is not yet created, you should not be using POST to create it while specifying the name. This should result in a ‘resource not found’ error because
You could though do something like this to create a resources using POST:
POST /questions HTTP/1.1
Host: www.example.com/
Note that in this case the resource name is not specified, the new objects URL path would be returned to you.
PUT is Used to create a resource, or overwrite it. While you specify the resources new URL.
PUT /questions/HTTP/1.1 Host: www.example.com/
To overwrite an existing resource:
PUT /questions/HTTP/1.1 Host: www.example.com/
PATCH
Patch request says that we would only send the data that we need to modify without modifying or effecting other parts of the data. Ex: if we need to update only the first name, we pass only the first name.PATCH – HTTP.PATCH can be used when the client is sending one or more changes to be applied by the server. The PATCH method requests that a set of changes described in the request entity be applied to the resource identified by the Request-URI. The set of changes is represented in a format called a patch document.
In PUT request, the enclosed entity would be considered as the modified version of a resource which residing on server and it would be replaced by this modified entity.
In PATCH request, enclosed entity contains the set of instructions that how the entity which residing on server, would be modified to produce a newer version.
DELETE
DELETE is pretty easy to understand. It is used to delete a resource identified by a URI.On successful deletion, return HTTP status 200 (OK) along with a response body, perhaps the representation of the deleted item (often demands too much bandwidth), or a wrapped response (see Return Values below). Either that or return HTTP status 204 (NO CONTENT) with no response body. In other words, a 204 status with no body, or the JSEND-style response and HTTP status 200 are the recommended responses.
Caching in REST API
- Caching is the ability to store copies of frequently accessed data in several places along the request-response path. When a consumer requests a resource representation, the request goes through a cache or a series of caches (local cache, proxy cache or reverse proxy) toward the service hosting the resource.
- If any of the caches along the request path has a fresh copy of the requested representation, it uses that copy to satisfy the request. If none of the caches can satisfy the request, the request travels all the way to the service (or origin server as it is formally known).
- Using HTTP headers, an origin server indicates whether a response can be cached and if so, by whom, and for how long. Caches along the response path can take a copy of a response, but only if the caching metadata allows them to do so.
- Few are the advantages of Caching
- Reduce bandwidth
- Reduce latency
- Reduce load on servers
- Hide network failures
- GET requests are cachable by default – until special condition arises. Usually, browsers treat all GET requests cacheable.
- POST requests are not cacheable by default but can be made cacheable if either an Expires header or a Cache-Control header with a directive, to explicitly allows caching, is added to the response. Responses to PUT and DELETE requests are not cacheable at all.
There are two main HTTP response headers that we can use to control caching behavior:
Expires : The Expires HTTP header specifies an absolute expiry time for a cached representation. Beyond that time, a cached representation is considered stale and must be re-validated with the origin server. To indicate that a representation never expires, a service can include a time up to one year in the future.
Expires: Wed, 6 March 2019 15:09:49 IST
Cache-Control:
The header value comprises one or more comma-separated directives. These directives determine whether a response is cacheable, and if so, by whom, and for how long e.g. max-age or s-maxage directives.
Cache-Control: max-age=3600
ETag: "abcd1234567n34jv"
(or)
Last-Modified: Fri, 10 May 2016 09:17:49 IST
Cacheable responses (whether to a GET or to a POST request) should also include a validator — either an ETag or a Last-Modified header.
ETag
An ETag value is an opaque string token that a server associates with a resource to uniquely identify the state of the resource over its lifetime. When the resource changes, the ETag changes accordingly.
Last-Modified
Whereas a response’s Date header indicates when the response was generated, the Last-Modified header indicates when the associated resource last changed. The Last-Modified value cannot be later than the Date value.
Custom Functional Interface definition using Lamdas
| Supplier |
Accounts.java
@FunctionalInterface
public interface Accounts{
  abstract String showAccountType();
}
AccountImpl.java
public class AccountImpl {
 public static void main(String[] args) {
  //Implementation of Custom Supplier Method for Accounts Interface
  Accounts squareRoot = () -> "Hi there";
  System.out.println(squareRoot.showAccountType());
 }
}
The above code could be expanded as below using Anonymous Inner Class
public class AccountImpl {
 public static void main(String[] args) {
  Accounts squareRoot = new Accounts() {
   @Override
   public String showAccountType() {
    return "Hi there";
   }
  };
  System.out.println(squareRoot.showAccountType());
 }
}
|
| Consumer |
Accounts.java
@FunctionalInterface
public interface Accounts {
 abstract void showAccountType(String strAccType);
}
AccountImpl.java
public class AccountImpl {
 public static void main(String[] args) {
  //Implementation of Custom Consumer Method for Accounts Interface
  Accounts squareRoot = (strAccType) -> System.out.println(strAccType);
  squareRoot.showAccountType("Savings");
 }
}
The above code could be expanded as below using Anonymous Inner Class
public class AccountImpl {
 public static void main(String[] args) {
  Accounts squareRoot = new Accounts() {
   @Override
   public void showAccountType(String strAccType) {
    System.out.println(strAccType);
   }
  };
 }
}
|
| Predicate |
Accounts.java
@FunctionalInterface
public interface Accounts{
  abstract boolean showAccountType(String accountType);
}
AccountImpl.java
public class AccountImpl {
 public static void main(String[] args) {
  //Implementation of Custom Predicate Method for Accounts Interface
  Accounts squareRoot = (accountType) -> {
   if ("Savings" == accountType)
    return true;
   else
    return false;
  };

  if (squareRoot.showAccountType("Savings"))
   System.out.println("Savings");
  else
   System.out.println("Invalid Account");
 }
}
The above code could be expanded as below using Anonymous Inner Class
public class AccountImpl {
 public static void main(String[] args) {
  Accounts squareRoot = new Accounts() {
   @Override
   public boolean showAccountType(String accountType) {
    if ("Savings" == accountType)
     return true;
    else
     return false;
   }
  };

  if (squareRoot.showAccountType("Savings"))
   System.out.println("Savings");
  else
   System.out.println("Invalid Account");
 }
}
|
| Function |
Accounts.java
@FunctionalInterface
public interface Accounts
{
 abstract String showAccountType(String accountType, String returnAccType);
}
AccountImpl.java
public class AccountImpl {
 public static void main(String[] args) {
  //Implementation of Custom Function Method for Accounts Interface
  Accounts squareRoot = (accountType, returnType) -> {
   if (accountType == "Savings")
    return "Credit";
   else
    return "Debit";
  };

  System.out.println(squareRoot.showAccountType("Savings", null));
 }
}
The above code could be expanded as below using Anonymous Inner Class
public class AccountImpl {
 public static void main(String[] args) {
  Accounts squareRoot = new Accounts() {
   @Override
   public String showAccountType(String accountType, String returnAccType) {

    if (accountType == "Savings")
     return "Credit";
    else
     return "Debit";
   }
  };

  System.out.println(squareRoot.showAccountType("Savings", null));
 }
}
|
| Urnary Operator |
Accounts.java
@FunctionalInterface
public interface Accounts{
 abstract String showAccountType(String accountType);
}
AccountImpl.java
public class AccountImpl {
 public static void main(String[] args) {
  //Implementation of Custom Operator Method for Accounts Interface
  Accounts squareRoot = (accountType) -> {
   return "AccountType is " + accountType;
  };
  squareRoot.showAccountType("Savings");
 }
}
The above code could be expanded as below using Anonymous Inner Class
public class AccountImpl {
 public static void main(String[] args) {
  Accounts squareRoot = new Accounts() {
   @Override
   public String showAccountType(String accountType) {
    return "AccountType is " + accountType;
   }
  };

  System.out.println(squareRoot.showAccountType("Savings"));
 }
}
|
What is Optional in Java 8
- Optional is a wrapper class which makes a field optional which means it may or may not have values.
- ptional as a single-value container that either contains a value or doesn’t (it is then said to be “empty”)
- The advantage compared to null references is that the Optional class forces you to think about the case when the value is not present. As a consequence, you can prevent unintended null pointer exceptions.
- The intention of the Optional class is not to replace every single null reference. Instead, its purpose is to help design more-comprehensible APIs so that by just reading the signature of a method, you can tell whether you can expect an optional value. This forces you to actively unwrap an Optional to deal with the absence of a value.
Lets take the below code
String version = computer.getSoundcard().getUSB().getVersion();
In the above piece of java code if any of the 3 values other the Version is NULL will throw a null pointer exception. To prevent this lets add a null check
String version = "UNKNOWN";
if(computer != null){
  Soundcard soundcard = computer.getSoundcard();
  if(soundcard != null){
    USB usb = soundcard.getUSB();
    if(usb != null){
      version = usb.getVersion();
    }
  }
}
Now the above code has become Clumsy with less readability and lot of boilerplate code has been added.
In languages like Groovy these conditions could be handles like one below
String version = computer?.getSoundcard()?.getUSB()?.getVersion();
(or)
String version =
    computer?.getSoundcard()?.getUSB()?.getVersion() ?: "UNKNOWN";
Now lets replace the above code with new Optional in Java 8
public class Computer {
  private Optional<Soundcard> soundcard;
  public Optional<Soundcard> getSoundcard() { ... }
  ...
}

public class Soundcard {
  private Optional<USB> usb;
  public Optional<USB> getUSB() { ... }

}

public class USB{
  public String getVersion(){ ... }
}
The advantage compared to null references is that the Optional class forces you to think about the case when the value is not present. As a consequence, you can prevent unintended null pointer exceptions.
What is the Point of Optional when the same could be done using NULL Check?
If you are doing NULL check the traditional way there would be no much difference. However, the difference is felt when you are carrying out chaining operations in streams and the datatypes returned are optional.The difference may not be significant in this case but as the chain of objects increases e.g. person.getAddress.getCity().getStreet().getBlock(),
Methods in Optional
get()
If a value is present in this Optional, returns the value, otherwise throws NoSuchElementException
void ifPresent(Consumer consumer)
If a value is present, it invokes the specified consumer with the value, otherwise does nothing.
boolean isPresent()
Returns true if there is a value present, otherwise false.
static
Returns an Optional describing the specified value, if non-null, otherwise returns an empty Optional.
T orElse(T other)
Returns the value if present, otherwise returns other.
T orElseGet(Supplier other)
Returns the value if present, otherwise invokes other and returns the result of that invocation.
orElseThrow(Supplier exceptionSupplier)
Returns the contained value, if present, otherwise throws an exception to be created by the provided supplier.
Lets take a simple example where Optional returns Empty or Value based on some Condition
package com.example.demo;
import java.util.Optional;
public class Test {

 public static void main(String[] args) {
  //IfPresent
  Optional < String > strOpt = getName(" Piggy");
  System.out.print("First Call -");
  strOpt.ifPresent(System.out::println);


  Optional < String > strOpt2 = getName("");
  System.out.print("Second Call -");
  strOpt2.ifPresent(System.out::println);

  System.out.println();

  //IsPresent and get
  Optional < String > strOpt3 = getNewName(" Biggy");
  System.out.print("Third Call -");

  if (strOpt3.isPresent())
   System.out.println(strOpt3.get());


  //orElse
  Optional < String > strOpt4 = getNewName(null);
  System.out.print("Fourth Call -");
  System.out.println(strOpt4.orElse(" Hippi"));


 }

 public static Optional < String > getName(String strName) {
  if (strName.length() > 0)
   return Optional.of(strName);
  else
   return Optional.empty();
 }

 public static Optional < String > getNewName(String strName) {
  //Optional strNewName = (strName!=null)?Optional.of(strName):Optional.empty();
  return Optional.ofNullable(strName);
 }
}
Output
First Call - Piggy
Second Call -
Third Call - Biggy
Fourth Call - Hippi
How @RequestBody and @ResponseBody Works
@RequestBody, spring will try to convert the content of the incoming request body to your parameter object on the fly.@ResponseBody, spring will try to convert its return value and write it to the http response automatically
@Controller
@RequestMapping(value = "/bookcase")
public class BookCaseController
{
    private BookCase bookCase;

    @RequestMapping(method = RequestMethod.GET)
    @ResponseBody
    public BookCase getBookCase() {
        return this.bookCase;
    }

    @RequestMapping(method = RequestMethod.PUT)
    @ResponseStatus(HttpStatus.NO_CONTENT)
    public void setBookCase(@RequestBody BookCase bookCase) {
        this.bookCase = bookCase;
    }
}
Depending on your configuration, spring has a list of HttpMessageConverters registered in the background. A HttpMessageConverters responsibility is to convert the request body to a specific class and back to the response body again, depending on a predefined mime type. Every time an issued request is hitting a @RequestBody or @ResponseBody annotation spring loops through all registered HttpMessageConverters seeking for the first that fits the given mime type and class and then uses it for the actual conversion.
Refer here
Bean definition to Spring Container
A Bean definition contains the following piece of information called configuration metadata, which helps the container know the following things.
• The way a bean should be created.
• Life cycle details of a bean.
• Associated Bean dependencies.
The above metadata for the bean configuration is provided as a set of properties or attributes in an XML file (configuration file) which together prepare a bean definition. The following are the set of properties.
| Properties | Usage |
|---|---|
| class | In a bean definition, it is a mandatory attribute. It is used to specify the bean class which can be used by the container to create the bean. |
| name | In a bean definition, this attribute is used to specify the bean identifier uniquely. In XML based configuration metadata for a bean, we use the id and/or name attributes in order to specify the bean identifier(s). |
| scope | This attribute is used to specify the scope of the objects which are created from a particular bean definition. |
| constructor-arg | In a bean definition, this attribute is used to inject the dependencies. |
| properties | In a bean definition, this attribute is used to inject the dependencies. |
| autowiring mode | In a bean definition, this attribute is used to inject the dependencies. |
| lazy-initialization mode | In a bean definition, a lazy-initialized bean informs the IoC container to create a bean instance only when it is first requested, instead of startup. |
| initialization method | In a bean definition, a callback to be called after all required properties on the bean have been set up by the container. |
| destruction method | In a bean definition, a callback to be used when the container that contains the bean is destroyed. |
In the following example, we are going to look into an XML based configuration file which has different bean definitions. The definitions include lazy initialization (lazy-init), initialization method (init-method), and destruction method (destroy-method) as shown below. This configuration metadata file can be loaded either through BeanFactory or ApplicationContext
<?xml version = "1.0" encoding = "UTF-8"?>

<beans xmlns = "http://www.springframework.org/schema/beans"
   xmlns:xsi = "http://www.w3.org/2001/XMLSchema-instance"
   xsi:schemaLocation = "http://www.springframework.org/schema/beans
   http://www.springframework.org/schema/beans/spring-beans-3.0.xsd">

   <!-- A simple bean definition -->
   <bean id = "..." class = "...">
      <!— Here will be collaborators and configuration for this bean -->
   </bean>

   <!-- A bean definition which has lazy init set on -->
   <bean id = "..." class = "..." lazy-init = "true">
      <!-- Here will be collaborators and configuration for this bean -->
   </bean>

   <!-- A bean definition which has initialization method -->
   <bean id = "..." class = "..." init-method = "...">
      <!-- Here will be collaborators and configuration for this bean -->
   </bean>

   <!-- A bean definition which has destruction method -->
   <bean id = "..." class = "..." destroy-method = "...">
      <!-- collaborators and configuration for this bean go here -->
   </bean>

   <!-- more bean definitions can be written below -->

</beans>
Method References in Java
Method reference is used to refer method of functional interface. It is compact and easy form of lambda expression. Each time when you are using lambda expression to just referring a method, you can replace your lambda expression with method reference.
3 types of method references:
- Reference to a static method
- Reference to an instance method
- Reference to a constructor
Reference to a static method
Syntax
ClassName::MethodName
import java.util.function.BiFunction;
class Arithmetic
 {
 public static int add(int a, int b)
 {
  return a + b;
 }
}
public class MethodReference
{
 public static void main(String[] args)
 {
  BiFunction < Integer, Integer, Integer > adder = Arithmetic::add;
  int result = adder.apply(10, 20);
  System.out.println(result);
 }
}
Reference to an instance method
Syntax
Object::methodName
import java.util.function.BiFunction;
class Arithmetic
 {
 public int add(int a, int b)
 {
  return a + b;
 }
}
public class MethodReference
{
 public static void main(String[] args)
 {
  Arithmetic objArithmetic = new Arithmetic();
  BiFunction < Integer, Integer, Integer > adder = objArithmetic::add;
  int result = adder.apply(10, 20);
  System.out.println(result);
 }
}
Reference to a constructor
Syntax
ClassName::new
interface Messageable {
 Message getMessage(String msg);
}
class Message {
 Message(String msg) {
  System.out.print(msg);
 }
}
public class ConstructorReference {
 public static void main(String[] args) {
  Messageable hello = Message::new;
  hello.getMessage("Hello");
 }
}
Spring Interview Questions
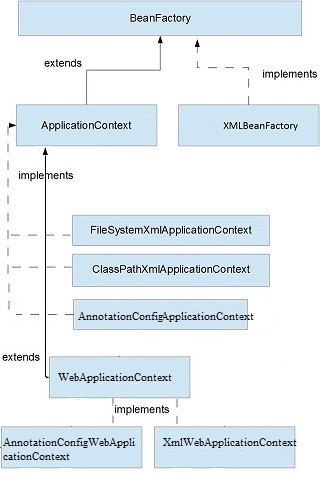
Q1.What is the Difference between applicationContext and BeanFactory?
ApplicationContext is more feature rich container implementation and should be favored over BeanFactory.Both BeanFactory and ApplicationContext provides a way to get a bean from Spring IOC container by calling getBean(“bean name”)
- Bean factory instantiate bean when you call getBean() method while ApplicationContext instantiates Singleton bean when the container is started, It doesn’t wait for getBean to be called.
- BeanFactory provides basic IOC and DI features while ApplicationContext provides advanced features
- ApplicationContext is ability to publish event to beans that are registered as listener.
- implementation of BeanFactory interface is XMLBeanFactory while one of the popular implementation of ApplicationContext interface is ClassPathXmlApplicationContext.In web application we use we use WebApplicationContext which extends ApplicationContext interface and adds getServletContext method
- ApplicationContext provides Bean instantiation/wiring,Automatic BeanPostProcessor registration, Automatic BeanFactoryPostProcessor registration,Convenient MessageSource access and ApplicationEvent publication whereas BeanFactory provides only Bean instantiation/wiring
Q2.What is the Difference between Component and Bean?
- @Component auto detects and configures the beans using classpath scanning whereas @Bean explicitly declares a single bean, rather than letting Spring do it automatically.
- @Component does not decouple the declaration of the bean from the class definition where as @Bean decouples the declaration of the bean from the class definition.
- @Component is a class level annotation where as @Bean is a method level annotation and name of the method serves as the bean name.
- @Component need not to be used with the @Configuration annotation where as @Bean annotation has to be used within the class which is annotated with @Configuration.
- We cannot create a bean of a class using @Component, if the class is outside spring container whereas we can create a bean of a class using @Bean even if the class is present outside the spring container.
- @Component has different specializations like @Controller, @Repository and @Service whereas @Bean has no specializations.
@Component (and @Service and @Repository) are used to auto-detect and auto-configure beans using classpath scanning. There’s an implicit one-to-one mapping between the annotated class and the bean (i.e. one bean per class). Control of wiring is quite limited with this approach since it’s purely declarative.
@Bean is used to explicitly declare a single bean, rather than letting Spring do it automatically as above. It decouples the declaration of the bean from the class definition and lets you create and configure beans exactly how you choose.
Let’s imagine that you want to wire components from 3rd-party libraries (you don’t have the source code so you can’t annotate its classes with @Component), where an automatic configuration is not possible.The @Bean annotation returns an object that spring should register as a bean in the application context. The body of the method bears the logic responsible for creating the instance.
@Bean is applicable to methods, whereas @Component is applicable to types
Q3.What is the difference between @Configuration and @Component in Spring?
@Configuration Indicates that a class declares one or more @Bean methods and may be processed by the Spring container to generate bean definitions and service requests for those beans at runtime
@Component Indicates that an annotated class is a “component”. Such classes are considered as candidates for auto-detection when using annotation-based configuration and classpath scanning.
@Configuration is meta-annotated with @Component, therefore @Configuration classes are candidates for component scanning
Q4.Life cycle of Spring Bean
- There are five methods called before bean comes to ready state
- BeanPostProcessor method – postProcessBeforeInitilaization and postProcessAfterInitilaization would be called between init method(3 methods)
- After postProcessBeforeInitilaization @postContruct and afterPropertiesSet method would be called(2 methods)
- Bean comes to Ready state
- Once Spring shutdown is called @PreDestroy, destroy() and custom destroy method are called(3 methods)
Refer here
Q5.What is CGLIB in Spring?
Classes in Java are loaded dynamically at runtime. Cglib is using this feature of Java language to make it possible to add new classes to an already running Java program.Hibernate uses cglib for generation of dynamic proxies. For example, it will not return full object stored in a database but it will return an instrumented version of stored class that lazily loads values from the database on demand.Popular mocking frameworks, like Mockito, use cglib for mocking methods. The mock is an instrumented class where methods are replaced by empty implementations.
Q6.What is the difference between applicationcontext and webapplicationcontext in Spring?
- Spring MVC has ApplicationContext and WebApplicationContexts which is the extension of ApplicationContext
- There could be more than one WebApplicationContext
- All the Stateless attributes like DBConnections and Spring Security would be defined in ApplicationContext and shared among multiple WebApplicationContext
- ApplicationContext are loaded by ContextLoaderListener which is declared in web.xml
- A single web application can have multiple WebApplicationContext and each Dispatcher servlet (which is the front controller of Spring MVC architecture) is associated with a WebApplicationContext. The webApplicationContext configuration file *-servlet.xml is specific to a DispatcherServlet. And since a web application can have more than one dispatcher servlet configured to serve multiple requests, there can be more than one webApplicationContext file per web application.
Refer here
Q7.What are different bean scopes with realtime example?
Singleton: It returns a single bean instance per Spring IoC container.This single instance is stored in a cache of such singleton beans, and all subsequent requests and references for that named bean return the cached object. If no bean scope is specified in the configuration file, singleton is default. Real world example: connection to a database
Prototype: It returns a new bean instance each time it is requested. It does not store any cache version like singleton. Real world example: declare configured form elements (a textbox configured to validate names, e-mail addresses for example) and get “living” instances of them for every form being created.Batch processing of data involves prototype scope beans.
Request: It returns a single bean instance per HTTP request. Real world example: information that should only be valid on one page like the result of a search or the confirmation of an order. The bean will be valid until the page is reloaded.
Session: It returns a single bean instance per HTTP session (User level session). Real world example: to hold authentication information getting invalidated when the session is closed (by timeout or logout). You can store other user information that you don’t want to reload with every request here as well.
GlobalSession: It returns a single bean instance per global HTTP session. It is only valid in the context of a web-aware Spring ApplicationContext (Application level session). It is similar to the Session scope and really only makes sense in the context of portlet-based web applications. The portlet specification defines the notion of a global Session that is shared among all of the various portlets that make up a single portlet web application. Beans defined at the global session scope are bound to the lifetime of the global portlet Session.
Q8.What is Portlet application?what is the difference between a portlet and a servlet?
Servlets and Portlets are web based components which use Java for their implementation.Portlets are managed by a portlet container just like servlet is managed by servlet container.
When your application works in Portlet container it is built of some amount of portlets. Each portlet has its own session, but if your want to store variables global for all portlets in your application than you should store them in globalSession. This scope doesn’t have any special effect different from session scope in Servlet based applications.
The simplest way to think of this is that a servlet renders an entire web page, and a portlet renders a specific rectangular part (subsection) of a web page. For example, the advertising bar on the right hand side of a news page could be rendered as a portlet. But you wouldn’t implement a single edit field as a portlet, because that’s too granular. Basically if you break down a web page into it’s major sectional areas, those are good candidates to make into portlets. Portlet never renders complete web page with html start and end tags but part of page.
Spring bean life Cycle
Spring Bean life Cycle is hooked to the below 4 interfaces Methods
- InitializingBean and DisposableBean callback interfaces
- *Aware interfaces for specific behavior
- Custom init() and destroy() methods in bean configuration file
- @PostConstruct and @PreDestroy annotations
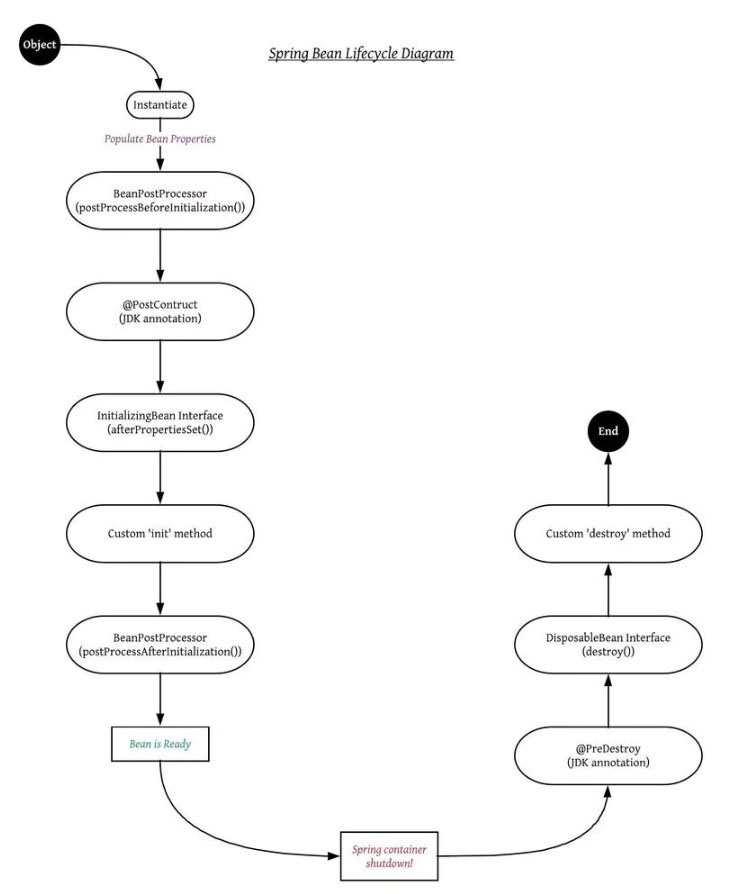
InitializingBean and DisposableBean callback interfaces
InitializingBean and DisposableBean are two marker interfaces, a useful way for Spring to perform certain actions upon bean initialization and destruction.
- For bean implemented InitializingBean, it will run afterPropertiesSet() after all bean properties have been set.
- For bean implemented DisposableBean, it will run destroy() after Spring container is released the bean.
Custom init() and destroy() methods in bean configuration file
Using init-method and destroy-method as attribute in bean configuration file for bean to perform certain actions upon initialization and destruction.
@PostConstruct and @PreDestroy annotations
We can manage lifecycle of a bean by using method-level annotations @PostConstruct and @PreDestroy.
The @PostConstruct annotation is used on a method that needs to be executed after dependency injection is done to perform any initialization.
The @PreDestroy annotation is used on methods as a callback notification to signal that the instance is in the process of being removed by the container.
@PostConstruct vs init-method vs afterPropertiesSet
There is any difference but there are priorities in the way they work. @PostConstruct, init-method.@PostConstruct is a JSR-250 annotation while init-method is Spring’s way of having an initializing method.If you have a @PostConstruct method, this will be called first before the initializing methods are called. If your bean implements InitializingBean and overrides afterPropertiesSet, first @PostConstruct is called, then the afterPropertiesSet and then init-method.
@Component
public class MyComponent implements InitializingBean {

	@Value("${mycomponent.value:Magic}")
	public String value;

	public MyComponent() {
		log.info("MyComponent in constructor: [{}]", value); // (0) displays: Null [properties not set yet]
	}

	@PostConstruct
	public void postConstruct() {
		log.info("MyComponent in postConstruct: [{}]", value); // (1) displays: Magic
	}

	@Override // (equivalent to init-method in XML; overrides InitializingBean.afterPropertiesSet()
	public void afterPropertiesSet() {
		log.info("MyComponent in afterPropertiesSet: [{}]", value);  // (2) displays: Magic
	}

        public void initIt() throws Exception {
	  log.info("MyComponent in init: " + value);
	}

	@PreDestroy
	public void preDestroy() {
		log.info("MyComponent in preDestroy: [{}], self=[{}]", value); // (3) displays:
	}

        public void cleanUp() throws Exception {
	  log.info("Spring Container is destroy! Customer clean up");
	}
}
Spring.xml
<beans xmlns="http://www.springframework.org/schema/beans"
	xmlns:xsi="http://www.w3.org/2001/XMLSchema-instance"
	xsi:schemaLocation="http://www.springframework.org/schema/beans
	http://www.springframework.org/schema/beans/spring-beans-2.5.xsd">
	<bean id="customerService" class="com.mkyong.customer.services.CustomerService"
		init-method="initIt" destroy-method="cleanUp">
		<property name="message" value="i'm property message" />
	</bean>
</beans>
Output
MyComponent in constructor: [null]
MyComponent in postConstruct: [Magic]
MyComponent in init: [Magic from XML]
MyComponent in afterPropertiesSet: [Magic]
MyComponent in preDestroy: [Magic]
Spring Container is destroy! Customer clean up
When to use what?
init-method and destroy-method is the recommended approach because of no direct dependency to Spring Framework and we can create our own methods.
InitializingBean and DisposableBean To interact with the container’s management of the bean lifecycle, you can implement the Spring InitializingBean and DisposableBean interfaces. The container calls afterPropertiesSet() for the former and destroy() for the latter to allow the bean to perform certain actions upon initialization and destruction of your beans.
@PostConstruct and @PreDestroy – The JSR-250 @PostConstruct and @PreDestroy annotations are generally considered best practice for receiving lifecycle callbacks in a modern Spring application. Using these annotations means that your beans are not coupled to Spring specific interfaces.