1.What is the Default Size and Capacity of ArrayList in Java 8?What is the Maximum Size of ArrayList?
Size is the number of elements you have placed into the arrayList while capacity is the max number of elements the arrayList can take. Once you’ve reached max, the capacity is doubled.The initial List size is zero (unless you specify otherwise).However the initial capacity of ArrayList is 10.The size of the list is the number of elements in it. The capacity of the list is the number of elements the backing data structure can hold at this time. The size will change as elements are added to or removed from the list. The capacity will change when the implementation of the list you’re using needs it to. (The size, of course, will never be bigger than the capacity.)
When it has to grow, this is used:
int newCapacity = oldCapacity + (oldCapacity >> 1)
oldCapacity >> 1 is division by two, so it grows by 1.5
int newCapacity = oldCapacity + (oldCapacity >> 1);
int newCapacity = oldCapacity + 0.5*oldCapacity;
int newCapacity = 1.5*oldCapacity ;
Maximum Size of ArrayList
It would depend on the implementation, but the limit is not defined by the List interface.An ArrayList can’t hold more than Integer.MAX_VALUE elements
2.Difference is between a fixed size container (data structure) and a variable size container.
An array is a fixed size container, the number of elements it holds is established when the array is created and never changes. (When the array is created all of those elements will have some default value, e.g., null for reference types or 0 for ints, but they’ll all be there in the array: you can index each and every one.)
A list is a variable size container, the number of elements in it can change, ranging from 0 to as many as you want (subject to implementation limits). After creation the number of elements can either grow or shrink. At all times you can retrieve any element by its index.
List is actually an interface and it can be implemented in many different ways. Thus, ArrayList, LinkedList, etc. There is a data structure “behind” the list to actually hold the elements. And that data structure itself might be fixed size or variable size, and at any given time might have the exact size of the number of elements in the list, or it might have some extra “buffer” space.The LinkedList, for example, always has in its underlying data structure exactly the same number of “places for elements” as are in the list it is representing. But the ArrayList uses a fixed length array as its backing store.
3.How to create a Synchronized ArrayList
There are two ways to Synchronize ArrayList
- Collections.synchronizedList() method – It returns synchronized list backed by the specified list.
- CopyOnWriteArrayList class – It is a thread-safe variant of ArrayList.It achieves thread-safety by creating a separate copy of List which is a is different way than vector or other collections use to provide thread-safety
More here
4.Why to use arrayList when vector is synchronized?
Vector synchronizes at the level of each individual operation. Generally a programmer like to synchronize a whole sequence of operations. Synchronizing individual operations is both less safe and slower.Vectors are considered obsolete an d unofficially deprecated in java.
5.Difference between CopyOnWriteArrayList and synchronizedList
Both synchronizedList and CopyOnWriteArrayList take a lock on the entire array during write operations.The difference emerges if you look at other operations, such as iterating over every element of the collection. The documentation for Collections.synchronizedList says It is imperative that the user manually synchronize on the returned list when iterating over it.Failure to follow this advice may result in non-deterministic behavior.
 List list = Collections.synchronizedList(new ArrayList());
    ...
    synchronized (list) {
        Iterator i = list.iterator(); // Must be in synchronized block
        while (i.hasNext())
            foo(i.next());
    }
Iterating over a synchronizedList is not thread-safe unless you do locking manually. Note that when using this technique, all operations by other threads on this list, including iterations, gets, sets, adds, and removals, are blocked. Only one thread at a time can do anything with this collection.
CopyOnWriteArrayList uses “snapshot” style iterator method uses a reference to the state of the array at the point that the iterator was created. This array never changes during the lifetime of the iterator, so interference is impossible and the iterator is guaranteed not to throw ConcurrentModificationException. The iterator will not reflect additions, removals, or changes to the list since the iterator was created. “snapshot” style iterator method uses a reference to the state of the array at the point that the iterator was created. This array never changes during the lifetime of the iterator, so interference is impossible and the iterator is guaranteed not to throw ConcurrentModificationException. The iterator will not reflect additions, removals, or changes to the list since the iterator was created.
Operations by other threads on this list can proceed concurrently, but the iteration isn’t affected by changes made by any other threads. So, even though write operations lock the entire list, CopyOnWriteArrayList still can provide higher throughput than an ordinary synchronizedList.
6.What is Functional Interface?What are the rules to define a Functional Interface?Is it Mandatory to define @FunctionalInterface annotation?
Functional Interface also know as Single Abstract Method(SAM) interface contains one and only one abstract method. @FunctionalInterface is not amndatory but tells other developers the interface is Functional and prevents them from adding anymore methods to it.We can have any number of Default methods and Static methods.Overridding methods in java.lang.object such as equals and hashcode doesnot count as an abstract method. More here
7.Difference between Streams and Collections?
| Stream |
Collections |
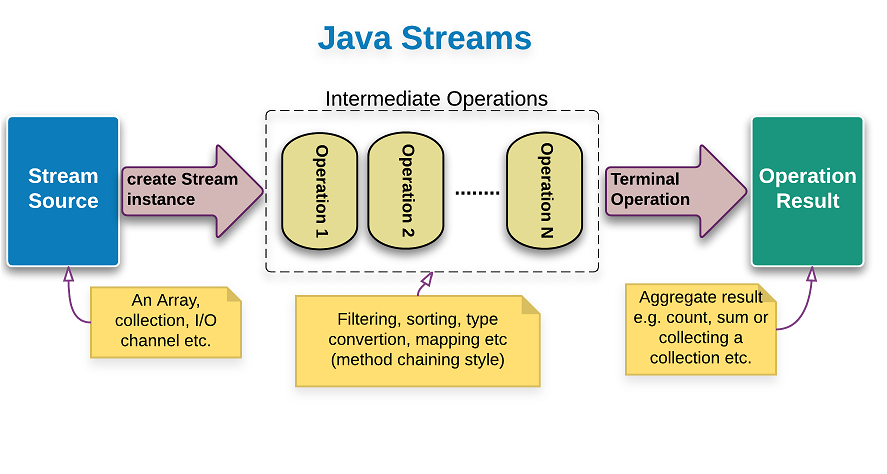
| A stream is not a data structure that stores elements; instead, it conveys elements from a source such as a data structure, an array, a generator function, or an I/O channel, through a pipeline of computational operations. |
Collection is a Datastructure |
| An operation on a stream produces a result, but does not modify its source. For example, filtering a Stream obtained from a collection produces a new Stream without the filtered elements, rather than removing elements from the source collection. |
Operation on collection will have direct impact on collection object itself |
| Streams are based on ‘process-only, on-demand’ strategy.Many stream operations, such as filtering, mapping, or duplicate removal, can be implemented lazily, exposing opportunities for optimization. Stream operations are divided into intermediate (Stream-producing) operations and terminal (value- or side-effect-producing) operations. Intermediate operations are always lazy. |
All Data Values in collections are processed in single shot |
| Stream acts upon infinite set of Values i.e. infinite stream |
Collections always act upon finite set of Data |
| The elements of a stream are only visited once during the life of a stream. Like an Iterator, a new stream must be generated to revisit the same elements of the source. |
Collections can be iterated any number of Times |
8.How do I read / convert an InputStream into a String in Java?
Using Apache commons IOUtils to copy the InputStream into a StringWriter
StringWriter writer = new StringWriter();
IOUtils.copy(inputStream, writer, encoding);
String theString = writer.toString();
String theString = IOUtils.toString(inputStream, encoding);
Using only the standard Java library
static String convertStreamToString(java.io.InputStream is) {
    java.util.Scanner s = new java.util.Scanner(is).useDelimiter("\\A");
    return s.hasNext() ? s.next() : "";
}
Scanner iterates over tokens in the stream, and in this case we separate tokens using “beginning of the input boundary” (\A), thus giving us only one token for the entire contents of the stream.
9.How do I convert a String to an InputStream in Java?
InputStream stream = new ByteArrayInputStream(exampleString.getBytes(StandardCharsets.UTF_8));
Using Apache Commons IO
String source = "This is the source of my input stream";
InputStream in = org.apache.commons.io.IOUtils.toInputStream(source, "UTF-8");
Using StringReader
String charset = ...; // your charset
byte[] bytes = string.getBytes(charset);
ByteArrayInputStream bais = new ByteArrayInputStream(bytes);
InputStreamReader isr = new InputStreamReader(bais);
10.Difference between hashtable and hashmap?
Click here
11.What is exception-masking?
When code in a try block throws an exception, and the close method in the finally also throws an exception, the exception thrown by the try block gets lost and the exception thrown in the finally gets propagated. This is usually unfortunate, since the exception thrown on close is something unhelpful while the useful exception is the informative one. Using try-with-resources to close your resources will prevent any exception-masking from taking place.
11.Try With Resources vs Try-Catch
- The main point of try-with-resources is to make sure resources are closed, without requiring the application code to do it.
- when there are situations where two independent exceptions can be thrown in sibling code blocks, in particular in the try block of a try-with-resources statement and the compiler-generated finally block which closes the resource. In these situations, only one of the thrown exceptions can be propagated. In the try-with-resources statement, when there are two such exceptions, the exception originating from the try block is propagated and the exception from the finally block is added to the list of exceptions suppressed by the exception from the try block. As an exception unwinds the stack, it can accumulate multiple suppressed exceptions.
- On the other hand if your code completes normally but the resource you’re using throws an exception on close, that exception (which would get suppressed if the code in the try block threw anything) gets thrown. That means that if you have some JDBC code where a ResultSet or PreparedStatement is closed by try-with-resources, an exception resulting from some infrastructure glitch when a JDBC object gets closed can be thrown and can rollback an operation that otherwise would have completed successfully.
12.How to get Suppressed Exceptions?
only one exception can be thrown by a method (per execution) but it is possible, in the case of a try-with-resources, for multiple exceptions to be thrown. For instance one might be thrown in the block and another might be thrown from the implicit finally provided by the try-with-resources.The compiler has to determine which of these to “really” throw. It chooses to throw the exception raised in the explicit code (the code in the try block) rather than the one thrown by the implicit code (the finally block). Therefore the exception(s) thrown in the implicit block are suppressed (ignored). This only occurs in the case of multiple exceptions.
The try-catch-resource block does expose the suppressed exception using the new (since Java 1.7) getSuppressed() method. This method returns all of the suppressed exceptions by the try-catch-resource block (notice that it returns ALL of the suppressed exceptions if more than one occurred). A caller might use the following structure to reconcile with existing behavior
try {
  testJava7TryCatchWithExceptionOnFinally(); //Method throws exception in both try and finally block
} catch (IOException e) {
  Throwable[] suppressed = e.getSuppressed();
    for (Throwable t : suppressed) {
    // Check T's type and decide on action to be taken
  }
}
13.How do you avoid fuzzy try-catch blocks in code like one below?
try{
     ...
     stmts
     ...
}
catch(Exception ex) {
     ...
     stmts
     ...
} finally {
     connection.close // throws an exception
}
Write a SQLUtils class that contains static closeQuietly methods that catch and log such exceptions, then use as appropriate.
public class SQLUtils
{
  private static Log log = LogFactory.getLog(SQLUtils.class);

  public static void closeQuietly(Connection connection)
  {
    try
    {
      if (connection != null)
      {
        connection.close();
      }
    }
    catch (SQLExcetpion e)
    {
      log.error("An error occurred closing connection.", e);
    }
  }

  public static void closeQuietly(Statement statement)
  {
    try
    {
      if (statement!= null)
      {
        statement.close();
      }
    }
    catch (SQLExcetpion e)
    {
      log.error("An error occurred closing statement.", e);
    }
  }

  public static void closeQuietly(ResultSet resultSet)
  {
    try
    {
      if (resultSet!= null)
      {
        resultSet.close();
      }
    }
    catch (SQLExcetpion e)
    {
      log.error("An error occurred closing result set.", e);
    }
  }
}
and
Connection connection = null;
Statement statement = null;
ResultSet resultSet = null;
try
{
  connection = getConnection();
  statement = connection.prepareStatement(...);
  resultSet = statement.executeQuery();

  ...
}
finally
{
  SQLUtils.closeQuietly(resultSet);
  SQLUtils.closeQuietly(statment);
  SQLUtils.closeQuietly(connection);
}
14.What is Difference between Iterator and Split Iterator
A Spliterator can be used to split given element set into multiple sets so that we can perform some kind of operations/calculations on each set in different threads independently, possibly taking advantage of parallelism. It is designed as a parallel analogue of Iterator. Other than collections, the source of elements covered by a Spliterator could be, for example, an array, an IO channel, or a generator function.
There are 2 main methods in the Spliterator interface.
- tryAdvance()- With tryAdvance(), we can traverse underlying elements one by one (just like Iterator.next()). If a remaining element exists, this method performs the consumer action on it, returning true; else returns false.
- forEachRemaining() -For sequential bulk traversal we can use forEachRemaining()
A Spliterator is also a “smarter” Iterator, via it’s internal properties like DISTINCT or SORTED, etc (which you need to provide correctly when implementing your own Spliterator). These flags are used internally to disable unnecessary operations, also called optimizations, like this one for example:
someStream().map(x -> y).count();
Because size does not change in case of the stream, the map can be skipped entirely, since all we do is counting.
You can create a Spliterator around an Iterator if you would need to, via:
Spliterators.spliteratorUnknownSize(yourIterator, properties)
15.What is Type Inference?
Type Inference means determining the Type by compiler at compile-time.It is not new feature in Java SE 8. It is available in Java 7 and before Java 7 too.Java 8 uses Type inference for calling lambda expressions. Refer here
16.What is Optional in Java 8? What is the use of Optional?Advantages of Java 8 Optional?
Optional is a final Class introduced as part of Java SE 8. It is defined in java.util package.It is used to represent optional values that is either exist or not exist. It can contain either one value or zero value. If it contains a value, we can get it. Otherwise, we get nothing.It is a bounded collection that is it contains at most one element only. It is an alternative to “null” value.
17.What is difference between initialization and instantiation?
instantiation – This is when memory is allocated for an object. This is what the new keyword is doing. A reference to the object that was created is returned from the new keyword.
initialization – This is when values are put into the memory that was allocated. This is what the Constructor of a class does when using the new keyword.A variable must also be initialized by having the reference to some object in memory passed to it.
Refer here
18.What are different Method References in Java?
- Reference to a static method – ClassName::MethodName
- Reference to an instance method – Object::methodName
- Reference to a constructor – ClassName::new
Refer Here
19.What are the difference between predicate and function?
Predicate interface has an abstract method test(T t) which has a Boolean return type. Usage, when we need to return/check the condition as True or False. It is best suited to code.
Function interface has an abstract method apply which takes the argument of type T and returns a result of type R. Here, R is nothing but the type of result user wants to return. It may be Integer, String, Boolean, Double, Long.
20.Why to go for Optional instead of NULL Check?
The Effectiveness of Optional could be only seen during Chaining in Streams or when accessing multiple getters at once like one below
.
.
computer.getSoundcard().getUSB().getVersion();
.
.
.
Optional.ofNullable(modem2)
       .map(Modem::getPrice)
       .filter(p -> p >= 10)
       .filter(p -> p <= 15)
       .isPresent();
21.What is Lambda Expressions?
The Lambda expression is used to provide the implementation for abstract method in functional interface. No need to define the method again for providing the implementation. Here, we just write the implementation code.
@FunctionalInterfac
interface Drawable {
 public void draw();
}

public class LambdaExpressionExample2 {
 public static void main(String[] args) {
  int width = 10;

  //with lambda
  Drawable d2 = () -> {
   System.out.println("Drawing " + width);
  };
  d2.draw();
 }
}
22.How to handle Checked Exceptions in Lambda Expressions?
To handle checked exception we use a lambda wrapper for the lambda function. Refer here
23.What is the Difference between Lambda Expression and Anonymous Inner Class?
The key difference between Anonymous class and Lambda expression is the usage of ‘this’ keyword. In the anonymous classes, ‘this’ keyword resolves to anonymous class itself, whereas for lambda expression ‘this’ keyword resolves to enclosing class where lambda expression is written.
Another difference between lambda expression and anonymous class is in the way these two are compiled. Java compiler compiles lambda expressions and convert them into private method of the class. It uses invokedynamic instruction that was added in Java 7 to bind this method dynamically.
Functions reside in permanent memory whereas for classes the memory is loaded on demand.
Functions act on unrelated data whereas objects act on their own data.
Refer here
24.Why static methods are Not allowed in Interface prior to Java 8?
Prior to Java 8 Interface could only have abstract methods. If you are writing a static method and defining it then the defining of the static methods may vary based on the implementing classes. So if two classes implement static method and since the
purpose of interface is to provide multiple inheritance when the fourth class implementsthe second and third method which is overrided the it would lead to Diamond of Death Problem.
This is similar to same thing with default methods in Java 8
This Works
class Animal {
    public static void identify() {
        System.out.println("This is an animal");
    }
}
class Cat extends Animal {}

public static void main(String[] args) {
    Animal.identify();
    Cat.identify(); // This compiles, even though it is not redefined in Cat.
}
This Doesnot Works
interface Animal {
    public static void identify() {
        System.out.println("This is an animal");
    }
}
class Cat implements Animal {}

public static void main(String[] args) {
    Animal.identify();
    Cat.identify(); // This does not compile, because interface static methods do not inherit. (Why?)
}
Cat can only extend one class so if Cat extends Animal, Cat.identify has only one meaning. Cat can implement multiple interfaces each of which can have a static implementation.
So Java Compiler is not sure which implementation to call
25.Explain different memory Allocation in JVM?
Memory in Java is divided into two portions
Stack: One stack is created per thread and it stores stack frames which again stores local variables and if a variable is a reference type then that variable refers to a memory location in heap for the actual object.
Heap: All kinds of objects will be created in heap only.
Heap memory is again divided into 3 portions
Young Generation: Stores objects which have a short life, Young Generation itself can be divided into two categories Eden Space and Survivor Space.
Old Generation: Store objects which have survived many garbage collection cycles and still being referenced.
Permanent Generation: Stores metadata about the program e.g. runtime constant pool.
