There would be scenarios where you need to skip few modules when building parent project because the unit test fail in child project. In such scenario we should define the surefire plugin at parent pom.xml and include and exclude the child modules for which the unit test should be executed.

<project>
  [...]
  <build>
    <plugins>
      <plugin>
        <groupId>org.apache.maven.plugins</groupId>
        <artifactId>maven-surefire-plugin</artifactId>
        <version>2.4.2</version>
        <configuration>
          <skipTests>true</skipTests>
        </configuration>
      </plugin>
    </plugins>
  </build>
  [...]
</project>

Rather than defining plugin(in our case surefire plugin), we can create a profile and define the behavior of plugins within the profile.

<project>
  [...]
  <profiles>
    <profile>
      <id>noTest</id>
      <activation>
        <property>
          <name>noTest</name>
          <value>true</value>
        </property>
      </activation>
      <build>
        <plugins>
          <plugin>
            <groupId>org.apache.maven.plugins</groupId>
            <artifactId>maven-surefire-plugin</artifactId>
            <version>2.4.2</version>
            <configuration>
              <skipTests>true</skipTests>
            </configuration>
          </plugin>
        </plugins>
      </build>
    </profile>
  </profiles>
  [...]
</project>

Now lets include and exclude child modules for which unit test should be carried out

Including Unit Test
Only the following(ChildModule3.java) file would be included and others would be excluded

<project>
  [...]
  <build>
    <plugins>
      <plugin>
        <groupId>org.apache.maven.plugins</groupId>
        <artifactId>maven-surefire-plugin</artifactId>
        <version>3.0.0-M4</version>
        <configuration>
          <includes>
            <include>ChildModule3.java</include>
          </includes>
        </configuration>
      </plugin>
    </plugins>
  </build>
  [...]
</project>

Excluding Unit Test
Only the following(ChildModule1.java, ChildModule2.java) file would be excluded

<project>
  [...]
  <build>
    <plugins>
      <plugin>
        <groupId>org.apache.maven.plugins</groupId>
        <artifactId>maven-surefire-plugin</artifactId>
        <version>3.0.0-M4</version>
        <configuration>
          <excludes>
            <exclude>**/ChildModule1.java</exclude>
            <exclude>**/ChildModule2.java</exclude>
          </excludes>
        </configuration>
      </plugin>
    </plugins>
  </build>
  [...]
</project>

How to activate profile in command prompt

>>mvn clean install -PnoTest

How to see list of active Profiles

>>mvn help:active-profiles

If you want to know what version of an specific plugin you have installed you can do this:

mvn -Dplugin=org.codehaus.mojo:wagon-maven-plugin help:describe
mvn -Dplugin=groupId:artifactId help:describe
mvn help:effective-pom

How to execute life cycle task using specific plugin

>>mvn groupID:artifactID:version:goal
>>mvn org.apache.maven.plugins:maven-checkstyle-plugin:2.5:checkstyle

  1. Gradle is Partly Declarative and Partly Programmatic and Uses Domain Specific Language(DSL) coded in groovy or kotlin in build.gradle
  2. Gradle Parses build.gradle file and constructs DAG(Directed Acyclic Graph) and constructs a graph of task
  3. Gradle executes tasks in order.If ouput of task is same as last output, then task wont be executed
  4. Gradle manages trasitive dependency on its own(Similar to maven) and gradle uses repositories.
  5. Gradle updates to new version of Dependencies

Teardown of build.gradle file

  1. To make gradle, java aware we need to add apply plugin:’java’
  2. Once the above line is added, the following tasks get tagged to project – clean, assemble, compile, test
  3. dependencies and repositories are added in flower bracket like one below
  4. under dependencies we can have multiple tasks. In the below code compile is added as a task

build.gradle

group 'com.mugil.employeeManagement'
version '1.0-Snapshot'

apply plugin: 'java'

sourceCompatibility=1.8

repositories {    
    mavenCentral()
}

dependencies {
	compile 'com.google.code.gson:gson:2.8.4'
}

What is the Difference between gradlew and gradle?

gradlew is a wrapper(w – character) that uses gradle.

Under the hood gradlew performs three main things:

  1. Download and install the correct gradle version
  2. Parse the arguments
  3. Call a gradle task

Using Gradle Wrapper we can distribute/share a project to everybody to use the same version and Gradle’s functionality(compile, build, install…) even if it has not been installed.

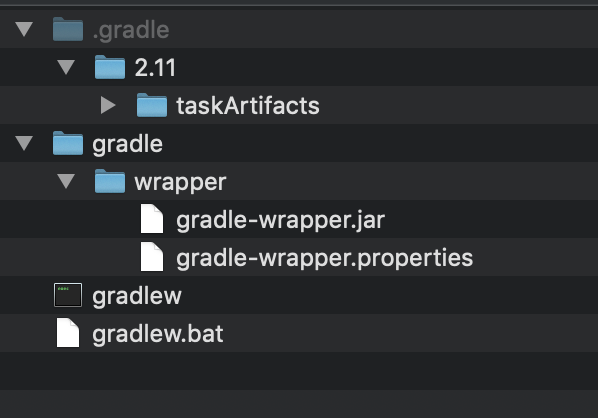
To create a wrapper run:

gradle wrapper

This command generate:

gradle-wrapper.properties will contain the information about the Gradle distribution

How to skip Gradle Test?

gradle build -x test 

How to supply Argument to Spring Controller during application startup in Gradle Wrapper

gradlew bootRun --args='--welcome.message=Mugil'

WelcomeController.java
In the below code welcomeMsg variable is assigned value during application startup. In similar ways environment variables could be setup
by supplying arguments as parameters while executing gradlew bootrun

import org.springframework.beans.factory.annotation.Autowired;
import org.springframework.beans.factory.annotation.Value;
import org.springframework.web.bind.annotation.GetMapping;
import org.springframework.web.bind.annotation.RestController;

@RestController
public class WelcomeController {
    public String welcomeMsg;

    @Autowired
    public WelcomeController(@Value("${welcome.message}") String message) {
        welcomeMsg = message;
        System.out.println("Hi "+ message);
    }

    @GetMapping("/")
    public String sayHello() {
        return "Mugil";
    }
}

Logarithmic and Exponential Form
Any number can be written in Logarithmic and Exponential Form

Logarithmic Form
logbx = a

Exponential Form
x = ba

Logarithmic Function and Exponential function are inverse function to each other
A function which is written in exponential form can be written into logarithmic form given both have the same base.

y = log3x

is equivalent to

3y = x

Let take a number 34

34 = 3 x 3 x 3 x 3 = 81

log381 = 4

Here
3 is Base
4 is exponent

What is the exponent of the below statement? What is the value of x?

log5125 = x
5 x 5 x 5 = 125
x = 3

log41 = x
x = 0

Why Know Logarithms?
Let us take the set of below numbers

1
10
1000
100000(105)
100000000(108)
100000000000000(1014 )

When we try to plot the numbers we won’t be able to accommodate the small and the higher values since the variations are huge and the difference between the first and last number is huge. In such a case, we can represent the numbers in terms of logarithms with respect to some other decimal value. Now the above numbers could be written as below.

log101 = 0
log101 = 1
log101000 = 3
log10x = 5
log10x = 8
log10x = 14

Now it is easy to accommodate 0,1,3,5,8,14 in the graph.

Practical application of Logarithms?
The best practical usage of the logarithm is the Richter scale which is used to measure the earthquake. Richter scale is a logarithmic scale with base 10. Let’s say we there are earthquakes in 3 locations as below
India – 6.0
Thailand – 7.0
Japan – 9.0

Now the difference of intensity between the earthquake in India and Thailand is 10 Times Stronger
The difference of intensity between the earthquake in India and Japan is 1000 Times Stronger

Fundamental properties

1st Property
logbx = a
x = ba
logbx = ba

2nd Property
logbb = x
logbx = b
x = 1

log44 = 1
log2525 = 1

3rd Property
logbbn = x
bx = bn
x = n

log11113 = 3
log445 = 5

  1. logbx = ba
  2. logbb = 1
  3. logbbn = n

Condition

  • logba – the value of a(argument) should be greater than 0 – Incorrect
  • logb0 is undefined and logb(-ve no) is incorrect – Incorrect
  • logb1= 0 is correct
  • logb(1/2)= -1 is correct
  • log1a is incorrect- base cannot be 1
  • log(-ve)a is incorrect- base cannot be -ve number
  • Change of Base Rule

  • logba = logxa/logxb where x>0, x != 1 and a,b >0
  • log denotes log to the base 10 and ln or log e represents natural log.

    e – Maximum possible result after continuously compounding 100% growth over a time period

    logab x logba = 1

    Logarithm Rules

    1. logb(xy)= logbx + logby
    2. logb(x/y)= logbx – logby
    3. logban = nlogba

    What is Asymptotic Analysis
    Asymptotic Analysis, we evaluate the performance of an algorithm in terms of input size (we don’t measure the actual running time). We calculate, how does the time (or space) taken by an algorithm increases with the input size.

    Asymptotic Analysis is not perfect, but that’s the best way available for analyzing algorithms. For example, say there are two sorting algorithms that take 1000nLogn and 2nLogn time respectively on a machine. Both of these algorithms are asymptotically same (order of growth is nLogn). So, With Asymptotic Analysis, we can’t judge which one is better as we ignore constants in Asymptotic Analysis. Also, in Asymptotic analysis, we always talk about input sizes larger than a constant value. It might be possible that those large inputs are never given to your software and an algorithm which is asymptotically slower, always performs better for your particular situation. So, you may end up choosing an algorithm that is Asymptotically slower but faster for your software.

    Increasing Order of Growth

    Time Complexity Name Example
    1 Constant Adding Element to the Front oif Linked List
    logn Logarithmic Finding the element in the Sorted Array
    n Linear Finding an element in an unserted Array
    nLogn Linear Logarithmic Sorting n items by divide and conquer technique
    Quadriatic Shortest Path between two nodes in a graph
    Cubic Matrix Multiplication
    2n Exponential The Towers of Hanoi Problem

    Let’s take a simple java code which looks for a number in an array

    public class LinearSearch
    {  
        // Linearly search x in arr[].  If x is present then return the index, 
        static int search(int arr[], int n, int x) { 
            int i; 
            for (i = 0; i < n; i++) { 
                if (arr[i] == x) { 
                    return i; 
                } 
            } 
            return -1; 
        }   
    
        public static void main(String[] args) 
        { 
            int arr[] = {41, 10, 40, 15}; 
            int x = 40; 
            int n = arr.length; 
            System.out.printf("%d is present at index %d", x, search(arr, n, x)); 
      
        } 
    } 
    

    In the above scenario we have
    Worst Case – O Notation(Big O Notation) – In the Worst case we calculate the Upper bound of the algorithm with the worst possible input. In our case it is O(n) if the element is found as last item of the array. The Big O notation defines an upper bound of an algorithm, it bounds a function only from above. For example, consider the case of Insertion Sort. It takes linear time in the best case and quadratic time in the worst case. We can safely say that the time complexity of Insertion sort is O(n^2)

    Best Case – Ω Notation(Omega Notation) – In the Best case we calculate the lower bound of the algorithm with the best possible input. In our case it is O(1) if the element is found in as first item of the array.

    AverageCase- Θ Notation(Theta Notation) – average case analysis, we take all possible inputs and calculate computing time for all of the inputs. Sum all the calculated values and divide the sum by total number of inputs

    1. A case is a class of inputs for which you consider your algorithm’s performance.
    2. the best case is the input that minimizes the function and the worst case is the input that maximizes the function
    3. An algorithm always have worst case, best case and average case
    4. Each case again has an upper bound, lower bound.Bounds are functions that we use to compare against a given algorithm’s function.
    5. An upper bound is a function that sits on top of another function. A lower bound is a function that sits under the other function. When we talk about Big O and Big Omega, we don’t care if the bounds are ALWAYS above or below the other function
    6. When we talk about worst case we would be always interested in upper bound and when we talk about Best Case we are always interested in lower bound.Because of this Worst Case and upper bound are used interchangably and vice versa.
    7. Worst Case Upper Bound: We are often interested in finding a tight upper bound on the worst case, because then we know how poorly our algorithm can run in the worst of times. Insertion sort’s worst case is a list that is completely out of order (i.e. completely reversed from its correct order). Every time we see a new item, we have to move it to the start of the list, pushing all subsequent items forward (which is a linear time operation, and doing it a linear number of times leads to quadratic behavior). However, we still know that this insertion behavior will be O(n2) in the worst case, acting as a tight upper bound for the worst case.
    8. Best Case Lower Bound: Insertion Sort works by walking through the list, and inserting any out-of-order it comes across in the right place. If the list is sorted, it will only need to walk through the list once without doing any inserts. This means that the tightest lower bound of the best case is Ω(n). You cannot do better than that without sacrificing correctness, because you still need to be able to walk through the list (linear time). However, the lower bound for the best case is better than the lower bound for the worst case!
    9. Worst Case Lower Bound: The classic example here is comparison-based sorting, which is famously known to be Ω(n log(n)) in the worst case. No matter what algorithm you devise, I can pick a set of worst-case inputs whereby the tightest lower bound function is log-linear. You cannot make an algorithm that beats that bound for the worst case, and you shouldn’t bother trying. It’s the basement of sorting. Of course, there are many lower bounds for the worst case: constant, linear, and sublinear are all lower bounds. But they are not useful lower bounds, because there the log-linear lower bound is the tightest one.
    10. Best Case Upper Bound: What’s the worst our algorithm can do in the best of times? In example before of finding an element in a list, where the first element was our desired element, the upper bound is O(1). In the worst case it was linear, but in the best case, the worst that can happen is that it’s still constant. This particular idea isn’t usually as important as Worst Case Upper Bound, in my opinion, because we’re usually more concerned with dealing with the worst case, not the best case.

    Legends

    Time Complexity

    1. Node Package manager is a package manager which ships along node
    2. It is a Javascript package manager which helps to manage modules like HTTP, Event etc..
    3. Once the npm init is run package.json would be created in the project folder.It is similar to pom.xml for Maven project which saves all the settings and dependencies
    4. To check the npm version
      >>npm -v 
      >>npm --version
      
    5. To create a new project we use the below command – take default setting by telling -yes
      >>npm init -yes
      
    6. To Install a new package is as below
      >>npm install NAME_OF_PACKAGE
      
    7. To Set particular config name
      >>npm set CONFIG_KEY CONFIG_VALUE
      >>npm set init-licencse "MIT"
      
    8. To Get particular config name
      >>npm get CONFIG_KEY 
      >>npm get init-licencse
      
    9. To Install a new package
      >>npm install packagename
      >>npm install loadash
      

      Running the above command is going to create a node_modules folder in project with the dependencies for the package(loadash) installed.

    10. To Install only dependencies that are needed to run app other than utility dependencies like gulp which provides minified version of JS use below command
      >>npm install --production
      
    11. To remove dependencies
      >>npm remove gulp
      
    12. To install specific version
      >>npm install gulp@4.7.3
      
    13. To update latest version
      >>npm update gulp
      
    14. Semantic versioning formart.PatchVersion includes bug fixes and minor tweaks
      MajorVersion.MinorVersion.PatchVersion
      4.7.8
      
    15. How to find the location of node modules
      >>npm root -g
      

      This will take you to location C:\Users\Mugil\AppData\Roaming\npm\node_modules

    16. How to install server globally – live-server will reload the JS files without restart of server
      >>npm install -g live-server
      

      This will take you to location C:\Users\Mugil\AppData\Roaming\npm\node_modules

    17. When you move the project to new environment no need to move the node_modules folder similar to avoiding JAR while shifting java application.We just need to move the JS file and package.json which contains the details of dependencies. Running npm install will read the package.json file and load the dependencies in new environment

    package.json

       "name": "my_package",
        "description": "",
        "version": "1.0.0",
        "main": "index.js",
        "scripts": {
          "test": "echo \"Error: no test specified\" && exit 1"
        },
        "dependencies": {"loadash" : 14.7.8},
        "keywords": [],
        "author": "",
        "license": "ISC",
        "bugs": {
          "url": "https://github.com/ashleygwilliams/my_package/issues"
        },
        "homepage": "https://github.com/ashleygwilliams/my_package"
      }
    

    How to run some js file in the beginning of the server
    I have JS server which needs to start at the beginning of application. In such case I would be defining the JS file in scripts.
    You need to call npm start after chaning package.json file
    package.json

    .
    .
    "scripts": {
          "start": "node server.js"
        }
    .
    .
    

    Let’s create a simple application which greets with Welcome message in console on start
    package.json

    {
      "name": "school",
      "version": "1.0.0",
      "description": "",
      "main": "index.js",
      "scripts": {
        "start": "node index.js"
      },
      "author": "Mugil",
      "license": "ISC"
    }
    

    index.js

    console.log('Welcome to School .....');
    

    output

    Welcome to School .....
    

    package.json
    live-server allows you to run code without restarting server after changes.

    .
    .
    "scripts": {
        "start": "node index.js",
        "server": "live-server"
      }
    .
    .
    
    >>npm run server
    
    1. Obersvable and Observer are from RxJS similiar to Event and Event listener
    2. Observer can listen to three actions of observable that is next, error and complete
    3. Below we create a observer JSON key value pair and calling function based on the action from observable
    4. We need to subscribe to Observable in ourcase observable and pass observer as parameter
    5. We should unsubscribe to obeservable once we are done inorder to prevent memory leaks

    test.html

    <script type="text/javascript" src="https://cdnjs.cloudflare.com/ajax/libs/rxjs/5.4.0/Rx.js"></script>
    
        <script>
            var observer = {
                next: function (value) { console.log(value); },
                error: function (error) { console.log(error); },
                complete: function () { console.log("Completed..!") }
            };
    
    
            const observable = new Rx.Observable(obs => {
                obs.next(102);
                obs.next(103);
                setTimeout(function () {
                    obs.next(109);
                    obs.complete("Completed");
                }, 2000);
            });
    
            observable.subscribe(observer);
        </script>
    

    Observable over Stream
    Observable is similar to event which keeps happening. During its occurance it could emit values, throw error or comes to complete.

    setTimeout is the functionality which comes along with the webapi whereas setInterval is javascript implementation.

    setTimeout(expression, timeout); runs the code/function once after the timeout.
    The clearTimeout() method stops the execution of the function specified in setTimeout().

    function doStuff() {
    alert("run your code here when time interval is reached");
    }
    var myTimer = setTimeout(doStuff, 5000);
    

    Output

    run your code here when time interval is reached
    

    setInterval(expression, timeout); runs the code/function in intervals, with the length of the timeout between them.

    function doStuff() {
    alert("run your code here when time interval is reached");
    }
    var myTimer = setInterval(doStuff, 5000);


    Output

    run your code here when time interval is reached
    

    JWT can be implemented the same way for OAuth where the authorization server and the resource server are different. In this scenario Authorization server provides just the token and exposes JWK(JSON web keyset) for its public key.

    JWT always deals with Authorization, not Authentication.

    1. User logins to application – Authentication to the user-facing application
    2. Once authenticated, User can request access to any resource.
    3. User-facing application can request an access token that will serve to request the external resource in representation of the end user, so the resource server can determine who is requesting the information (authentication) and the access level of that user (authorization). On this step an Oauth2 Access token request is performed
    4. Authorization server will validate the request for an access token. The end-user application can provide client credentials to prove identity of the invoker, as well as a hint to determine the user who triggers the process.

      Authorization server to generate a new RSA key pair, whose private key will be utilized to create the JWT signature, while the public key will be stored and published so any resource server who receives the JWT can look up the public key and perform signature verification.

    5. User-facing application receives the JWT access token, attaches it to a new HTTP request as an Authorization header, as a bearer token, and invokes the resource server to attempt the retrieval of the external resource.
    6. Resource server detects that a Bearer token was included in the new request received, decodes the header in order to find out the JWK key id, then connects to the authorization server JWK set URL in order to retrieve the list of available public keys, then filters the key with id indicated in the header. Once the JWK is found, Resource server just must perform signature verification to determine if the JWT received is valid
    7. Once JWT is verified, the payload is considered as valid, and any information within the payload can be used by the resource server to determine whether the requested resource can be delivered in the request received or not.

    Advantage of Using Asymmetric Keys
    In a microservice architecture where JWTs are exchanged, each service can have a public/private key pair. Compared to symmetric signatures, this scheme significantly reduces the impact of a breach of a single service in this architecture.

    Posted in JWT.

    What is the difference between a shim and a polyfill?
    Shim
    A piece of code that you could add (i.e. JavaScript) that would fix some functionality, but it would most often have it’s own API.Shims intercepts API calls and creates an abstract layer between the caller and the target. Typically shims are used for backward compability. For instance the es5-shim npm package will let you write ECMAScript 5 (ES5) syntax and not care if the browser is running ES5 or not. Take Date.now as an example. This is a new function in ES5 where the syntax in ES3 would be new Date().getTime(). If you use the es5-shim you can write Date.now and if the browser you’re running in supports ES5 it will just run. However, if the browser is running the ES3 engine es5-shim will intercept the call to Date.now and just return new Date().getTime() instead. This interception is called shimming. The relevant source code from es5-shim looks like this:

    polyfill
    something you could drop in (i.e. JavaScript) and it would silently work to mimic existing browser APIs that are otherwise unsupported.A polyfill is a piece of code (or plugin) that provides the technology that you, the developer, expect the browser to provide natively. Flattening the API landscape if you will.A polyfill is a type of shim that retrofits legacy browsers with modern HTML5/CSS3 features usually using Javascript or Flash.Polyfill is about implementing missing features in an API, whereas a shim wouldn’t necessarily be as much about implementing missing features as it is about correcting features. As an example there is no support for sessionStorage in IE7, but the polyfill in the sessionstorage npm package will add this feature in IE7 (and older) by using techniques like storing data in the name property of the window or by using cookies.

    Code Snippets – Table of Contents

    1. Builtin Angular Directives

      1. Attribute Directive – NgStyle, NgClass
      2. Structural Directive – *NgIf, *NgFor, *NgSwitch

    Attribute Directive – ngClass and ngStyle
    ngClass

    1. For using ngClass the styling should be in JSON Obect
    2. Advantage of using ngClass is applying more than one class to the DOM Element unlike class
    3. In the below code you see class which applies present or absent based on one true or false returned by getResult function
    4. In the registration.component.ts we have declared a JSON object which applies 2 classes present and normal or absent and bold based on true or false returned by getStatus(method)

    Styling using class
    registration.component.html

    .
    .
    <td [class]="getStatus()?'present':'absent'">{{objStudent.science}}</td>
    .
    .
    .
    

    Styling using ngClass
    registration.component.html

    .
    .
    <td [ngclass]="cssStyle">{{objStudent.science}}</td>
    .
    .
    .


    registration.component.ts

    .
    .
    export class RegistrationComponent implements OnInit { 
      public cssStyle;  
     
      ngOnInit() {
         this.cssStyle = {
           "present" : getStatus(),
           "absent"  : !getStatus(),
           "normal"  : getStatus()
           "bold"    : !getStatus(),       
         };
      }
    }
    
    .
    .
    .


    ngStyle

    1. ngStyle is to apply style directly instead of defining style using class
    2. Same registration.component.ts has been modified to take style attributed such as color and weight

    registration.component.ts

    .
    .
    export class RegistrationComponent implements OnInit { 
      public cssStyle;  
     
      ngOnInit() {
         this.cssStyle = {
           "background-color"  : getStatus()?"green":"red",
           "font-weight"       : getStatus()?"normal":"bold"       
         };
      }
    }
    .
    .
    .
    

    There is an alternative for both above [class] and [ngClass] as below

    .
    .
    <td [class.positive]="getStatus()" [class.negative]="!getStatus()">{{objStudent.science}}</td>.
    .
    

    Similarly for [ngStyle] as below

    .
    .
    <td [style.background-color]="getStatus()?'green':'red'">{{objStudent.science}}</td>.
    .
    

    Structural Directive – ngIf, ngFor and ngSwitch
    ngIf

    1. In the below code we decide the words to be displayed based on the value returned by getStatus(objStudent) method
    2. Pass would be displayed if true or else fail would be returned
    .
    .
    <span *ngIf="getStatus(objStudent)">Pass</span>
    <span *ngIf="!getStatus(objStudent)">Fail</span>
    .
    

    ngFor

    1. In the below code we use *ngFor loop to iterate over array of student object
    2. We are generating serial no for first column by adding 1 to variable i and displaying name of student in second column
    3. *ngFor has other loacl values apart from indes such as even, odd, first, last based on which manipulations could be carried out

    registration.component.ts

    .
    .
    export class RegistrationComponent implements OnInit {
      public arrStudent:Array<Student>;
    
      ngOnInit() {
         this.arrStudent = [new Student(101, 'Mugil', 31, 74, 65,55,64,84),
                            new Student(102, 'Manasa', 26, 31, 65,55,86,84),
                            new Student(103, 'Kavitha', 27, 90, 65,60,84,46),
                            new Student(104, 'Renu', 28, 31, 65,55,84,46),
                            new Student(105, 'Joseph', 23, 31, 65,55,89,84)];
    
      }
    .
    .
    }
    

    registration.component.ts

    .
    .
    <tr>
        <th>Sno</th>
        <th>Student ID</th>
    </tr>
    <tbody>
      <tr *ngFor="let objStudent of arrStudent; index as i;">
         <td>{{i+1}}</td>
         <td>{{objStudent.studentId}}</td>
         .
         .
         .
         .
      </tr>
    </tbody>
    .
    .
    

    Now let’s see a simple example of applying a different color to text based on odd and even rows

    registration.component.ts

    .
    .
    <tr *ngFor="let objStudent of arrStudent; index as i;odd as isOdd; even as isEven" [class]="isOdd?'odd':'even'">
         .
         <td>{{i+1}}</td>
         <td>{{objStudent.studentId}}</td>
         .
    </tr>
    

    the same code can be written as below where the only difference is styles are applied seperately evaluating for both odd and even.
    registration.component.ts

    .
    .
    <tr *ngFor="let objStudent of arrStudent; index as i;odd as isOdd; even as isEven" [class]="isOdd" [class.even]="isEven">
         .
         <td>{{i+1}}</td>
         <td>{{objStudent.studentId}}</td>
         .
    </tr>
    

    We can define the template directly in a component instead of giving the templateURL using a template and define styleURL instead of styles.

    registration.component.ts

    .
    .
    @Component({
      selector: 'app-registration',
      template: '<tr>
                  <td>{{objStudent.studentId}}</td>
                  <td>{{objStudent.studentName}}</td>
                </tr>',
      styleUrls: ['./registration.component.css']
    })
    .
    .
    .
    

    registration.component.ts

    .
    .
    @Component({
      selector    : 'app-registration',
      templateURL : 'app-registration.html',
      styles      : ['
                       .present
                       {
                          background-color: greenyellow;
                       }
    
                       .absent
                       {
                          background-color: #fc8674;
                       }
                    ']
    })
    .
    .
    .