Below we have class – ClassA which contains the actual method – MethodA to be tested. MethodA has call to two dependent
ClassA.java

package com.mugil.org;

public class ClassA {
    public ClassADep1 dependency1;
    public ClassADep2 dependency2;

    public ClassA(ClassADep1 dependency1, ClassADep2 dependency2) {
        this.dependency1 = dependency1;
        this.dependency2 = dependency2;
    }

    public boolean MethodA(){
        System.out.println("I am going to call Dep1Method");
        dependency1.Dep1Method();

        System.out.println("I am going to call Dep2Method");
        dependency2.Dep2Method();

        return true;
    }
}

ClassADep1.java

package com.mugil.org;

public class ClassADep1 {
    public void Dep1Method(){
        System.out.println("This is ClassADep1 Method getting called");
    }
}

ClassADep2.java

package com.mugil.org;

public class ClassADep2 {
    public void Dep2Method(){
        System.out.println("This is ClassADep2 Method getting called");
    }
}

Use @Mock when you want to just test the functionality externally without actually calling that method.If you want to be safe and avoid calling external services and just want to test the logic inside of the unit, then use mock.

Using @Mock annotation for Dependency
ClassATest.java

package com.mugil.org;

import org.junit.jupiter.api.Test;
import org.junit.jupiter.api.extension.ExtendWith;
import org.mockito.InjectMocks;
import org.mockito.Mock;
import org.mockito.junit.jupiter.MockitoExtension;

import static org.junit.jupiter.api.Assertions.*;

@ExtendWith({MockitoExtension.class})
class ClassATest {
    @InjectMocks
    ClassA classA;

    @Mock
    ClassADep1 dependency1;

    @Mock
    ClassADep2 dependency2;

    @Test
    void methodA() {
        assertEquals(true, classA.MethodA());
    }
}

Output

I am going to call Dep1Method
I am going to call Dep2Method

Use @Spy when you want to test the functionality externally + internally with the very method being called. If you want to call an external service and perform calling of real dependencies, or simply say, you want to run the program as it is and just stub specific methods, then use spy.

Using @Spy annotation for Dependency
ClassATest.java

package com.mugil.org;

import org.junit.jupiter.api.Test;
import org.junit.jupiter.api.extension.ExtendWith;
import org.mockito.InjectMocks;
import org.mockito.Spy;
import org.mockito.junit.jupiter.MockitoExtension;

import static org.junit.jupiter.api.Assertions.assertEquals;

@ExtendWith({MockitoExtension.class})
class ClassATest {
    @InjectMocks
    ClassA classA;

    @Spy
    ClassADep1 dependency1;

    @Spy
    ClassADep2 dependency2;

    @Test
    void methodA() {
        assertEquals(true, classA.MethodA());
    }
}

Output

I am going to call Dep1Method
This is ClassADep1 Method getting called
I am going to call Dep2Method
This is ClassADep2 Method getting called

Below is a class StudentUtils which contains only two Method – doNothingWhenCalled and dummymethod. We are going to unit test doNothingWhenCalled method.

The conclusion would be to use @Spy when we mock methods of same class tested to doNothing and use @Mock to mock method to doNothing call to other classes.

StudentUtils.java

package com.mugil.org;

import java.util.ArrayList;
import java.util.List;

public class StudentUtils {
    private List arrStudents = new ArrayList();
    private String Name = "Mugil";

    public StudentUtils(){
        arrStudents.add(new Student("101", "Mugil"));
    }

    public Student doNothingWhenCalled()
    {
        dummymethod(new Student("102" ,"abc"));
        return new Student("103", "StudentName");
    }

    public String dummymethod(Student objStudent)
    {
        System.out.println("Dummy Method Called");
        return "Dummy Method";
    }

@InjectMocks
StudentUtilsTest.java

@ExtendWith({MockitoExtension.class})
class StudentUtilsTest {
    @InjectMocks
    StudentUtils systemUnderTest;

    @Test
    void doNothingCalled() {
        Assertions.assertThat(systemUnderTest.doNothingWhenCalled()).isInstanceOf(Student.class);
    }
}

Output

Dummy Method Called

@Mocks
StudentUtilsTest.java

@ExtendWith({MockitoExtension.class})
class StudentUtilsTest {
    @InjectMocks
    StudentUtils systemUnderTest;

    @Test
    void doNothingCalled() {
        systemUnderTest = Mockito.mock(StudentUtils.class);
        Mockito.when(systemUnderTest.dummymethod(any())).thenReturn("Dummy Method");

        Assertions.assertThat(systemUnderTest.doNothingWhenCalled()).isInstanceOf(Student.class);
    }
}

You can see below we are trying to call method to be tested under empty mock instance which doesnot have default method definition. There is no point in mocking method definition since systemUnderTest.doNothingWhenCalled() would try to invoke test method which has no idea about.
Output

java.lang.AssertionError: 
Expecting actual not to be null

@Spy
StudentUtilsTest.java

@ExtendWith({MockitoExtension.class})
class StudentUtilsTest {
    @InjectMocks
    StudentUtils systemUnderTest;

    @Test
    void doNothingCalled() {
        systemUnderTest = Mockito.spy(StudentUtils.class);
        Assertions.assertThat(systemUnderTest.doNothingWhenCalled()).isInstanceOf(Student.class);
    }
}

Output

Dummy Method Called

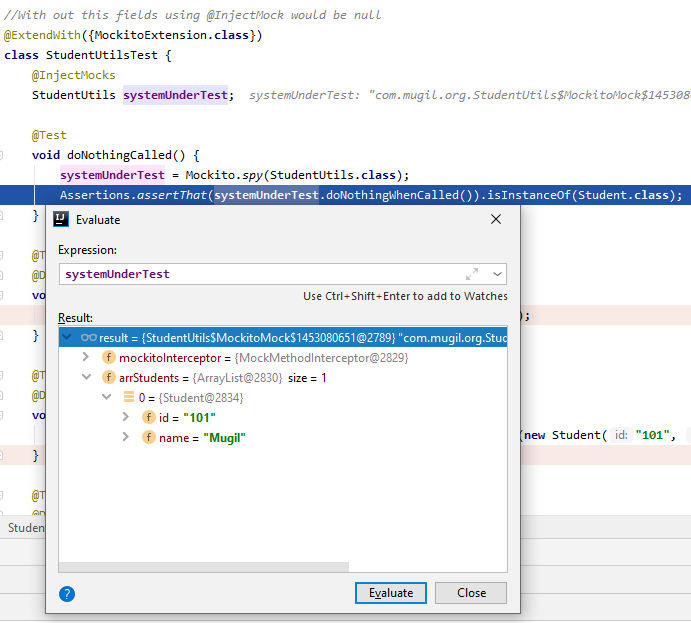
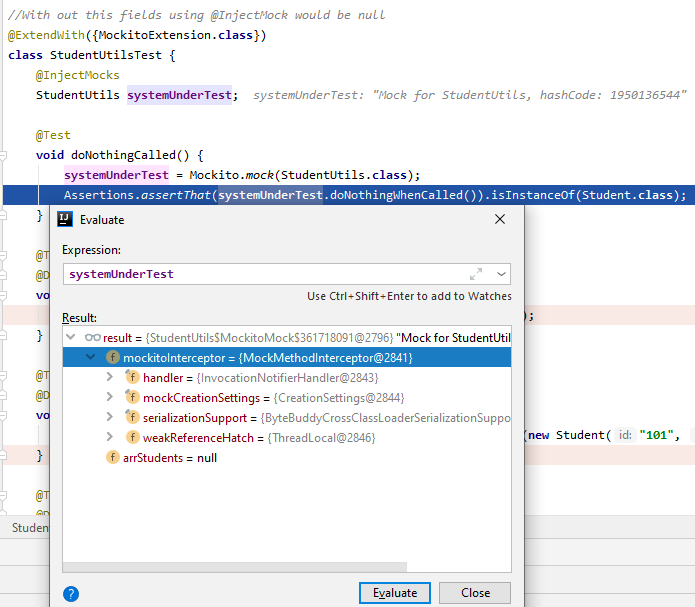
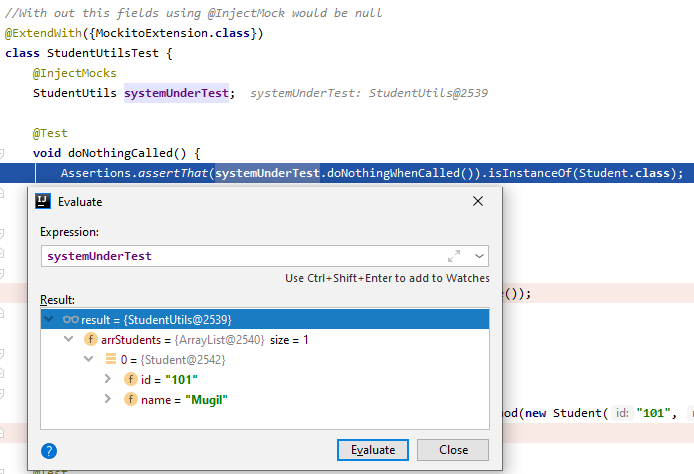
Below is the Debug of Object created using @Mock, @InjectMock and @Spy.As you can see the one with Mock contains only MockInterceptor which does not have definition of methods on its own where as @InjectMock created instance of TestClass. @Spy contains both MockInterceptor and Instance enabling partial mock.

While Using InjectMock you can see the MockitoInterceptor in scope

While Using InjectMock you can see the class variables getting initialized

While Using Spy you can see both class variables getting initialized and MockitoInterceptor in scope

How to Pass Interface or Abstract Class as Matcher?
Person.java

public interface Person {
}

StudentUtils.java

 public String methodWithInterfaceArg(Person person)
    {
        //This method takes Interface Implementation as Parameter
        Somemethod(person);
        return "Test Success";
    }

    public void Somemethod(Person p){
        System.out.println("Hello There");
    }

StudentUtilsTest.java

@Test
    @DisplayName("Test for method which takes interface as argument")
    void methodWithInterfaceArg() 
    {
        Person objPerson = Mockito.mock(Person.class);

        // Using spy we are creating a new mock and call the method to be tested
        StudentUtils studentUtils= Mockito.spy(StudentUtils.class);

        doNothing().when(studentUtils).Somemethod(objPerson);

        // While testing we should call the method to be tested using new spyObject rather than systemUnderTest
        // This is because only in the Spy object studentUtils we have created a mock definition for Somemethod
        // Hence when methodWithInterfaceArg is called using systemUnderTest the mock  definition created using spy would be lost
        assertEquals("Test Success", studentUtils.methodWithInterfaceArg(objPerson));
    }

How to doNothing when internal method which returns void is gets called?
StudentUtils.java

    public String methodWithInterfaceArg(Person person)
    {
        //This method has void return type
        Somemethod(person);
        return "Test Success";
    }

    public void Somemethod(Person p){
        System.out.println("Hello There");
    }

StudentUtilsTest.java

    @Test
    @DisplayName("Test for internal method which is of void return type")
    void methodWithInterfaceArg() {
        Person objPerson = Mockito.mock(Person.class);

        // Using spy we are creating a new mock and call the method to be tested
        StudentUtils studentUtils= Mockito.spy(StudentUtils.class);

        //With Object Created using spy we can mock the actual method to do nothing
        doNothing().when(studentUtils).Somemethod(objPerson);

        assertEquals("Test Success", studentUtils.methodWithInterfaceArg(objPerson));
    }

How to doNothing when method which returns value is called?
StudentUtils.java

public class StudentUtils {
    private List arrStudents = new ArrayList();
    private String Name = "Mugil";

    public String dummymethod(Student objStudent)
    {
        System.out.println("Dummy Method Called");
        return "Dummy Method";
    }

    public String methodCallingAnotherMethodReturningVal()
    {
        String something = dummymethod(new Student("102" ,"abc"));
        return "Dummy Method returned "+ something;
    }
}

StudentUtilsTest.java

 @Test
    @DisplayName("Test for Method calling another method which returns value")
    void methodCallingAnotherMethodReturningVal() {
        StudentUtils studentUtils= Mockito.spy(StudentUtils.class);

        Mockito.when(studentUtils.dummymethod(any())).thenReturn("Test Student");
        Assert.assertEquals("Dummy Method returned Test Student", studentUtils.methodCallingAnotherMethodReturningVal());
    }

How to mock methods of private and public instance class variables?

  1. The below scenario we are going to mock instance of method which belongs to other class initialized over by public and private class variables
  2. We Create a new mock and initialize using reflectionUtils for the objDBConnectionFactory which is private whereas we use a spy to directly change the method definition of objDBConnectionFactory2

DBConnectionFactory.java

package com.mugil.org;

public class DBConnectionFactory {
    public DBConnectionFactory() {
    }

    public <T> T  readDetails(byte[] src, Class<People> valueType){
        return (T)new Student();
    }

    public <T> T  readDetails2(String src){
        return (T)new Student();
    }
}

MockPrivateFileds.java

package com.mugil.org;

import org.springframework.web.client.HttpStatusCodeException;

public class MockPrivateFileds {
    private DBConnectionFactory objDBConnectionFactory = new DBConnectionFactory();

    public DBConnectionFactory objDBConnectionFactory2 = new DBConnectionFactory();

    private Student getDetails(HttpStatusCodeException httpStatusCodeException) {
        return objDBConnectionFactory.readDetails(httpStatusCodeException.getResponseBodyAsByteArray(), People.class);
    }

    public Student getDetails2(HttpStatusCodeException httpStatusCodeException) {
        return objDBConnectionFactory2.readDetails2("String");
    }
}

MockPrivateFiledsTest.java

package com.mugil.org;

import org.junit.jupiter.api.Test;
import org.junit.jupiter.api.extension.ExtendWith;
import org.mockito.InjectMocks;
import org.mockito.Mockito;
import org.mockito.junit.jupiter.MockitoExtension;
import org.springframework.test.util.ReflectionTestUtils;
import org.springframework.web.client.HttpStatusCodeException;

import static org.hamcrest.MatcherAssert.assertThat;
import static org.hamcrest.Matchers.instanceOf;
import static org.mockito.ArgumentMatchers.*;

@ExtendWith({MockitoExtension.class})
class MockPrivateFiledsTest {
    @InjectMocks
    MockPrivateFileds systemUnderTest;

    @Test
    void getDetailsTest() {
        HttpStatusCodeException httpStatusCodeException = Mockito.mock(HttpStatusCodeException.class);

        /*The Below two lines of code are needed because the objDBConnectionFactory created doesnot contain any definition of methods
        * So the definition could be set by creating new mock object as below. If there is Setter we can use setter to set the newly created mock object
        * Since there is no setter and its private we are going to use reflectionUtils */
        DBConnectionFactory dbConnectionFactory = Mockito.mock(DBConnectionFactory.class);
        ReflectionTestUtils.setField(systemUnderTest, "objDBConnectionFactory", dbConnectionFactory);
        Mockito.when(dbConnectionFactory.readDetails(nullable(byte[].class), eq(People.class))).thenReturn(new Student());

        assertThat(ReflectionTestUtils.invokeMethod(systemUnderTest, "getDetails", httpStatusCodeException), instanceOf(Student.class));
    }

    @Test
    void getDetailsTest2() {
        HttpStatusCodeException httpStatusCodeException = Mockito.mock(HttpStatusCodeException.class);
        systemUnderTest = Mockito.spy(MockPrivateFileds.class);

        DBConnectionFactory dbConnectionFactory2 = Mockito.spy(DBConnectionFactory.class);
        ReflectionTestUtils.setField(systemUnderTest, "objDBConnectionFactory2", dbConnectionFactory2);

        /*Below is a mocking of a public method through its instance by using spy. The below case is similar to above
        * scenario with the only difference we can use spy to gain access to readDetails2 */
        Mockito.when(systemUnderTest.objDBConnectionFactory2.readDetails2(anyString())).thenReturn(new Student());

        assertThat(systemUnderTest.getDetails2(httpStatusCodeException), instanceOf(Student.class));
    }
}

TestTraits.java

public interface TestTraits {
    String EMPLOYEE_ID = "1";
    Long EMPLOYEE_ID_LONG = 1L;

    default EmployeeRpy getEmployee(){
        EmployeeRpy objEmpRpy = new EmployeeRpy();
        objEmpRpy.setEmpName("Mugil");
        objEmpRpy.setEmpAge("34");
        return objEmpRpy;

     default EmployeeDetailsResource createMockedEmployeeDetails() 
          throws IOException(){
       EmployeeDetailsResource objEmployeeDetailsResource = 
              new Gson.fromJson(getReader("json-data/EmployeeDetails.json"), EmployeeDetails.class);    
       return objEmployeeDetailsResource; 
     } 

     default Reader getReader(String filePath) throws IOException{
       return new FileReader(new ClassPathResource(filePath).getFile());  
     }
}

EmployeeDetails.json

  {
     "empID" : "101",
     "empName" : "Mugilvannan",
     "empAge" : "30"
  } 

EmployeeMgmtTest.java

 @ExtendWith({MockitoExtension.class})
 class EmployeeMgmtTest implements TestTraits{
    .
    . 
    Code for Testing Goes Here
    .
    .
 }

What @Springbootapplication does?

@SpringBootApplication = @Configuration + @ComponentScan + @EnableAutoConfiguration

  1. @Configuration to enable Java-based configuration
  2. @ComponentScan – This annotation enables component-scanning so that the web controller classes and other components you create will be automatically discovered and registered as beans in Spring’s Application Context. All the@Controller classes you write are discovered by this annotation..
  3. @EnableAutoConfiguration annotation tells Spring Boot to “guess” how you will want to configure Spring, based on the jar dependencies that you have added. For example, If HSQLDB is on your classpath, and you have not manually configured any database connection beans, then Spring will auto-configure an in-memory database.For example, if you add spring-boot-starter-web dependency in your classpath, it automatically configures Tomcat and Spring MVC.
    <dependency>
        <groupId>org.springframework.boot</groupId>
        <artifactId>spring-boot-starter-web</artifactId>
    </dependency>
    

What @springboottest annotation should do?

  1. Should check whether Java-based configuration are loaded
  2. Should do component scan and create beans.
  3. Should assign appropriate beans by resolving

@SpringBootTest annotation is used to bootstrap the entire container. The annotation works by creating the ApplicationContext that will be utilized in our tests. @SpringBootTest annotation works by creating the ApplicationContext used in our tests through SpringApplication.It starts the embedded server, creates a web environment and then enables @Test methods to do integration testing.

  1. Below we have two class DBConfig.java and DBProperties.java.
  2. DBConfig loads DBProperties bean. DBProperties bean gets its value from application.yml
  3. In the below integration test we are going to check whether all the classes are properly getting loaded into application context.
  4. Classes loaded using @SpringBootTest would be available only in the context of the class in which it is used. Just because you add the list of classes in TestConfigApplicationTests.java it wont be available in other test classes(DatasourceConfigTest.java, ExampleConfigurationTest.java)

DBProperties.java

package com.mugil.org.configs;

import org.springframework.boot.context.properties.ConfigurationProperties;

import java.util.ArrayList;
import java.util.List;

@ConfigurationProperties(prefix = "spring.datasource")
public class DBProperties {   
    private String userName;
    private String password;

    public String getUserName() {
        return userName;
    }

    public void setUserName(String userName) {
        this.userName = userName;
    }

    public String getPassword() {
        return password;
    }

    public void setPassword(String password) {
        this.password = password;
    }
}

DBConfig.java

@Configuration
@EnableConfigurationProperties(DBProperties.class) // Tells from which class is needed for creation of Beans
public class DBConfig {

    @Bean
    public DBProperties dbProperties(){
        DBProperties objDBProperties = new DBProperties();
        return objDBProperties;
    }
}

application.yml

spring:
  profiles:
    active: dev
---
spring:
  config:
    activate:
      on-profile: dev
  datasource:
    driver-class-name: com.mysql.cj.jdbc.Driver
    password: root
    url: jdbc:mysql://localhost:3306/db
    username: root
  servers:
    - www.abc.test.com
    - www.xyz.test.com

---
spring:
  config:
    activate:
      on-profile: production
  datasource:
    driver-class-name: org.h2.Driver
    password: sa
    url: jdbc:h2:mem:db;DB_CLOSE_DELAY=-1
    username: sa
  servers:
    - www.abc.com
    - www.xyz.com

TestConfigApplication.java

package com.mugil.org;

import org.springframework.boot.SpringApplication;
import org.springframework.boot.autoconfigure.SpringBootApplication;

@SpringBootApplication
public class TestConfigApplication {
	public static void main(String[] args) {
		SpringApplication.run(TestConfigApplication.class, args);
	}
}

@SpringBootTest loads the DBConfig.java and creates DBProperties bean by reading values from application.yml file. The SpringBootTest ensures that all loading of beans defined in configuration file and all the values needed from application.yml and application.properties are available without any issue.

In case if you want to have any class to be autowired in @SpringBootTest class, the same should be defined in @SpringBootTest(classes = DBConfig.class) annotation.

The below @SpringBootTest takes classes which should be available by the time the application is bootstrapped. So we are expecting the properties to be read from application.yml and the bean gets created. Incase there is a problem the test case would fail below.

TestConfigApplication.java

package com.mugil.org;

import com.mugil.org.configs.DBConfig;
import com.mugil.org.configs.DBProperties;
import com.mugil.org.configs.ExampleConfiguration;
import org.junit.jupiter.api.Test;
import org.springframework.beans.factory.annotation.Autowired;
import org.springframework.boot.test.context.SpringBootTest;

@SpringBootTest(classes = {DBConfig.class})
class TestConfigApplicationTests {
	@Autowired
	DBProperties dbProperties;

	@Test
	void contextLoads() {
		System.out.println(dbProperties.getUserName());
	}
}

Below is a test which check if the value are loaded from yaml and is not null.
DatasourceConfigTest.java

package com.mugil.org.configs;

import org.junit.jupiter.api.Test;
import org.springframework.beans.factory.annotation.Autowired;
import org.springframework.boot.test.context.SpringBootTest;
import static org.junit.jupiter.api.Assertions.assertNotNull;

@SpringBootTest(classes = DBConfig.class)
class DatasourceConfigTest{

    //This is same as using context.run method where the beans would be initialized
    //context.run method in our case is invoked because of @SpringBootTest defined class
    @Autowired
    DBProperties dbProperties;

    @Test
    public void dbConfigTest() throws Exception {
        final String name = dbProperties.getUserName();

        //We can check whether the property is getting loaded and its not null only not null
        assertNotNull(name);
    }
}
  1. The @SpringBootTest annotation tells Spring Boot to look for a main configuration class (one with @SpringBootApplication , for instance) and use that to start a Spring application context.
  2. Spring Boot Integration Testing is running an application in ApplicationContext and run tests.spring-boot-starter-test which will internally use spring-test and other dependent libraries
  3. @SpringBootTest annotation works by creating the ApplicationContext used in our tests through SpringApplication.It starts the embedded server, creates a web environment and then enables @Test methods to do integration testing.

ExampleConfiguration.java

package com.mugil.org.configs;

import com.mugil.org.services.ExampleService;
import org.springframework.context.annotation.Bean;
import org.springframework.context.annotation.Configuration;

@Configuration
public class ExampleConfiguration {

    @Bean
    ExampleService exampleService() {
        ExampleService exampleService = new ExampleService();
        return exampleService;
    }
}

Below is the testing of the same functionality in a different way. Instead of using @SpringBootTest we are loading the class with help of ApplicationContextRunner and checking whether the loaded class – ExampleConfiguration.java dependencies – ExampleService.java in turn gets loaded

How to check if bean from particular configuration is loaded
ExampleConfigurationTest.java

package com.mugil.org.configs;

import com.mugil.org.services.ExampleService;
import org.junit.jupiter.api.Test;
import org.springframework.boot.test.context.runner.ApplicationContextRunner;

import static org.assertj.core.api.Assertions.assertThat;

class ExampleConfigurationTest {

    /*
     * I setup a context runner with the class ExampleConfiguration
     * in it. For that, I use ApplicationContextRunner#withUserConfiguration()
     * methods to populate the context.
     */
    ApplicationContextRunner context = new ApplicationContextRunner()
            .withUserConfiguration(ExampleConfiguration.class);

    @Test
    public void should_check_presence_of_example_service() {
        /*
         * We start the context, and we will be able to trigger
         * assertions in a lambda receiving a
         * AssertableApplicationContext
         */

        context.run(it -> {
            /*
             * I can use assertThat to assert on the context
             * and check if the @Bean configured is present
             * (and unique)
             */
            assertThat(it).hasSingleBean(ExampleService.class);
        });
    }
}

new ApplicationContextRunner() creates a new context and creates the bean by loading the configuration

For further reference check the code in the Link

Below is a static util class which can be used to check the list of beans available in the application context

ExampleConfigurationTest.java

package com.mugil.org.utils;

import org.springframework.beans.BeansException;
import org.springframework.context.ApplicationContext;
import org.springframework.context.ApplicationContextAware;
import org.springframework.stereotype.Service;

@Service
public class SpringUtils implements ApplicationContextAware {
    private static ApplicationContext ctx;

    @Override
    public void setApplicationContext(ApplicationContext appContext)
            throws BeansException {
        ctx = appContext;
    }

    public static ApplicationContext getApplicationContext() {
        return ctx;
    }
}

} Below is a static util class that can be used to check the list of beans available in the application context

ExampleConfigurationTest.java

package com.mugil.org.utils;

import org.springframework.beans.BeansException;
import org.springframework.context.ApplicationContext;
import org.springframework.context.ApplicationContextAware;
import org.springframework.stereotype.Service;

@Service
public class SpringUtils implements ApplicationContextAware {
    private static ApplicationContext ctx;

    @Override
    public void setApplicationContext(ApplicationContext appContext)
            throws BeansException {
        ctx = appContext;
    }

    public static ApplicationContext getApplicationContext() {
        return ctx;
    }
}

SomeRandomClass.java

class SomeRandomClass
{
    @Autowired
    SpringUtils springUtils;

    
    public void getBeans() 
    {  
        String[] beans = springUtils.getApplicationContext().getBeanDefinitionNames();
        Arrays.sort(beans);
        for (String bean : beans)
        {
            System.out.println(bean + " of Type :: " + springUtils.getApplicationContext().getBean(bean).getClass());
        }
}
}

Output

DBConfig of Type :: class com.mugil.org.configs.DBConfig$$EnhancerBySpringCGLIB$$d32ee4ac
dbProperties of Type :: class com.mugil.org.configs.DBProperties
spring.datasource-com.mugil.org.configs.DBProperties of Type :: class com.mugil.org.configs.DBProperties
springUtils of Type :: class com.mugil.org.utils.SpringUtils

In case if you don’t want to create a separate class and wanted to access beans in the context you can implement the ApplicationContextAware interface and specify the for loop in overridden setApplicationContext method.

How to load a single class into ApplicationContext

.
.
ApplicationContextRunner context = new ApplicationContextRunner().withUserConfiguration(ExampleConfiguration.class);
.
.

When the client communicates with the server over HTTPS either browser or REST call, the server doesn’t care who the client is, as long as they have the correct credentials. This is what happens in Login forms(Asymmetric communication followed by Symmetric Communication).

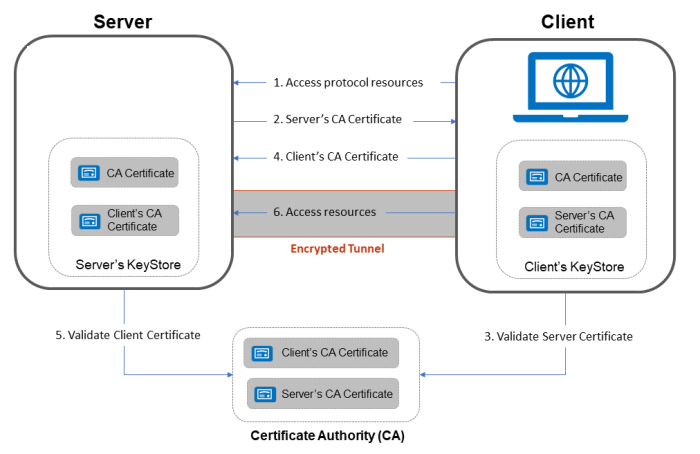
Two-way SSL is used for places where you only want the server to accept connections from a restricted number of users. It helps to mitigate the risk of fraud in online transactions. Two-way SSL authentication (also known as “mutual authentication”, or “TLS/SSL with client certificates”) where two parties authenticate
each other through verifying provided digital certificates, so that both parties are assured of the other’s identity.

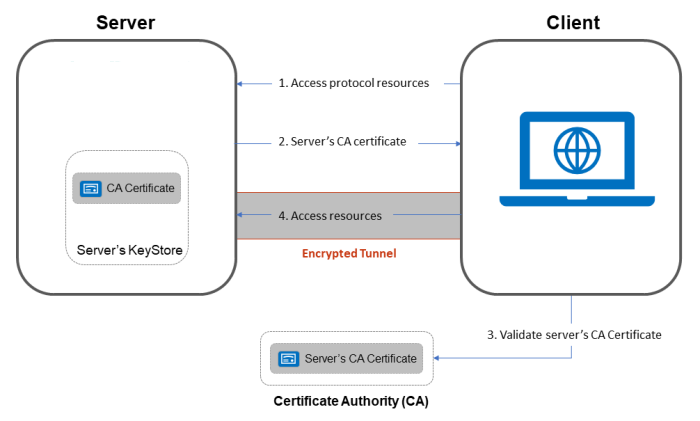
In One-way SSL, where the browser (the client) establishes an SSL connection to a secure web site and the server’s certificate is checked, creating SSL authentication in RESTful web services. The browser either relies on itself or the operating system providing a list of certs that have been designated as trusted Certificate Authorities (CA).

In context to java, Java Key Store is used to store the certs and keys.It must be password protected and entries in it must have an “alias” that is unique. If an alias is not specified, “mykey” is used by default.

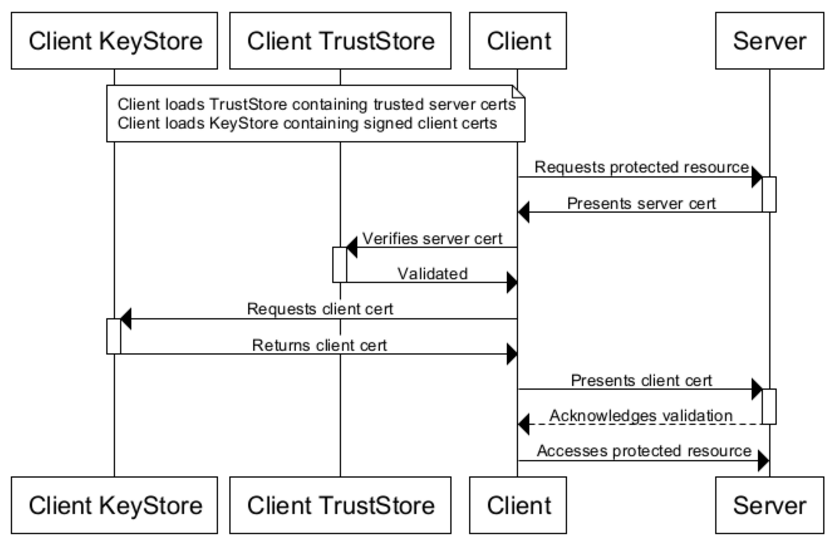
KeyStores provide credentials, TrustStores verify credentials.Clients will use certificates stored in their TrustStores to verify identities of servers. They will present certificates stored in their KeyStores to servers requiring them.

The JDK ships with a tool called Keytool. It manages a JKS of cryptographic keys, X.509 certificate chains, and trusted certificates.

//Importing a truststore which could be used by client for server certificate verification
>> keytool -import -v -trustcacerts -keystore client_truststore.jks -storepass apassword -alias server -file foo.snaplogic.com.cert

//Importing a keystore which could be used by client when server asks of identity certificate
>> keytool -importkeystore -srckeystore client-certificate.p12 -srcstoretype pkcs12 -destkeystore client_keystore.jks -deststoretype jks -deststorepass apassword

// Viewing list of servcer certificates in Client Truststore  
>> keytool -list -v -keystore client_truststore.jks

We can now complete configuration of the REST SSL Account by uploading our client_truststore.jks and client_keystore.jks KeyStore files

One way SSL

  1. Client requests for some protected data from the server on HTTPS protocol. This initiates SSL/TLS handshake process.
  2. Server returns its public certificate to the client along with server hello message.
  3. Client validates/verifies the received certificate. Client verifies the certificate through certification authority (CA) for CA signed certificates.
  4. SSL/TLS client sends the random byte string that enables both the client and the server to compute the secret key to be used for encrypting subsequent message data. The random byte string itself is encrypted with the server’s public key.
  5. After agreeing on this secret key, client and server communicate further for actual data transfer by encrypting/decrypting data using this key.

Two way SSL

  1. Client requests a protected resource over HTTPS protocol and the SSL/TSL handshake process begins.
  2. Server returns its public certificate to the client along with server hello.
  3. Client validates/verifies the received certificate. Client verifies the certificate through certification authority (CA) for CA signed certificates.
  4. If Server certificate was validated successfully, client will provide its public certificate to the server.
  5. Server validates/verifies the received certificate. Server verifies the certificate through certification authority (CA) for CA signed certificates.
  6. After completion of handshake process, client and server communicate and transfer data with each other encrypted with the secret keys shared between the two during handshake.

When Creating a certificate the first thing we do is creating a public and private keys. The Keys generated using java keytool or either by using keystore comes with a self signed certificate which could not be verified with CA. To win third party trust we get our public key signed with someone who is in common between thirdparty and data provider(server). This common entity is nothing but Certificate Authority(CA). To Apply for certificate we should create a CSR Request along with organization name, common name (domain name), locality, and country details.

Certificate Signing Request
A CSR or Certificate Signing request is a block of encoded text that is given to a Certificate Authority when applying for an SSL Certificate. It is usually generated on the server where the certificate will be installed and contains information that will be included in the certificate such as the organization name, common name (domain name), locality, and country. It also contains the public key that will be included in the certificate. A private key is usually created at the same time that you create the CSR, making a key pair. A certificate authority will use a CSR to create your SSL certificate, but it does not need your private key. You need to keep your private key secret. The certificate created with a particular CSR will only work with the private key that was generated with it. So if you lose the private key, the certificate will no longer work.

The CSR is signed by the applicant’s private key.This proves to the CA that the applicant has control of the private key that corresponds to the public key included in the CSR.

How does a CSR looks like?

-----BEGIN CERTIFICATE REQUEST-----
MIIC5jCCAc4CAQAwcTELMAkGA1UEBhMCSU4xEjAQBgNVBAgTCXRhbWlsbmFkdTEQMA4GA1UEBxMH
Y2hlbm5haTESMBAGA1UEChMJbXVnaWwub3JnMRIwEAYDVQQLEwltdWdpbC5vcmcxFDASBgNVBAMT
C211Z2lsdmFubmFuMIIBIjANBgkqhkiG9w0BAQEFAAOCAQ8AMIIBCgKCAQEA9alda8sBOwSPXBOV
IyWD2bgn96RkCcoP1hNE7wsV1sus6mGFpptcF9qu6NZib+7acjRRjFnC5yTgzVOBLse0c3/EQ8H4
KZ+AAgye2++kFmdfwCjeoPeylUaYL2hEdb/cfSIJD4tulpuuocQf1N/X6+Z7W2ojzz9KpCkVhxYv
iuk+V2/zE5Z+kTwDVEPw/t9FKYTkf4+Viv+AGnyZHI3ZjgfLhccLaVL/kxJ8Y62wBC/muFK4CN92
xotBoTj3u7eQyoKb+NsaEvvQK+8+CYacjwMrsrMSPEmyHEAjmfWFkBi/4ZBF1vWhL9tBYZaXqjk5
0npE8fZTEOexO+hNeZVUQwIDAQABoDAwLgYJKoZIhvcNAQkOMSEwHzAdBgNVHQ4EFgQUV9G4Cp5/
QslDtFRjFOXcjj5kYRkwDQYJKoZIhvcNAQELBQADggEBAAejlSzDMUuAbqSe3zNxOADSTJCqhsJU
FE+0F0lxJlkKB6cDcxSvujoDoCuARk0RF0yLfnQz54qUPjWcPWnawLs9nZF/nzFf/ylF3J41fgVX
VveyKPc7TG40S5zGI5R1Y0zpW0hE/O2vZ4kdD1ZaO7UaUmFPZUcGhJWdf2QJh7enEhK6Z+FM19B/
RTySjmDIYKyMAgh65IDqutJD89FcrQx0UcAK0WCe6xR5dylg0FNiEw4GDorJF+HlMp2YXkUuYHNZ
RAZBvjqoic4CyZ60/HhXUruStn7ElB1hga10HyfGanclmfX2+vU5W+ulkhj1xvo4JHJC4AlmKdFZ
fm69MwU=
-----END CERTIFICATE REQUEST-----

Certificate Authority
Whether it is one-way SSL or two-way SSL, certificate-based communication starts through a handshake mechanism that works on the principles of mutual trust. This trust is rooted at the top level with a root CA who is a certified, highly regulated authority that is trusted and authorized to issue and sign digital certificates.

There are multiple layers of CA with the top-most Certificate Authority known as Root CA which is the most trusted body which can issue Root Certificates and is considered as the primary authority to be trusted. Under Root CA, there can be n number of Intermediate CAs which are themselves trusted by Root CA and are eligible and authorized to issue certificates.

Typically, your web browsers store Root CAs certificates in the trust store, and whenever any secure website is accessed, SSL handshake mechanism works by utilizing this trust store to validate any subsequent intermediate or leaf certificates.

//Generate a Keystore with public and Pricate key along with selfsigned certificate
>>keytool -genkey -alias mugilcert2 -keyalg RSA -keystore “D:\mugil2.jks”

//Exporting a self signed certificate which came along in above step(which is are of no use)
>>keytool -export -alias mugilcert2 -file “D:\mugil2jks.cer” -keystore “D:\mugil2.jks”

//Generate a CSR request to be sent to CA
>>keytool -certreq -alias server -file csr.txt -keystore “D:\mugil2.jks”

Self-Signed Certificate
A self-signed SSL certificate is an SSL Certificate that is issued by the individual using it. It’s issued with software that the user has and controls. This can be good for testing environments but it’s got some major drawbacks, but essentially what you need to know is that when a browser receives an SSL Certificate it’s looking for it to be issued by a party it trusts(CA). When you sign your own certificate you’re essentially vouching for your own identity. The primary operational difference between a self-signed certificate and a CA certificate is that with self-signed, a browser will generally give some type of error, warning that the certificate is not issued by a CA.

Root Certificate, Intermediate Certificate and Leaf (Server) Certificate
Root Certificates are available in the trust-store or root store and a certificate validity is confirmed only if its chain of trust reaches to a trusted CA.Below are the list of companies that holds Root to certificate and could offer intermediate certificates.

  1. IdenTrust
  2. DigiCert
  3. GoDaddy

The above companies has tie-up with companies like google or mozilla which install trust store or root store in users systems.. Root CA is a Certificate Authority that owns one or more trusted roots. That means that they have roots in the trust stores of the major browsers. Intermediate CAs or Sub CAs are Certificate Authorities that issue off an intermediate root. They do not have roots in the browser’s trust stores, instead, their intermediate roots chain back to a trusted third-party root. This is sometimes called cross-signing.

Intermediate Certificates are in turn trusted by a Root Certificate by chain of Trust. CAs issue digital certificates to its clients (usually intermediate CAs).
Server Certificate (also known as Leaf Certificate) is a certificate that has been issued to a server by a intermediate CA. A certificate issued to a server is usually by an intermediate CA and a chain of certificates in the form of certificate bundles gets linked to the Root CA to build a trust chain.

In the above example DigiCert is root CA and Digicert2 extended validation server is Intermeidate CA.

Root Store
A root store contains list of trusted root CA certificates.A public-facing root store is usually maintained under the authority of a major software provider, which distributes their root store along with software which depends upon it to determine trust. Many providers of browsers and operating systems operate their own root store programs, and CAs may apply to be accepted into a root store using the criteria of that program. The device will use whatever root store is native to its OS, otherwise it might use a third-party root store via an app like a web browser. There are several major root programs of note:

  1. Microsoft
  2. Apple
  3. Google
  4. Mozilla

CAs do not issue directly from their roots. They add layers of security by issuing intermediates and then signing certificates with those. This helps to minimize and compartmentalize damage in the event of a mis-issuance or security event. Rather than revoke the root certificate and literally every certificate that it signed by extension, you just revoke the intermediate, which only causes the group of certificates issued off that intermediate to get distrusted.

Google and the other browsers recently distrusted Symantec CA brand SSL certificates. They just removed all of Symantec CA’s roots from their trust stores. Now any certificate that is supposed to chain back to those roots fails and is distrusted
Simple Pipeline

 Build -> Tests(QA) -> Deployment(Prod)

Trigger – One which starts an action. On Commit it should trigger a pipeline
Stage – Pipeline contains multiple stages. Stages are logical boundaries. Build, Test and Deployment above are all stages
Job – Stage contains multiple jobs. Build stage contains multiple jobs like asking for VM agent, Copying Target file to drop location
Steps – Job contains multiple steps. Steps can be a task or script which would be run.

Agents would be used to build artifacts in the pipeline. Agents may be based on windows, Linux or mac images which would be available on the fly when the build stage is started during pipeline execution

trigger:
- master

pool:
  vmImage: ubuntu-latest

stages:
- stage: Build
  jobs:
  - job: build
    steps:
    - script: 
        echo Displayed from Script
    - task: Npm@1
      inputs:
        command: 'install'    

Stages

stages:
- stage: string  # name of the stage, A-Z, a-z, 0-9, and underscore
  displayName: string  # friendly name to display in the UI
  dependsOn: string | [ string ]
  condition: string
  pool: string | pool
  variables: { string: string } | [ variable | variableReference ] 
  jobs: [ job | templateReference]