Angular Components
- Decorators – Passing value between components
- Change Detection
- Value Projection
Sending value from Parent to Child Component – Input decorator
- There may be times where the value needs to be passed between Parent Component and Child Component
- Passing Value occurs by parent HTML app.component.html by defining value to be passed and by using @Input() annotation
- In the app.component.ts we are sending a Student object with variable name classRepSent
- In the registration.component.ts we are receiving a Student object with variable name classRepReceive
- app.component.html is the one which enables passing of variable. The passed variable(classRepSent) is at the right side of bracket “classRepSent” and received variable is on left side in square brackets [classRepReceive]
Sending value from Parent to Child Component
app.component.ts
export class AppComponent {
  public classRepSent:Student;

  constructor(){
    this.classRepSent= new Student(110, 'Baalaaji', 31, 74, 65,55,64,84);
  }
  .
  .
}
registration.component.ts
import { Component, OnInit, Input } from '@angular/core';
.
.
export class RegistrationComponent implements OnInit {
  @Input() public classRepReceive:Student;
  .
  .
  ngOnInit() {
    console.log(this.classRepReceive);
  }
app.component.html
<app-registration [classRepReceive]="classRepSent"></app-registration>
Sending value from Child to Parent Component – Output decorator
- For Sending value from child component to parent component we use EventEmitter and @Output annotation
- We want to send a Student object from Child Component(registration.component.ts) to parent Component(app.component.ts)
- Value from child component to parent component could not be sent at time of loading since the components are loaded in hieracial order – parent to child. hence it should be triggered manually in our case we are doing it by using a button
- We use a button in registration.component.html which calls a function sendStudent that inturn calls the emitter to send a student with value anand to parent
- The Same would be received in app.component.ts using receiveStudent function
- Note we are sending a event and receiving a student object. In the HTML we have used receiveStudent as getting event rather than receiving a student object
app.component.ts
export class AppComponent {
.
.
receiveStudent(student:Student){
  console.log(student);
}
.
}
registration.component.ts
import { Component, OnInit, Input, Output, EventEmitter } from '@angular/core';
.
.
export class RegistrationComponent implements OnInit {
  .
  .
  .
  @Output() private student:EventEmitter<Student> = new EventEmitter<Student>();
  .
  .
  sendStudent(pEvent)
  {
    this.student.emit(new Student(106, 'Anandh', 23, 31, 65,55,89,84));
  }
}
app.component.html
<app-registration [classRepReceive]="classRepSent" (student)="receiveStudent($event)"></app-registration>
registration.component.html
.
.
.
<td><input type="button" name="btnCallParent" id="btnCallParent" value="Send Student" (click)="sendStudent($event)"/></td>
.
.
.
Change Detection using ChangeDetection Strategy
- Every time angular notices an event it goes through each and every component tree to check the change in the attribute of object. In very large application this could be a bottleneck and going to have a hit on performance.To avoid the unnecessary check on all component we can let angular know the possible components which could be affected during operation.
- ChangeDetectionStrateg.default- is the change strategy available to component by default. When a object is created by parent component and shared with child component
then any change in attribute of object made in parent component would be immediately available to child component and updated in model - ChangeDetectionStrateg.OnPush – is forcing angular to refresh view of child only when the object is accessed.(Note:This object is created in Parent). Though the child component
would have the updated value it wont be shown up in view.

- The object which is created in parent is shared in between parent and child.
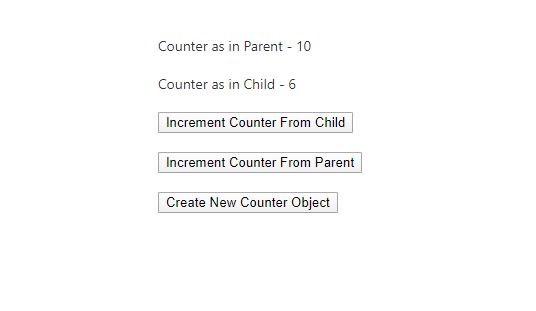
- In the above Screen the Counter as in Parent and Counter as in Child would have the same value irrespective of whether you click increment from parent or increment from childwhen the ChangeDetection Strategy is set to default.When the ChangeDetection Strategy is set to default then incrementing counter using Increment Counter From Parent and Increment Counter From child would have the same effect.
- The Counter as in Parent and Counter as in Child would be changed immediately and reflected in screen. This is nature of angular to detect refresh all component when attribute of object used in one component is changed.But in big application many component need not be refreshed and we could tell angular what component needs to be checked
- When the ChangeDetection Strategy is set to onPush in child then the incrementing the parent counter wont be reflected in Counter as in Child.The updated value would be shown in child only when object is accessed by child component. Otherwise, increment counter in child would display updated value in Counter as in Child
ParentcounterComponent.ts
import { Component, OnInit } from '@angular/core';
import { Counter } from 'src/app/model/counter';

@Component({
  selector: 'app-parentcounter',
  templateUrl: './parentcounter.component.html',
  styleUrls: ['./parentcounter.component.css']
})
export class ParentcounterComponent implements OnInit {

  constructor() { }

  public counter : Counter;

  ngOnInit(): void {
    this.counter = new Counter(1);
  }


  increaseCounter()
  {
    this.counter.value +=2;
    console.log(this.counter.value);
  }

  createNewCounter(){
    this.counter = new Counter(1);
  }
}
CounterComponent.ts
import { Component, OnInit, Input, Output, EventEmitter, ChangeDetectionStrategy } from '@angular/core';
import { Counter } from 'src/app/model/counter';

@Component({
  selector: 'app-counter',
  templateUrl: './counter.component.html',
  styleUrls: ['./counter.component.css']
})
export class CounterComponent implements OnInit {

  @Input() public counterVal: Counter;
  @Output() private counterEmitter: EventEmitter<Counter>;

  ngOnInit(): void {
  }

  increaseChildCounter()
  {
    console.log(this.counterVal.value);
    this.counterVal.value +=1;
  }

  sendCounterToParentComp(){
    this.counterEmitter.emit(this.counterVal);
  }
}
parentcounter.component.html
<span>Counter as in Parent - {{counter.value}}</span><br/>    <br/>
<app-counter [counterVal]="counter"></app-counter><br/>
<button (click)="increaseCounter()">Increment Counter From Parent</button><br/> <br/>
<button (click)="createNewCounter()">Create New Counter Object </button><br/>  <br/>
counter.component.html
<span>Counter as in Child - {{counterVal.value}}</span><br/>    <br/>
<button (click)="increaseChildCounter()">Update Counter From Child</button><br/>
