How to Delete duplicate Rows from Table

In the below table studId 1,6 and 9 is repeated which should be deleted.

studId studentName age
1 Mugil 35
2 Vinu 36
3 Viju 42
4 Mani 35
5 Madhu 36
6 Mugil 35
7 Venu 37
8 Banu 34
9 Mugil 35

Below query wont work on MySQL but the format doesn’t change. When you take Max only last occurrence of row would be taken and others would be excluded.

DELETE FROM tblStudents TS
 WHERE TS.studId NOT IN (SELECT MAX(TSS.studId)
                            FROM tblStudents TSS
                        GROUP BY TSS.studentName, TSS.age)c

The same could be done using MIN function.

SELECT TS.* FROM tblStudents TS
 WHERE TS.studId NOT IN (SELECT MIN(TSS.studId)
                           FROM tblStudents TSS
                          GROUP BY TSS.studentName, TSS.age)                        

Output

studId studentName age
6 Mugil 35
9 Mugil 35

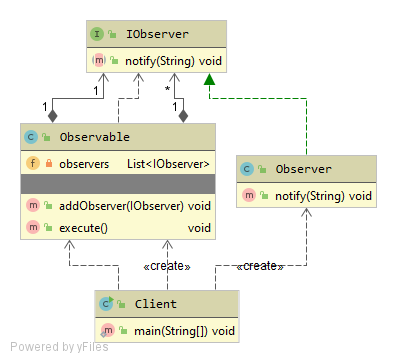
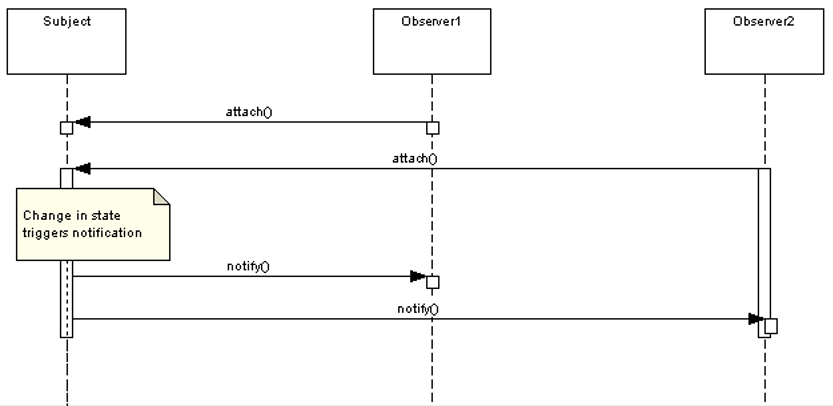
The Observer Pattern defines a one-to-many dependency between objects so that when one object changes state, all of its dependents are notified and updated automatically. The observer pattern is a behavioral design pattern that defines a one-to-many relationship between objects. It allows an object, called the subject, to notify other objects, called observers, about any changes in its state. The observers can then react to these changes according to their own logic.

Why Observer Design Pattern
The subject and the observers are loosely coupled, meaning that they do not depend on each other’s implementation details. The subject only knows that it has a list of observers, and the observers only know that they can update themselves when the subject changes.

When Observer Design Pattern
The observer pattern is especially useful in event-driven systems, where the system reacts to events that occur asynchronously. An event is a change in the state of the system or its components, such as a user input, a network request, or a timer. Use the pattern when some objects in your app must observe others, but only for a limited time or in specific cases. Use the Observer pattern when changes to the state of one object may require changing other objects, and the actual set of objects is unknown beforehand or changes dynamically.

How Observer Design Pattern

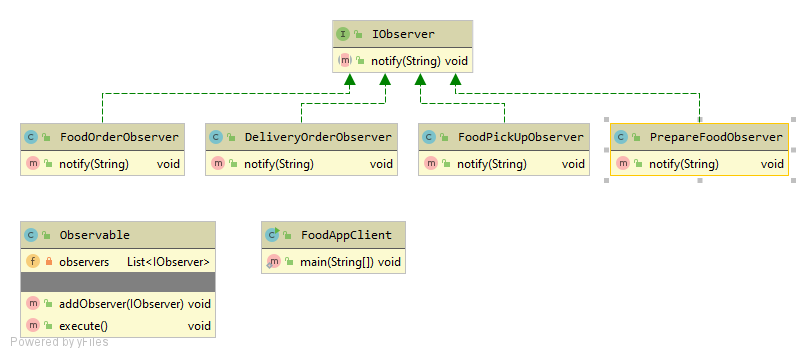
  1. Declare the subscriber interface(IObserver.java). At a bare minimum, it should declare a single update method.
  2. Declare the publisher interface(Observable.java) and describe a pair of methods for adding a subscriber(Observer) object to and removing it from the list. Remember that publishers must work with subscribers only via the subscriber interface.
  3. Create concrete publisher classes. Each time something important happens inside a publisher, it must notify all its subscribers.
  4. Implement the update notification methods in concrete subscriber classes. Most subscribers would need some context data about the event. It can be passed as an argument of the notification method.

IObserver.java

public interface IObserver {
    public void notify(String serviceName);
}

Observer.java

public class Observer implements IObserver {
    @Override
    public void notify(String serviceName) {
            System.out.println("Notification from " + serviceName);
    }
}

Observable.java

public class Observable {
    private List<IObserver> observers = new ArrayList<IObserver>();

    public void addObserver(IObserver observer){
        this.observers.add(observer);
    }

    public void execute(){
        for (IObserver observer : observers) {
            observer.notify("Email Service");
        }
    }
}

Client.java

public class Client {
    public static void main(String[] args) {
        Observable observable = new Observable();
        observable.addObserver(new Observer());
        observable.execute();
    }
}

IObserver.java

public interface IObserver {
    public void notify(String foodItem);
}

DeliveryOrderObserver.java

public class DeliveryOrderObserver implements IObserver {
    @Override
    public void notify(String foodItem) {
        System.out.println("Ready for Pickup - "+ foodItem);
    }
}

FoodOrderObserver.java

public class FoodOrderObserver implements IObserver {
    @Override
    public void notify(String foodItem) {
        System.out.println(" Order received - "+ foodItem);
    }
}

FoodPickUpObserver.java

public class FoodPickUpObserver implements IObserver {
    @Override
    public void notify(String foodItem) {
        System.out.println("Parcel - "+ foodItem);
    }
}

PrepareFoodObserver.java

public class PrepareFoodObserver implements IObserver {
    @Override
    public void notify(String foodItem) {
        System.out.println("Preparing - "+ foodItem);
    }
}

Observable.java

public class Observable {
    private List<IObserver> observers = new ArrayList<IObserver>();

    public void addObserver(IObserver observer){
        this.observers.add(observer);
    }

    public void execute(){
            for(IObserver observer: observers){
                observer.notify("Egg Biryani");
        }
    }
}

FoodAppClient.java

public class FoodAppClient {
    public static void main(String[] args) {
        Observable observable = new Observable();

        observable.addObserver(new FoodOrderObserver());
        observable.addObserver(new PrepareFoodObserver());
        observable.addObserver(new FoodPickUpObserver());
        observable.addObserver(new DeliveryOrderObserver());
        observable.execute();
    }
}
Order received - Egg Biryani
Preparing - Egg Biryani
Parcel - Egg Biryani
Ready for Pickup - Egg Biryani

Advantages of Observer Pattern

  1. The subject and the observers can be reused in different contexts, as long as they implement the common interface. The subject does not need to know the details of the observers, and the observers do not need to know the details of the subject. The subject and the observers can be added, removed, or changed at runtime, without affecting the rest of the system.
  2. The subject can notify the observers asynchronously, without waiting for their responses. The observers can process the events in parallel, without blocking the subject. This allows for the subject and the observers to adapt to changing requirements and scenarios.

Strategy Design Pattern provides a way to extract the behavior of an object into separate classes that can be swapped in and out at runtime

Why Strategy Design Pattern
This pattern enables an object to choose from multiple algorithms and behaviors at runtime, rather than statically choosing a single one.

When Strategy Design Pattern
Places where different algorithms(Strategy) is used to address a single solution I.E Different sorting algorithms can be encapsulated into separate strategies and passed to an object that needs sorting, Different formatting strategies can be encapsulated into separate strategies and passed to an object that needs formatting, Different payment methods can be encapsulated into separate strategies and passed to an object that needs to process payments.

How Strategy Design Pattern
The Strategy Design Pattern works by separating the behavior of an object from the object itself. The behavior is encapsulated into different strategies, each with its own implementation of the behavior.The context maintains a reference to a strategy object and interacts with it through a common interface. At runtime, the context can swap the current strategy with another one, effectively changing the object’s behavior.

  1. Identify the algorithm or behavior that needs to be encapsulated and made interchangeable.
  2. Define an interface that represents the behavior, with a single method signature that takes in any required parameters.
  3. Implement concrete classes that provide specific implementations of the behavior defined in the interface.
  4. Define a context class that holds a reference to the interface and calls its method when needed.
  5. Modify the context class to allow for the dynamic swapping of the concrete implementations at runtime.

PaymentProcessor.java

public class PaymentProcessor{
    private PaymentType paymentType;

    public void processPayment(String paymentAmount){
        if(paymentType.equals(PaymentType.CASH)){
            System.out.println("Cash Payment on Delivery");
        }else if(paymentType.equals(PaymentType.NET_BANKING)){
            System.out.println("Net Banking Payment ");
        }else if(paymentType.equals(PaymentType.UPI)){
            System.out.println("UPI Payment by GPay or Paytm ");
        }else if(paymentType.equals(PaymentType.DEBIT_CARD)){
            System.out.println("Debit Card Payment ");
        }else if(paymentType.equals(PaymentType.CREDIT_CARD)){
            System.out.println("Credit Card Payment ");
        }else{
            System.out.println("Gift Coupon");
        }

    }

    public void setPaymentType(PaymentType paymentType) {
        this.paymentType = paymentType;
    }
}

Problem with above code
In this code, the PaymentProcessorclass has a processPayment method that takes a payment amount and processes the payment. The payment type is set using the setPaymentType method, which sets the paymentType field. The processPayment method then checks the value of paymentType and processes the payment accordingly.

The problem with this code is that it violates the Open-Closed Principle, which states that classes should be open for extension but closed for modification. In this code, if you want to add a new payment type, you would have to modify the processPayment method, which violates the Open-Closed Principle.
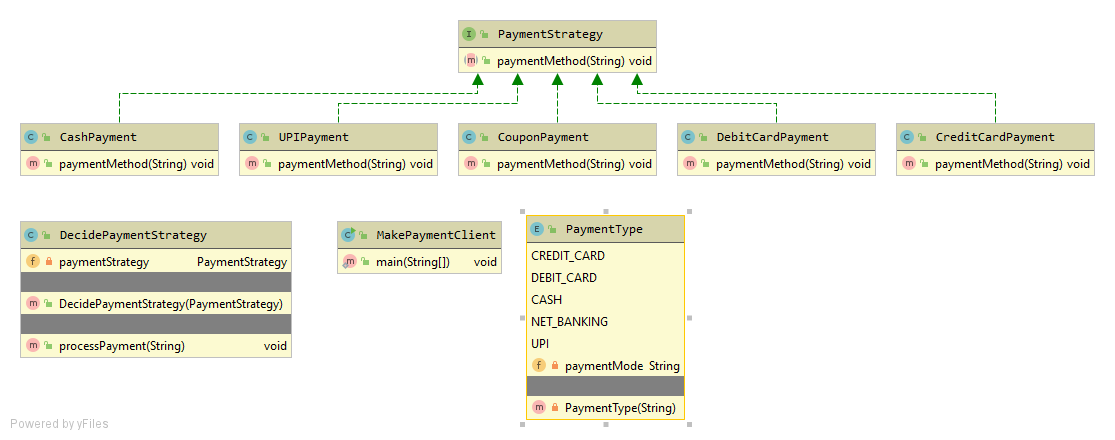
PaymentStrategy.java

public interface PaymentStrategy {
    public void paymentMethod(String amount);
}

CashPayment.java

public class CashPayment implements PaymentStrategy {
    @Override
    public void paymentMethod(String amount) {
        System.out.println(amount + " paid in cash");
    }
}

CreditCardPayment.java

public class CreditCardPayment implements PaymentStrategy {
    @Override
    public void paymentMethod(String amount) {
        System.out.println(amount + " paid in credit card");
    }
}

CouponPayment.java

public class CouponPayment implements PaymentStrategy {
    @Override
    public void paymentMethod(String amount) {
        System.out.println(amount + " paid in Coupons");
    }
}

DebitCardPayment.java

public class DebitCardPayment implements PaymentStrategy {
    @Override
    public void paymentMethod(String amount) {
        System.out.println(amount + " paid in debit card");
    }
}

UPIPayment.java

public class UPIPayment implements PaymentStrategy {
    @Override
    public void paymentMethod(String amount) {
        System.out.println(amount + " paid in UPI");
    }
}

DecidePaymentStrategy.java

public class DecidePaymentStrategy {
    private PaymentStrategy paymentStrategy;

    public DecidePaymentStrategy(PaymentStrategy paymentStrategy) {
        this.paymentStrategy = paymentStrategy;
    }

    public void processPayment(String paymentAmount){
        paymentStrategy.paymentMethod(paymentAmount);
    }
}

MakePaymentClient.java

public class MakePaymentClient {
    public static void main(String[] args) {
        PaymentStrategy objPaymentStrategy = new CashPayment();
        MakePayment objMakePayment = new MakePayment(objPaymentStrategy);
        objMakePayment.processPayment("35.54");
    }
}

PaymentType.java

public enum PaymentType {
    CREDIT_CARD("CREDIT_CARD"), DEBIT_CARD("DEBIT_CARD"), CASH("CASH"), NET_BANKING("NET_BANKING"),UPI("UPI");

    private String paymentMode;

    PaymentType(String paymentMode) {
        this.paymentMode = paymentMode;
    }
}
35.54 paid in cash

Note:
The same strategy design pattern could be implemented using Factory method by moving code to Factory class and deciding the strategy based on the static factory method call.
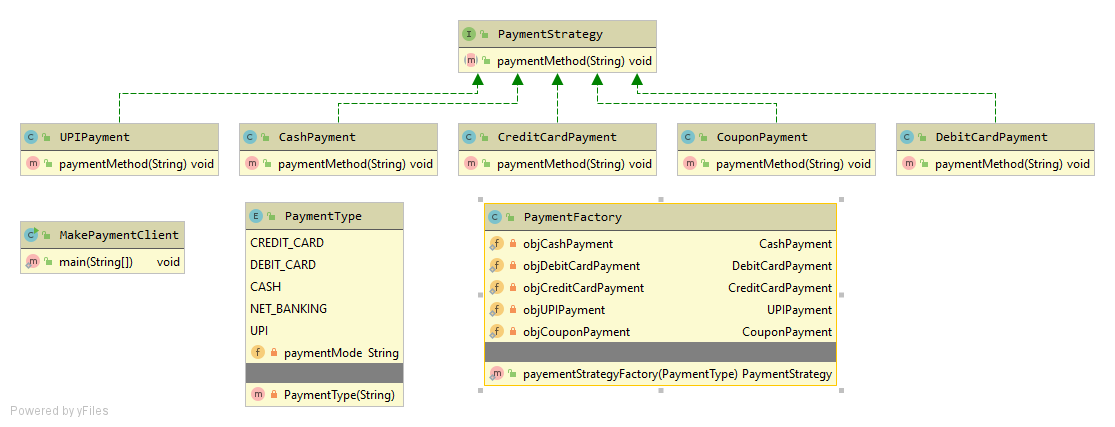
Implementation using Factory Method

PaymentFactory.java

public class PaymentFactory {
    private static CashPayment objCashPayment =  new CashPayment();
    private static DebitCardPayment objDebitCardPayment =  new DebitCardPayment();
    private static CreditCardPayment objCreditCardPayment =  new CreditCardPayment();
    private static UPIPayment objUPIPayment =  new UPIPayment();
    private static CouponPayment objCouponPayment =  new CouponPayment();

    public static PaymentStrategy  payementStrategyFactory(PaymentType paymentType){
        if(paymentType.equals(PaymentType.CASH)){
            return objCashPayment;
        }else if(paymentType.equals(PaymentType.UPI)){
            return objUPIPayment;
        }else if(paymentType.equals(PaymentType.DEBIT_CARD)){
            return objDebitCardPayment;
        }else if(paymentType.equals(PaymentType.CREDIT_CARD)){
            return objCreditCardPayment;
        }else{
            return objCouponPayment;
        }
    }
}

MakePaymentClient.java

public class MakePaymentClient {
    public static void main(String[] args) {
        PaymentStrategy objPaymentStrategy = PaymentFactory.payementStrategyFactory(PaymentType.CREDIT_CARD);
        objPaymentStrategy.paymentMethod("300");
    }
}  
300 paid in credit card

Reference to Factory Pattern
Decorator pattern dynamically changes the functionality of an object at run-time without creating new object rather by adding behavior and attribute to existing Object.

Why Decorator Pattern?

It allows adding new functionality to an existing object without altering its original class. This pattern involves wrapping the original object in a decorator class, which has the same interface as the object it decorates. The decorator class then adds its behavior to the object during runtime, allowing for increased flexibility and modularity in programming.

When Decorator Pattern?
If you want to add additional functionality to an existing object (i.e. already instantiated class at runtime), as opposed to object’s class and/or subclass then Decorator pattern should be used. It is easy to add functionality to an entire class of objects by subclassing an object’s class, but it is impossible to extend a single object this way. With the Decorator Pattern, you can add functionality to a single object and leave others like it unmodified.

How Decorator Pattern Implemented?

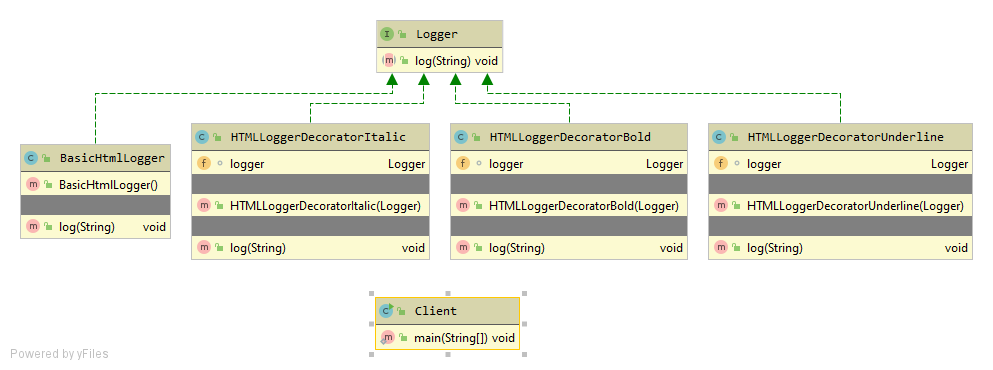
  1. Create a Interface with a concrete base class which implements Interface. This base class has only default constructor
  2. Create Concrete Decorator Classes which implements Interface
  3. The Decorator keeps appending the Logs and the log method would be invoked only once after all the appending is done

Logger.java

public interface Logger {
    void  log(String msg);
}

BasicHtmlLogger.java

public class BasicHtmlLogger implements  Logger {
    public BasicHtmlLogger() {
    }

    @Override
    public void log(String msg) {
        System.out.println("<html>" + msg + "</html>");
    }
}

HTMLLoggerDecoratorBold.java

public class HTMLLoggerDecoratorBold implements Logger {
    Logger logger;

    public HTMLLoggerDecoratorBold(Logger logger) {
        this.logger = logger;
    }

    @Override
    public void log(String msg) {
        logger.log("<bold>"+ msg+ "</bold>");
    }
}

HTMLLoggerDecoratorItalic.java

public class HTMLLoggerDecoratorItalic implements Logger {
    Logger logger;

    public HTMLLoggerDecoratorItalic(Logger logger) {
        this.logger = logger;
    }

    @Override
    public void log(String msg) {
        logger.log("<italic>"+ msg+ "</italic>");
    }
}

HTMLLoggerDecoratorUnderline.java

public class HTMLLoggerDecoratorUnderline implements Logger {
    Logger logger;

    public HTMLLoggerDecoratorUnderline(Logger logger) {
        this.logger = logger;
    }

    @Override
    public void log(String msg) {
        logger.log("<underline>"+ msg+ "</underline>");
    }
}

Client.java

public class Client {
    public static void main(String[] args) {
        Logger objBasicLogger = new BasicHtmlLogger();
        Logger objBoldLogger = new HTMLLoggerDecoratorBold(objBasicLogger);
        Logger objItalicLogger = new HTMLLoggerDecoratorItalic(objBasicLogger);
        Logger objUnderlineLogger = new HTMLLoggerDecoratorUnderline(objBasicLogger);

        Logger objBoldItalicLogger = new HTMLLoggerDecoratorItalic(objBoldLogger);

        objBasicLogger.log("Logging Msg without Formatting"); //Basic Logging
        objUnderlineLogger.log("Logging Msg with Underline"); //Basic Logging + Underline
        objBoldLogger.log("Logging Msg with Bold Formatting"); //Basic Logging + Bold
        objItalicLogger.log("Logging Msg with Italic Formatting"); //Basic Logging + Italic
        objBoldItalicLogger.log("Logging Msg with Bold, Italic Formatting"); //Basic Logging + Bold + Italic
    }
}

Output

<html>Logging Msg without Formatting</html>
<html><underline>Logging Msg with Underline</underline></html>
<html><bold>Logging Msg with Bold Formatting</bold></html>
<html><italic>Logging Msg with Italic Formatting</italic></html>
<html><bold><italic>Logging Msg with Bold, Italic Formatting</italic></bold></html>

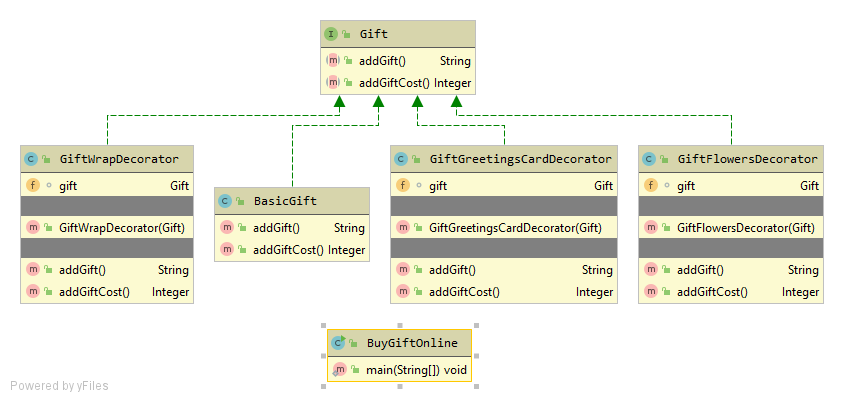
Below we have one more example of Decorator Pattern

Gift.java

public interface Gift {
    public String addGift();
    public Integer addGiftCost();
}

BasicGift.java

public class BasicGift implements Gift {
    @Override
    public String addGift() {
        return "Gift Item";
    }

    @Override
    public Integer addGiftCost() {
        return 50;
    }
}

GiftFlowersDecorator.java

public class GiftFlowersDecorator implements Gift {
    Gift gift;

    public GiftFlowersDecorator(Gift gift) {
        this.gift = gift;
    }

    @Override
    public String addGift() {
        if(gift != null){
            return gift.addGift() + " + Flowers ";
        }

        return " Flowers to gift Item";
    }

    @Override
    public Integer addGiftCost() {

        if(gift != null){
            return gift.addGiftCost() + 10;
        }

        return 5;
    }
}

GiftGreetingsCardDecorator.java

public class GiftGreetingsCardDecorator implements Gift {
    Gift gift;

    public GiftGreetingsCardDecorator(Gift gift) {
        this.gift = gift;
    }

    @Override
    public String addGift() {
        if(gift != null){
            return gift.addGift() + " + Greetings Card";
        }

        return " Greetings Card";
    }

    @Override
    public Integer addGiftCost() {

        if(gift != null){
            return gift.addGiftCost() + 7;
        }

        return 5;
    }
}

GiftWrapDecorator.java

public class GiftWrapDecorator implements Gift {
    Gift gift;

    public GiftWrapDecorator(Gift gift) {
        this.gift = gift;
    }

    @Override
    public String addGift() {
        if(gift != null){
            return gift.addGift() + " + Wrapper ";
        }

        return " wrapping gift Item";
    }

    @Override
    public Integer addGiftCost() {

        if(gift != null){
            return gift.addGiftCost() + 5;
        }

        return 5;
    }
}

BuyGiftOnline.java

public class BuyGiftOnline {
    public static void main(String[] args) {
        Gift objGift = new BasicGift();
        System.out.println(objGift.addGift() + " = " + objGift.addGiftCost());

        Gift objGiftWithWrapper = new GiftWrapDecorator(objGift);
        System.out.println(objGiftWithWrapper.addGift() + " = " + objGiftWithWrapper.addGiftCost());

        Gift objGiftWithWrapperAndFlowers = new GiftFlowersDecorator(objGiftWithWrapper);
        System.out.println(objGiftWithWrapperAndFlowers.addGift() + "= " + objGiftWithWrapperAndFlowers.addGiftCost());

        Gift objGiftWithWrapperAndInvitation= new GiftGreetingsCardDecorator(objGiftWithWrapper);
        System.out.println(objGiftWithWrapperAndInvitation.addGift() + " = " + objGiftWithWrapperAndInvitation.addGiftCost());
    }
}

Output

Gift Item = 50
Gift Item + Wrapper  = 55
Gift Item + Wrapper  + Flowers = 65
Gift Item + Wrapper  + Greetings Card = 62

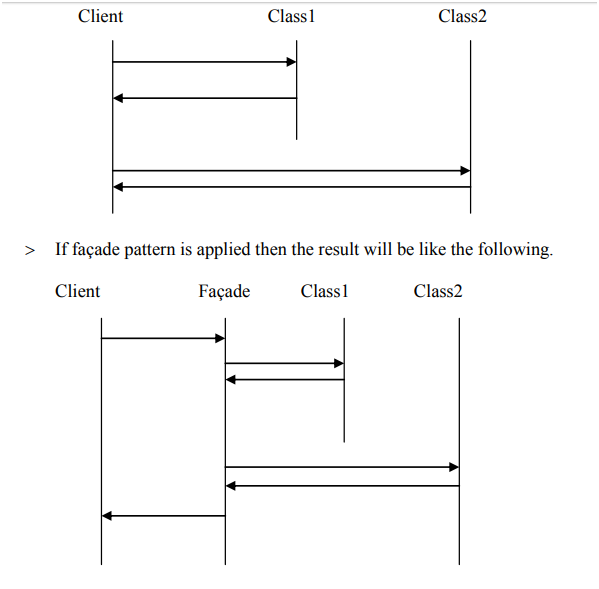
Facade design pattern simplifies the interface to a complex system; because it is usually composed of all the classes which make up the subsystems of the complex system

Why to use Facade Pattern?
Classes in all design patterns are just normal classes. What is important is how they are structured and how they work together to solve a given problem in the best possible way.

The Facade design pattern simplifies the interface to a complex system; because it is usually composed of all the classes which make up the subsystems of the complex system.

A Facade shields the user from the complex details of the system and provides them with a simplified view of it which is easy to use. It also decouples the code that uses the system from the details of the subsystems, making it easier to modify the system later.

When to use Facade Pattern?
To provide higher-level interface that makes the subsystem easier to use.

How to implement Facade Pattern?
Instead of exposing the complex code logic we wrap the complex code in a separate class facade class and call the method of Facade Class.

Code Implementation

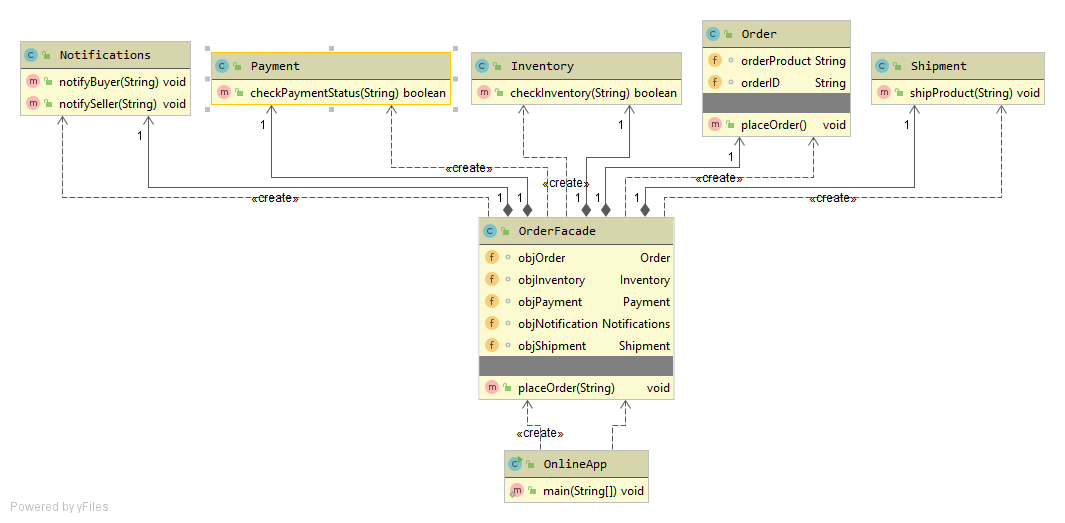
  1. OnlineApp has many code logic which includes Creating Order, Inventory Updation, Payment Tracking, Seller Buyer Notification and Shipment
  2. Instead of writing all the code in onlineApp we can move the code to FacadeClass(OrderFacade.java) and call the method of OrderFacade

Code without Facade Pattern

OnlineApp.java

public class OnlineApp {
    public static void main(String[] args) {
        System.out.println("Step 1: Order Created");
        Order objOrder = new Order();
        objOrder.placeOrder();
        System.out.println("------------------------");

        System.out.println("Step 2: Inventory Updated");
        Inventory objInventory = new Inventory();
        objInventory.checkInventory("Iphone 13");
        System.out.println("------------------------");

        System.out.println("Step 3: Payment Succesful");
        Payment objPayment = new Payment();
        objPayment.checkPaymentStatus("873901");
        System.out.println("------------------------");

        System.out.println("Step 4: Seller and Buyer Notified");
        Notifications objNotification = new Notifications();
        objNotification.notifyBuyer("873901");
        objNotification.notifySeller("873901");
        System.out.println("------------------------");

        System.out.println("Step 5: Shipment Done");
        Shipment objShipment = new Shipment();
        objShipment.shipProduct("Road Name, Location");
        System.out.println("------------------------");

    }
}

Code with Facade Pattern

OrderFacade.java

public class OrderFacade {
    Order objOrder = new Order();
    Inventory objInventory = new Inventory();
    Payment objPayment = new Payment();
    Notifications objNotification = new Notifications();
    Shipment objShipment = new Shipment();

    public void placeOrder(String orderId) {
        System.out.println("Step 1: Order Created");
        objOrder.placeOrder();
        System.out.println("------------------------");

        System.out.println("Step 2: Inventory Updated");
        objInventory.checkInventory("Iphone 13");
        System.out.println("------------------------");

        System.out.println("Step 3: Payment Succesful");
        objPayment.checkPaymentStatus(orderId);
        System.out.println("------------------------");

        System.out.println("Step 4: Seller and Buyer Notified");
        objNotification.notifyBuyer(orderId);
        objNotification.notifySeller(orderId);
        System.out.println("------------------------");

        System.out.println("Step 5: Shipment Done");
        objShipment.shipProduct("Road Name, Location");
        System.out.println("------------------------");
    }
}

OnlineApp.java

public class OnlineApp {
    public static void main(String[] args) {
        OrderFacade objOrderFacade = new OrderFacade();
        objOrderFacade.placeOrder("873901");
    }
}

Output

Step 1: Order Created
Display Cart Order
------------------------
Step 2: Inventory Updated
------------------------
Step 3: Payment Succesful
------------------------
Step 4: Seller and Buyer Notified
Order placed by Buyer
Order Received by Seller
------------------------
Step 5: Shipment Done
Shipping toRoad Name, Location
------------------------

Adapter Pattern help in changing the third party integration without making much changes to the Core code.

Why to use Adapter Pattern?

  1. It Allows Incompatible interfaces between classes to work together without modifying their source code.
  2. It acts as a bridge between two interfaces, making them compatible so that they can collaborate and interact seamlessly.
  3. This pattern is useful when integrating existing or third-party code into an application without modifying the existing codebase.

When to use Adapter Pattern?
You can use the Adapter design pattern when you have to deal with different interfaces with similar behavior (which usually means classes with similar behavior but with different methods).

How to implement Adapter Pattern?
In your code instead of hard coding the method calls of each vendor (or Adaptee), you could then create a generic interface to wrap these similar behaviors and work with only one type of object. The Adapters will then implement the Target interface delegating its method calls to the Adaptees that are passed to the Adapters via constructor.

Code Example:

  1. Below we have PhonePay implementing BankAPI methods
  2. If Phonepay directly tries to use the classes of hdfcAPI or Any other bank api the code would become tightly coupled and would become difficult to change
  3. To get rid of tight coupling what we do in adaptor is we override the methods in the BankAPI and in method definition we call respective banks which the phone pay application has tie ups
  4. In case there is a need tomorrow for the phonepay application to change the Bank Gateway the only place to change is where the Adapter is called.
  5. The transferAmount of the bank API interface is overridden in the corresponding adapter classes and the definition is changed based on the way the corresponding way Bank APIs are getting called

BankAPI.java

public interface BankAPI {
    public void transferAmount(String fromAcc, String toAcc, String amount);
}

HDFCAdapter.java

public class HDFCAdapter implements BankAPI {
    HDFCBankAPI objHDFCBankAPI = new HDFCBankAPI();

    @Override
    public void transferAmount(String fromAcc, String toAcc, String amount) {
        objHDFCBankAPI.performTransaction(fromAcc, toAcc, Float.valueOf(amount));
    }
}

HDFCBankAPI.java

public class HDFCBankAPI {
    public void performTransaction(String creditorAcc, String debitorAcc, Float Amount){
        System.out.println("Transfering Funds");
    }
}

YesAdapter.java

public class YesAdapter implements BankAPI {
    YesBankAPI objYesBankAPI = new YesBankAPI();

    @Override
    public void transferAmount(String fromAcc, String toAcc, String amount) {
        objYesBankAPI.sendMoney(fromAcc, toAcc);
    }
}

YesBankAPI.java

public class YesBankAPI {
    public boolean sendMoney(String creditAcc, String debitAcc){
        System.out.println("Transaction Steps.....");
        return true;
    }
}

SBIAdapter.java

public class SBIAdapter implements BankAPI {
    SBIBankAPI objSBIBankAPI = new SBIBankAPI();

    @Override
    public void transferAmount(String fromAcc, String toAcc, String amount) {
        objSBIBankAPI.transfer(fromAcc, toAcc, amount);
    }
}

SBIBankAPI.java

public class SBIBankAPI {
    public String transfer(String account1, String account2, String Amount){
        System.out.println("Transaction from Account1 to Account2");
        return "Transaction Successful";
    }
}

PhonePay.java

public class PhonePay {
    public static void main(String[] args) {
        //Incase you want to change the Bank Gateway tomorrow you can change the Adapter Alone
        BankAPI objBankAPI = new YesAdapter();
        objBankAPI.transferAmount("AccNo 154264", "AccNo 4264755", "452");
    }
}

What is prototype Pattern?

The Prototype pattern is a creation pattern based on cloning a pre-configured object. The idea is that you pick an object that is configured for either the default or in the ballpark of some specific use case and then you clone this object and configure to your exact needs.

When to use prototype Pattern?

  1. Prototype patterns are required when object creation is a time-consuming, and costly operation, so we create objects with the existing object itself.
  2. The Prototype Design Pattern allows you to create new objects by cloning existing ones without being bound to the specific classes of the objects being cloned. This promotes decoupling between the client code and the concrete classes, making it easier to introduce new types of objects without modifying the client code.

Where to use prototype Pattern?

  1. If you want to create an object but do not want to go through the expensive object creation procedure where network or database calls are made, then use the prototype pattern. Just create a copy of the object and do your changes on it.

How prototype Pattern is acheived?

  1. Create a Interface with clone method
  2. Create a Concrete prototypes which implements the interface. In the below example it is PersonPrototype. This Concrete class would be DB classes which consume lot of resource and the one which you dont want to create again and again
  3. Classes use the above Concrete prototype to add their own attributes and create new classes EmployeePrototype, StudentPrototype, SoftwareEmployee(Concrete Class)
  4. Prototypes are added to Registry which is nothing but an HashMap to Store String and Prototype classes
  5. Concrete classes which want to extend the Prototype uses the above hashmap registry to fetch the protype and add their custom attributes.

There are two things to note in code

  • One is Clone method which makes the extending class mandatory to implement clone method. The same can be done by implementing Clone interface
  • Second thing is how the Concrete Classes implements the clone and creates copy of itself at the same time calling the parent prototype class
    .
    .
        public StudentPrototype(StudentPrototype studentPrototype) {
            super(studentPrototype);
            this.institution = studentPrototype.institution;
            this.rollNo = studentPrototype.rollNo;
        }
    
    .
    
  • PersonPrototype is Concrete Prototype which is costly to create
  • We add Custom attributes at each level and create prototype and concrete class from PersonPrototype

Prototype.java

public interface Prototype<T> {
    T clone();
}

ConcretePersonPrototype.java

public class ConcretePersonPrototype implements Prototype<ConcretePersonPrototype>{
    private String name = "Mugilvannan G";
    private String aadhar = "1452-5874-5124-847";

    public ConcretePersonPrototype() {
    }

    @Override
    public ConcretePersonPrototype clone() {
        return new ConcretePersonPrototype(this);
    }

    public ConcretePersonPrototype(ConcretePersonPrototype concretePersonPrototype) {
        this.name = concretePersonPrototype.name;
        this.aadhar = concretePersonPrototype.aadhar;
    }

    public String getName() {
        return name;
    }

    public String getAadhar() {
        return aadhar;
    }
}

EmployeePrototype.java

public class EmployeePrototype extends ConcretePersonPrototype {
    private Integer pfAccountNo;
    private String startDate;
    private String endDate;

    public EmployeePrototype() {
    }

    public EmployeePrototype(EmployeePrototype employeePrototype) {
        super(employeePrototype);
        this.pfAccountNo = employeePrototype.pfAccountNo;
    }

    public EmployeePrototype clone() {
        return new EmployeePrototype(this);
    }

    public Integer getPfAccountNo() {
        return pfAccountNo;
    }

    public void setPfAccountNo(Integer pfAccountNo) {
        this.pfAccountNo = pfAccountNo;
    }

    public String getStartDate() {
        return startDate;
    }

    public void setStartDate(String startDate) {
        this.startDate = startDate;
    }

    public String getEndDate() {
        return endDate;
    }

    public void setEndDate(String endDate) {
        this.endDate = endDate;
    }

    @Override
    public String toString() {
        return "Career Details : {" + '\'' +
                " Employee Name ='" + super.getName() + '\'' +
                " Employee Aadhar ='" + super.getAadhar() + '\'' +
                " Employee pfAccountNo='" + this.getPfAccountNo() + '\'' +
                '}';
    }
}

StudentPrototype.java

public class StudentPrototypeConcrete extends ConcretePersonPrototype {
    private String institution;
    private  Integer rollNo;

    public StudentPrototypeConcrete() {
    }

    public StudentPrototypeConcrete(StudentPrototypeConcrete studentPrototype) {
        super(studentPrototype);
        this.institution = studentPrototype.institution;
        this.rollNo = studentPrototype.rollNo;
    }

    public Integer getRollNo() {
        return rollNo;
    }

    public void setRollNo(Integer rollNo) {
        this.rollNo = rollNo;
    }

    public String getInstitution() {
        return institution;
    }

    public void setInstitution(String institution) {
        this.institution = institution;
    }

    public StudentPrototypeConcrete clone(){
        return new StudentPrototypeConcrete(this);
    }

    @Override
    public String toString() {
        return "Education Details : {" +
                " Student Name='" + super.getName() + '\'' +
                " Student Aadhar='" + this.getAadhar() + '\'' +
                " Student Institution='" + this.getInstitution() + '\'' +
                " Student Rollno='" + this.getRollNo() + '\'' +
                '}';
    }
}

EmployeePrototype.java

public class EmployeePrototype extends PersonPrototype {
    private Integer pfAccountNo;
    private String startDate;
    private String endDate;

    public EmployeePrototype() {
    }

    public EmployeePrototype(EmployeePrototype employeePrototype) {
        super(employeePrototype);
        this.pfAccountNo = employeePrototype.pfAccountNo;
    }

    public EmployeePrototype clone() {
        return new EmployeePrototype(this);
    }

    public Integer getPfAccountNo() {
        return pfAccountNo;
    }

    public void setPfAccountNo(Integer pfAccountNo) {
        this.pfAccountNo = pfAccountNo;
    }

    public String getStartDate() {
        return startDate;
    }

    public void setStartDate(String startDate) {
        this.startDate = startDate;
    }

    public String getEndDate() {
        return endDate;
    }

    public void setEndDate(String endDate) {
        this.endDate = endDate;
    }

    @Override
    public String toString() {
        return "Career Details : {" + '\'' +
                " Employee Name ='" + super.getName() + '\'' +
                " Employee Aadhar ='" + super.getAadhar() + '\'' +
                " Employee pfAccountNo='" + this.getPfAccountNo() + '\'' +
                '}';
    }
}

SoftwareEmployee.java

public class SoftwareEmployee extends EmployeePrototype {
    public Integer empId;
    public String designation;
    public String practice;
    public String organisation;

    public SoftwareEmployee() {
    }

    public SoftwareEmployee(SoftwareEmployee softwareEmployee) {
        super(softwareEmployee);
        this.empId = softwareEmployee.empId;
        this.designation = softwareEmployee.designation;
        this.practice = softwareEmployee.practice;
        this.organisation = softwareEmployee.organisation;
    }

    public SoftwareEmployee clone(){
        return new SoftwareEmployee(this);
    }

    public Integer getEmpId() {
        return empId;
    }

    public void setEmpId(Integer empId) {
        this.empId = empId;
    }

    public String getDesignation() {
        return designation;
    }

    public void setDesignation(String designation) {
        this.designation = designation;
    }

    public String getPractice() {
        return practice;
    }

    public void setPractice(String practice) {
        this.practice = practice;
    }

    public String getOrganisation() {
        return organisation;
    }

    public void setOrganisation(String organisation) {
        this.organisation = organisation;
    }

    @Override
    public String toString() {
        return "Present Work Details: {" +
                "Software Engineer Name ='" + super.getName() + '\'' +
                " Aadhar No ='" + super.getAadhar() + '\'' +
                " EmpId ='" + this.empId + '\'' +
                " Designation='" + this.designation + '\'' +
                " Organisation='" + this.organisation + '\'' +
                " Practice='" + this.practice + '\'' +
                '}';
    }
}

Client.java

public class Client {
    public static void fillRegistry(PersonRegistry registry) {
        StudentPrototype objStudPrototype = new StudentPrototype();
        objStudPrototype.setRollNo(15462);
        objStudPrototype.setInstitution("Mowbarys");
        registry.register("StudentPerson", objStudPrototype);

        EmployeePrototype objEmpPrototype = new EmployeePrototype();
        objEmpPrototype.setPfAccountNo(4151542);
        objEmpPrototype.setStartDate("2012");
        objEmpPrototype.setEndDate("NA");
        registry.register("EmployeePerson", objEmpPrototype);

        SoftwareEmployee objSoftwareEmployee = new SoftwareEmployee();
        objSoftwareEmployee.setPfAccountNo(4151542);
        registry.register("SoftwareEmployee", objSoftwareEmployee);
    }

    public static void main(String[] args) {
        PersonRegistry registry = new PersonRegistry();
        fillRegistry(registry);

        EmployeePrototype objEmployee = (EmployeePrototype) registry.get("EmployeePerson").clone();

        StudentPrototype objStudent = (StudentPrototype)registry.get("StudentPerson").clone();
        objStudent.setRollNo(15425);
        objStudent.setInstitution("Mowbarys");

        SoftwareEmployee objSoftEmployee1 = (SoftwareEmployee) registry.get("SoftwareEmployee").clone();
        objSoftEmployee1.setStartDate("2011");
        objSoftEmployee1.setEndDate("2012");
        objSoftEmployee1.setEmpId(1001);
        objSoftEmployee1.setOrganisation("Fuchsia Software");
        objSoftEmployee1.designation = "Programmer";
        objSoftEmployee1.practice = "Classic ASP, HTML, CSS";

        SoftwareEmployee objSoftEmployee2 = (SoftwareEmployee) registry.get("SoftwareEmployee").clone();
        objSoftEmployee2.setStartDate("2012");
        objSoftEmployee2.setEndDate("2015");
        objSoftEmployee2.setEmpId(754185);
        objSoftEmployee2.setOrganisation("Infosys");
        objSoftEmployee2.designation = "Technology Analyst";
        objSoftEmployee2.practice = "Java, Spring Boot";

        SoftwareEmployee objSoftEmployee3 = (SoftwareEmployee) registry.get("SoftwareEmployee").clone();
        objSoftEmployee3.setStartDate("2018");
        objSoftEmployee3.setEndDate("NA");
        objSoftEmployee3.setEmpId(152);
        objSoftEmployee3.setOrganisation("Cognizant");
        objSoftEmployee3.designation = "Technology Lead";
        objSoftEmployee3.practice = "Java, Devops";


        System.out.println(objStudent);
        System.out.println(objEmployee);
        System.out.println(objSoftEmployee1);
        System.out.println(objSoftEmployee2);
        System.out.println(objSoftEmployee3);
    }
}

Output

Education Details : { Student Name='Mugilvannan G' Student Aadhar='1452-5874-5124-847' Student Institution='Mowbarys' Student Rollno='15425'}
Career Details : {' Employee Name ='Mugilvannan G' Employee Aadhar ='1452-5874-5124-847' Employee pfAccountNo='4151542'}
Present Work Details: {Software Engineer Name ='Mugilvannan G' Aadhar No ='1452-5874-5124-847' EmpId ='1001' Designation='Programmer' Organisation='Fuchsia Software' Practice='Classic ASP, HTML, CSS'}
Present Work Details: {Software Engineer Name ='Mugilvannan G' Aadhar No ='1452-5874-5124-847' EmpId ='754185' Designation='Technology Analyst' Organisation='Infosys' Practice='Java, Spring Boot'}
Present Work Details: {Software Engineer Name ='Mugilvannan G' Aadhar No ='1452-5874-5124-847' EmpId ='152' Designation='Technology Lead' Organisation='Cognizant' Practice='Java, Devops'}

What is Telescoping Pattern
A telescoping constructor is a series of constructors where each one has a different number of parameters. Each constructor calls a more specific constructor in the hierarchy, providing a default value for the remaining parameters.

Disadvantage of Below Approach

  1. Constructors are hard to read when they have many parameters
  2. When adding new parameters, you have to add new constructors to the chain. This pattern can therefore not scale very well
  3. It becomes difficult to remember the required order of the parameters, especially when many of them are of the same type. Additionally, the code becomes less readable, and it’s not always clear what is being passed to the constructor. This is addressed by using Builder Pattern

Report

import java.util.Date;

public class Report {
    private String reportName;
    private Integer reportSize;
    private String  reportFormat;
    private Date reportDate;

    public Report() {
    }

    //Constructor1
    public Report(String reportName) {
        this.reportName = reportName;
    }

    public Report(String reportName, Integer reportSize) {
        this(reportName); //Call to before Constructor1
        this.reportSize = reportSize;
    }

    public Report(String reportName, Integer reportSize, String  reportFormat) {
        this(reportName, reportSize); //Call to before Constructor2
        this.reportFormat = reportFormat;
    }

    public Report(String reportName, Integer reportSize, String  reportFormat, Date reportDate) {
        this(reportName, reportSize, reportFormat); //Call to before Constructor3
        this.reportDate = reportDate;
    }
}

Why builder Pattern?
If there are many attributes in the class and object is created over several calls it may be in an inconsistent state partway through its construction. To address this builder pattern is introduced. If Object Creation should be delayed until all the validation of class attributes are performed builder pattern addresses the need.

If there are 2 attributes to a Class then we can create 2^N Constructor based on the two attributes. This Results in Boiler plate code. What if the number of attributes keeps increasing over a period of time.

Report.java

import java.util.InvalidPropertiesFormatException;

public class Report {
    private String reportName;
    private String reportFormat;

    private Report(){}

    public static ReportBuilder getReportBuilder(){
        return new ReportBuilder();
    }


    @Override
    public String toString() {
        return "Report{" +
                "reportName='" + reportName + '\'' +
                ", reportFormat='" + reportFormat + '\'' +
                '}';
    }

    public static class ReportBuilder {
        private String reportName;
        private String reportFormat;

        private ReportBuilder(){}

        public ReportBuilder setReportName(String reportName) {
            this.reportName = reportName;
            return this;
        }

        public ReportBuilder setReportFormat(String reportFormat) {
            this.reportFormat = reportFormat;
            return this;
        }

        public Report build() throws InvalidPropertiesFormatException {
            if(this.reportFormat == "CSV"){
                throw new InvalidPropertiesFormatException("Format Not Supported");
            }

            if(this.reportName.length() < 10){
                throw new InvalidPropertiesFormatException("Name should be greater than 10");
            }

            //Object for Report should not be created before validation is completed as above
            Report objReport = new Report();
            objReport.reportName = this.reportName;
            objReport.reportFormat = this.reportFormat;
            return objReport;
        }
    }
}

BuilderPatternClient.java

import java.util.InvalidPropertiesFormatException;

public class BuilderPatternClient {
    public static void main(String[] args) throws InvalidPropertiesFormatException {
        Report objReport = Report.getReportBuilder()
                .setReportFormat("PDF")
                .setReportName("Monthly Transactions")
                .build();

        System.out.println(objReport);
    }
}

Output

Report{reportName='Monthly Transactions', reportFormat='PDF'}