A Bean definition contains the following piece of information called configuration metadata, which helps the container know the following things.

• The way a bean should be created.
• Life cycle details of a bean.
• Associated Bean dependencies.

The above metadata for the bean configuration is provided as a set of properties or attributes in an XML file (configuration file) which together prepare a bean definition. The following are the set of properties.

Properties Usage
class In a bean definition, it is a mandatory attribute. It is used to specify the bean class which can be used by the container to create the bean.
name In a bean definition, this attribute is used to specify the bean identifier uniquely. In XML based configuration metadata for a bean, we use the id and/or name attributes in order to specify the bean identifier(s).
scope This attribute is used to specify the scope of the objects which are created from a particular bean definition.
constructor-arg In a bean definition, this attribute is used to inject the dependencies.
properties In a bean definition, this attribute is used to inject the dependencies.
autowiring mode In a bean definition, this attribute is used to inject the dependencies.
lazy-initialization mode In a bean definition, a lazy-initialized bean informs the IoC container to create a bean instance only when it is first requested, instead of startup.
initialization method In a bean definition, a callback to be called after all required properties on the bean have been set up by the container.
destruction method In a bean definition, a callback to be used when the container that contains the bean is destroyed.

In the following example, we are going to look into an XML based configuration file which has different bean definitions. The definitions include lazy initialization (lazy-init), initialization method (init-method), and destruction method (destroy-method) as shown below. This configuration metadata file can be loaded either through BeanFactory or ApplicationContext

<?xml version = "1.0" encoding = "UTF-8"?>

<beans xmlns = "http://www.springframework.org/schema/beans"
   xmlns:xsi = "http://www.w3.org/2001/XMLSchema-instance"
   xsi:schemaLocation = "http://www.springframework.org/schema/beans
   http://www.springframework.org/schema/beans/spring-beans-3.0.xsd">

   <!-- A simple bean definition -->
   <bean id = "..." class = "...">
      <!— Here will be collaborators and configuration for this bean -->
   </bean>

   <!-- A bean definition which has lazy init set on -->
   <bean id = "..." class = "..." lazy-init = "true">
      <!-- Here will be collaborators and configuration for this bean -->
   </bean>

   <!-- A bean definition which has initialization method -->
   <bean id = "..." class = "..." init-method = "...">
      <!-- Here will be collaborators and configuration for this bean -->
   </bean>

   <!-- A bean definition which has destruction method -->
   <bean id = "..." class = "..." destroy-method = "...">
      <!-- collaborators and configuration for this bean go here -->
   </bean>

   <!-- more bean definitions can be written below -->
   
</beans>

Method reference is used to refer method of functional interface. It is compact and easy form of lambda expression. Each time when you are using lambda expression to just referring a method, you can replace your lambda expression with method reference.

3 types of method references:

  1. Reference to a static method
  2. Reference to an instance method
  3. Reference to a constructor

Reference to a static method
Syntax

  ClassName::MethodName
import java.util.function.BiFunction;
class Arithmetic 
 {
 public static int add(int a, int b) 
 {
  return a + b;
 }
}
public class MethodReference 
{
 public static void main(String[] args) 
 {
  BiFunction < Integer, Integer, Integer > adder = Arithmetic::add;
  int result = adder.apply(10, 20);
  System.out.println(result);
 }
}

Reference to an instance method
Syntax

Object::methodName
import java.util.function.BiFunction;
class Arithmetic 
 {
 public int add(int a, int b) 
 {
  return a + b;
 }
}
public class MethodReference 
{
 public static void main(String[] args) 
 {
  Arithmetic objArithmetic = new Arithmetic();
  BiFunction < Integer, Integer, Integer > adder = objArithmetic::add;
  int result = adder.apply(10, 20);
  System.out.println(result);
 }
}

Reference to a constructor
Syntax

ClassName::new  
interface Messageable {
 Message getMessage(String msg);
}
class Message {
 Message(String msg) {
  System.out.print(msg);
 }
}
public class ConstructorReference {
 public static void main(String[] args) {
  Messageable hello = Message::new;
  hello.getMessage("Hello");
 }
}

Q1.What is the Difference between applicationContext and BeanFactory?
ApplicationContext is more feature rich container implementation and should be favored over BeanFactory.Both BeanFactory and ApplicationContext provides a way to get a bean from Spring IOC container by calling getBean(“bean name”)

  1. Bean factory instantiate bean when you call getBean() method while ApplicationContext instantiates Singleton bean when the container is started, It doesn’t wait for getBean to be called.
  2. BeanFactory provides basic IOC and DI features while ApplicationContext provides advanced features
  3. ApplicationContext is ability to publish event to beans that are registered as listener.
  4. implementation of BeanFactory interface is XMLBeanFactory while one of the popular implementation of ApplicationContext interface is ClassPathXmlApplicationContext.In web application we use we use WebApplicationContext which extends ApplicationContext interface and adds getServletContext method
  5. ApplicationContext provides Bean instantiation/wiring,Automatic BeanPostProcessor registration, Automatic BeanFactoryPostProcessor registration,Convenient MessageSource access and ApplicationEvent publication whereas BeanFactory provides only Bean instantiation/wiring

null

Q2.What is the Difference between Component and Bean?

  1. @Component auto detects and configures the beans using classpath scanning whereas @Bean explicitly declares a single bean, rather than letting Spring do it automatically.
  2. @Component does not decouple the declaration of the bean from the class definition where as @Bean decouples the declaration of the bean from the class definition.
  3. @Component is a class level annotation where as @Bean is a method level annotation and name of the method serves as the bean name.
  4. @Component need not to be used with the @Configuration annotation where as @Bean annotation has to be used within the class which is annotated with @Configuration.
  5. We cannot create a bean of a class using @Component, if the class is outside spring container whereas we can create a bean of a class using @Bean even if the class is present outside the spring container.
  6. @Component has different specializations like @Controller, @Repository and @Service whereas @Bean has no specializations.

@Component (and @Service and @Repository) are used to auto-detect and auto-configure beans using classpath scanning. There’s an implicit one-to-one mapping between the annotated class and the bean (i.e. one bean per class). Control of wiring is quite limited with this approach since it’s purely declarative.

@Bean is used to explicitly declare a single bean, rather than letting Spring do it automatically as above. It decouples the declaration of the bean from the class definition and lets you create and configure beans exactly how you choose.

Let’s imagine that you want to wire components from 3rd-party libraries (you don’t have the source code so you can’t annotate its classes with @Component), where an automatic configuration is not possible.The @Bean annotation returns an object that spring should register as a bean in the application context. The body of the method bears the logic responsible for creating the instance.
@Bean is applicable to methods, whereas @Component is applicable to types

Q3.What is the difference between @Configuration and @Component in Spring?
@Configuration Indicates that a class declares one or more @Bean methods and may be processed by the Spring container to generate bean definitions and service requests for those beans at runtime

@Component Indicates that an annotated class is a “component”. Such classes are considered as candidates for auto-detection when using annotation-based configuration and classpath scanning.

@Configuration is meta-annotated with @Component, therefore @Configuration classes are candidates for component scanning

Q4.Life cycle of Spring Bean

  1. There are five methods called before bean comes to ready state
  2. BeanPostProcessor method – postProcessBeforeInitilaization and postProcessAfterInitilaization would be called between init method(3 methods)
  3. After postProcessBeforeInitilaization @postContruct and afterPropertiesSet method would be called(2 methods)
  4. Bean comes to Ready state
  5. Once Spring shutdown is called @PreDestroy, destroy() and custom destroy method are called(3 methods)

Refer here

Q5.What is CGLIB in Spring?
Classes in Java are loaded dynamically at runtime. Cglib is using this feature of Java language to make it possible to add new classes to an already running Java program.Hibernate uses cglib for generation of dynamic proxies. For example, it will not return full object stored in a database but it will return an instrumented version of stored class that lazily loads values from the database on demand.Popular mocking frameworks, like Mockito, use cglib for mocking methods. The mock is an instrumented class where methods are replaced by empty implementations.

Q6.What is the difference between applicationcontext and webapplicationcontext in Spring?

  1. Spring MVC has ApplicationContext and WebApplicationContexts which is the extension of ApplicationContext
  2. There could be more than one WebApplicationContext
  3. All the Stateless attributes like DBConnections and Spring Security would be defined in ApplicationContext and shared among multiple WebApplicationContext
  4. ApplicationContext are loaded by ContextLoaderListener which is declared in web.xml
  5. A single web application can have multiple WebApplicationContext and each Dispatcher servlet (which is the front controller of Spring MVC architecture) is associated with a WebApplicationContext. The webApplicationContext configuration file *-servlet.xml is specific to a DispatcherServlet. And since a web application can have more than one dispatcher servlet configured to serve multiple requests, there can be more than one webApplicationContext file per web application.

Refer here

Q7.What are different bean scopes with realtime example?
Singleton: It returns a single bean instance per Spring IoC container.This single instance is stored in a cache of such singleton beans, and all subsequent requests and references for that named bean return the cached object. If no bean scope is specified in the configuration file, singleton is default. Real world example: connection to a database

Prototype: It returns a new bean instance each time it is requested. It does not store any cache version like singleton. Real world example: declare configured form elements (a textbox configured to validate names, e-mail addresses for example) and get “living” instances of them for every form being created.Batch processing of data involves prototype scope beans.

Request: It returns a single bean instance per HTTP request. Real world example: information that should only be valid on one page like the result of a search or the confirmation of an order. The bean will be valid until the page is reloaded.

Session: It returns a single bean instance per HTTP session (User level session). Real world example: to hold authentication information getting invalidated when the session is closed (by timeout or logout). You can store other user information that you don’t want to reload with every request here as well.

GlobalSession: It returns a single bean instance per global HTTP session. It is only valid in the context of a web-aware Spring ApplicationContext (Application level session). It is similar to the Session scope and really only makes sense in the context of portlet-based web applications. The portlet specification defines the notion of a global Session that is shared among all of the various portlets that make up a single portlet web application. Beans defined at the global session scope are bound to the lifetime of the global portlet Session.

Q8.What is Portlet application?what is the difference between a portlet and a servlet?
Servlets and Portlets are web based components which use Java for their implementation.Portlets are managed by a portlet container just like servlet is managed by servlet container.
When your application works in Portlet container it is built of some amount of portlets. Each portlet has its own session, but if your want to store variables global for all portlets in your application than you should store them in globalSession. This scope doesn’t have any special effect different from session scope in Servlet based applications.

The simplest way to think of this is that a servlet renders an entire web page, and a portlet renders a specific rectangular part (subsection) of a web page. For example, the advertising bar on the right hand side of a news page could be rendered as a portlet. But you wouldn’t implement a single edit field as a portlet, because that’s too granular. Basically if you break down a web page into it’s major sectional areas, those are good candidates to make into portlets. Portlet never renders complete web page with html start and end tags but part of page.

Spring Bean life Cycle is hooked to the below 4 interfaces Methods

  1. InitializingBean and DisposableBean callback interfaces
  2. *Aware interfaces for specific behavior
  3. Custom init() and destroy() methods in bean configuration file
  4. @PostConstruct and @PreDestroy annotations

null

InitializingBean and DisposableBean callback interfaces
InitializingBean and DisposableBean are two marker interfaces, a useful way for Spring to perform certain actions upon bean initialization and destruction.

  1. For bean implemented InitializingBean, it will run afterPropertiesSet() after all bean properties have been set.
  2. For bean implemented DisposableBean, it will run destroy() after Spring container is released the bean.

Refer Here and here

Custom init() and destroy() methods in bean configuration file
Using init-method and destroy-method as attribute in bean configuration file for bean to perform certain actions upon initialization and destruction.

@PostConstruct and @PreDestroy annotations
We can manage lifecycle of a bean by using method-level annotations @PostConstruct and @PreDestroy.

The @PostConstruct annotation is used on a method that needs to be executed after dependency injection is done to perform any initialization.

The @PreDestroy annotation is used on methods as a callback notification to signal that the instance is in the process of being removed by the container.

@PostConstruct vs init-method vs afterPropertiesSet
There is any difference but there are priorities in the way they work. @PostConstruct, init-method.@PostConstruct is a JSR-250 annotation while init-method is Spring’s way of having an initializing method.If you have a @PostConstruct method, this will be called first before the initializing methods are called. If your bean implements InitializingBean and overrides afterPropertiesSet, first @PostConstruct is called, then the afterPropertiesSet and then init-method.

@Component
public class MyComponent implements InitializingBean {
	
	@Value("${mycomponent.value:Magic}")
	public String value;
	
	public MyComponent() {
		log.info("MyComponent in constructor: [{}]", value); // (0) displays: Null [properties not set yet]
	}
	
	@PostConstruct
	public void postConstruct() {
		log.info("MyComponent in postConstruct: [{}]", value); // (1) displays: Magic
	}

	@Override // (equivalent to init-method in XML; overrides InitializingBean.afterPropertiesSet()
	public void afterPropertiesSet() {
		log.info("MyComponent in afterPropertiesSet: [{}]", value);  // (2) displays: Magic
	}	

        public void initIt() throws Exception {
	  log.info("MyComponent in init: " + value);
	}

	@PreDestroy
	public void preDestroy() {
		log.info("MyComponent in preDestroy: [{}], self=[{}]", value); // (3) displays: 
	}

        public void cleanUp() throws Exception {
	  log.info("Spring Container is destroy! Customer clean up");
	}
}

Spring.xml

<beans xmlns="http://www.springframework.org/schema/beans"
	xmlns:xsi="http://www.w3.org/2001/XMLSchema-instance"
	xsi:schemaLocation="http://www.springframework.org/schema/beans
	http://www.springframework.org/schema/beans/spring-beans-2.5.xsd">
	<bean id="customerService" class="com.mkyong.customer.services.CustomerService" 
		init-method="initIt" destroy-method="cleanUp">   		
		<property name="message" value="i'm property message" />
	</bean>		
</beans>

Output

MyComponent in constructor: [null]
MyComponent in postConstruct: [Magic]
MyComponent in init: [Magic from XML]
MyComponent in afterPropertiesSet: [Magic]
MyComponent in preDestroy: [Magic]
Spring Container is destroy! Customer clean up

When to use what?
init-method and destroy-method is the recommended approach because of no direct dependency to Spring Framework and we can create our own methods.
InitializingBean and DisposableBean To interact with the container’s management of the bean lifecycle, you can implement the Spring InitializingBean and DisposableBean interfaces. The container calls afterPropertiesSet() for the former and destroy() for the latter to allow the bean to perform certain actions upon initialization and destruction of your beans.
@PostConstruct and @PreDestroy – The JSR-250 @PostConstruct and @PreDestroy annotations are generally considered best practice for receiving lifecycle callbacks in a modern Spring application. Using these annotations means that your beans are not coupled to Spring specific interfaces.

Q1.How to inject bean created using new Operator or Injecting Spring beans into non-managed objects

  1. Using @Configurable refer here
  2. using AutowireCapableBeanFactory

Let take the below code

public class MyBean 
{
    @Autowired 
    private AnotherBean anotherBean;
}

MyBean obj = new MyBean();

I have a class doStuff in which the obj of MyBean created using new operator needs to be injected. To do this use AutowireCapableBeanFactory and call autowireBean method with beanFactory reference.

private @Autowired AutowireCapableBeanFactory beanFactory;

public void doStuff() {
   MyBean obj = new MyBean();
   beanFactory.autowireBean(obj);
   //obj will now have its dependencies autowired.
}

Q2.What is the Difference between @Inject and @Autowired in Spring Framework?
@Inject specified in javax.inject.Inject annotations is part of the Java CDI (Contexts and Dependency Injection) standard introduced in Java EE 6 (JSR-299). Spring has chosen to support using @Inject synonymously with their own @Autowired annotation.@Autowired is Spring’s own (legacy) annotation. @Inject is part of a new Java technology called CDI that defines a standard for dependency injection similar to Spring. In a Spring application, the two annotations work the same way as Spring has decided to support some JSR-299 annotations in addition to their own.

Q3.Use of the Following in Spring Framework?
@RequestMapping – All incoming requests are handled by the Dispatcher Servlet and it routes them through the Spring framework. When the Dispatcher Servlet receives a web request, it determines which controllers should handle the incoming request. Dispatcher Servlet initially scans all the classes that are annotated with the @Controller annotation. The dispatching process depends on the various @RequestMapping annotations declared in a controller class and its handler methods.The @RequestMapping annotation is used to map the web request onto a handler class (i.e. Controller) or a handler method and it can be used at the Method Level or the Class Level.
Example – for the URL http://localhost:8080/ProjectName/countryController/countries

@Controller
@RequestMapping(value = "/countryController")
public class CountryController {
 
 @RequestMapping(value = "/countries", method = RequestMethod.GET, headers = "Accept=application/json")
 public List getCountries() {
    // Some Business Logic
 } 
Annotations Equivalent
@GetMapping @RequestMapping(method = RequestMethod.GET)
@PostMapping @RequestMapping(method = RequestMethod.POST)
@PutMapping @RequestMapping(method = RequestMethod.PUT)
@DeleteMapping @RequestMapping(method = RequestMethod.DELETE)
@PatchMapping @RequestMapping(method = RequestMethod.PATCH)

@RequestParam – By using RequestParam we can get parameters to the method

@RequestMapping(value = "/display", method = RequestMethod.GET)
public String showEmployeeForm(@RequestParam("empId") String empId) {
        // Some Business Logic
}

@Pathvariable – @PathVariable is to obtain some placeholder from the URI
If empId and empName as parameters to the method showEmployeeForm() by using the @PathVariable annotation. For e.g.: /employee/display/101/Mux
empId = 101
empName = Mux

@Controller
@RequestMapping(value = "/employee")
public class EmployeeController {
    @RequestMapping(value = "/display/{empId}/{empName}")
    public ModelAndView showEmployeeForm(@PathVariable String empId, @PathVariable String empName) {
                // Some Business Logic
    } 
}

Q4.What is the Difference between @RequestParam vs @PathVariable?
@RequestParam annotation has following attributes

http://localhost:8080/springmvc/hello/101?param1=10¶m2=20
public String getDetails(
    @RequestParam(value="param1", required=true) String param1,
        @RequestParam(value="param2", required=false) String param2){
...
}
defaultValue This is the default value as a fallback mechanism if request is not having the value or it is empty. i.e param1
name Name of the parameter to bind i.e param1
required Whether the parameter is mandatory or not. If it is true, failing to send that parameter will fail. i.e false
value This is an alias for the name attribute i.e param1

@PathVariable is to obtain some placeholder from the URI (Spring call it an URI Template) and @RequestParam is to obtain an parameter from the URI as well.@PathVariable annotation has only one attribute value for binding the request URI template. It is allowed to use the multiple @PathVariable annotation in the single method. But, ensure that no more than one method has the same pattern.Annotation which indicates that a method parameter should be bound to a name-value pair within a path segment. Supported for RequestMapping annotated handler methods.

localhost:8080/person/Tom;age=25;height=175 and Controller:
@GetMapping("/person/{name}")
@ResponseBody
public String person(
    @PathVariable("name") String name, 
    @MatrixVariable("age") int age,
    @MatrixVariable("height") int height) {

    // ...
}

Q5.What is use of @RequestBody and @ResponseBody?

  1. @RequestBody and @ResponseBody used in controller to implement smart object serialization and deserialization. They help you avoid boilerplate code by extracting the logic of message conversion and making it an aspect. Other than that they help you support multiple formats for a single REST resource without duplication of code.
  2. If you annotate a method with @ResponseBody, spring will try to convert its return value and write it to the http response automatically.
  3. If you annotate a methods parameter with @RequestBody, spring will try to convert the content of the incoming request body to your parameter object on the fly.

Q6.What is @Transactional used for?
When Spring loads your bean definitions, and has been configured to look for @Transactional annotations, it will create these proxy objects around your actual bean. These proxy objects are instances of classes that are auto-generated at runtime. The default behaviour of these proxy objects when a method is invoked is just to invoke the same method on the “target” bean (i.e. your bean).
Refere here

Q1.What is use of @SpringBootApplication

 @SpringBootApplication =  @Configuration + @EnableAutoConfiguration + @ComponentScan

@Configuration – Spring Configuration annotation indicates that the class has @Bean definition methods. So Spring container can process the class and generate Spring Beans to be used in the application.Refer here

@EnableAutoConfiguration – @EnableAutoConfiguration automatically configures the Spring application based on its included jar files, it sets up defaults or helper based on dependencies in pom.xml. Auto-configuration is usually applied based on the classpath and the defined beans. Therefore, we donot need to define any of the DataSource, EntityManagerFactory, TransactionManager etc and magically based on the classpath, Spring Boot automatically creates proper beans and registers them for us. For example when there is a tomcat-embedded.jar on your classpath you likely need a TomcatEmbeddedServletContainerFactory (unless you have defined your own EmbeddedServletContainerFactory bean).

@EnableAutoConfiguration has a exclude attribute to disable an auto-configuration explicitly otherwise we can simply exclude it from the pom.xml, for example if we do not want Spring to configure the tomcat then exclude spring-bootstarter-tomcat from spring-boot-starter-web.
@ComponentScan – @ComponentScan provides scope for spring component scan, it simply goes though the provided base package and picks up dependencies required by @Bean or @Autowired etc, In a typical Spring application, @ComponentScan is used in a configuration classes, the ones annotated with @Configuration. Configuration classes contains methods annotated with @Bean. These @Bean annotated methods generate beans managed by Spring container. Those beans will be auto-detected by @ComponentScan annotation. There are some annotations which make beans auto-detectable like @Repository , @Service, @Controller, @Configuration, @Component. In below code Spring starts scanning from the package including BeanA class

@Configuration
@ComponentScan(basePackageClasses = BeanA.class)
@EnableAutoConfiguration(exclude = {DataSourceAutoConfiguration.class})
public class Config {

  @Bean
  public BeanA beanA(){
    return new BeanA();
  }

  @Bean
  public BeanB beanB{
    return new BeanB();
  }

}

Q2.What @Configurable annotation Does?
@Configurable – @Configurable is an annotation that injects dependencies into objects, that are not managed by Spring using aspectj libraries. You still use old way of instantiation with plain new operator to create objects but the spring will take care of injecting the dependencies into that object automatically for you.
Refer here

Q3.What is Starter Project?What are the Starter Project offered?
Starter POMs are a set of convenient dependency descriptors that you can include in your application
spring-boot-starter-web-services – SOAP Web Services
spring-boot-starter-web – Web & RESTful applications
spring-boot-starter-test – Unit testing and Integration Testing
spring-boot-starter-jdbc – Traditional JDBC
spring-boot-starter-hateoas – Add HATEOAS features to your services
spring-boot-starter-security – Authentication and Authorization using Spring Security
spring-boot-starter-data-jpa – Spring Data JPA with Hibernate
spring-boot-starter-data-rest – Expose Simple REST Services using Spring Data REST

Q4.What SpringApplication.run() method does?

@SpringBootApplication
public class EmployeeManagementApplication 
{
 public static void main(String[] args) 
 {
  SpringApplication.run(EmployeeManagementApplication.class, args);
 }
}

– SpringApplication class is used to bootstrap and launch a Spring application from a Java main method.
– Creates the ApplicationContext from the classpath, scan the configuration classes and launch the application
– You can find the list of beans loaded by changing the code as below.Spring Boot provides auto-configuration, there are a lot of beans getting configured by it.

  
@SpringBootApplication(scanBasePackages = "com.mugil.org.beans")
public class EmployeeManagementApplication
{
	public static void main(String[] args)
	{
		ApplicationContext ctx = SpringApplication.run(EmployeeManagementApplication.class, args);
		String[] beans = ctx.getBeanDefinitionNames();
		for(String s : beans) System.out.println(s);
	}
}

@Component
public class Employee 
{
.
.
.
}

In the console you could see employeeManagementApplication and employee getting printed with their starting
letter in lower case.

Q5.Why Spring Boot created?
There was lot of difficulty to setup Hibernate Datasource, Entity Manager, Session Factory, and Transaction Management. It takes a lot of time for a developer to set up a basic project using Spring with minimum functionality. Spring Boot does all of those using AutoConfiguration and will take care of all the internal dependencies that your application needs — all you need to do is run your application. It follows “Opinionated Defaults Configuration” Approach to reduce Developer effort.Spring Boot looks at a) Frameworks available on the CLASSPATH b) Existing configuration for the application. Based on these, Spring Boot provides the basic configuration needed to configure the application with these frameworks. This is called Auto Configuration.

Q6.
Q7.

@Configuration – @Configuration as a replacement to the XML based configuration for configuring spring beans.So instead of an xml file we write a class and annotate that with @Configuration and define the beans in it using @Bean annotation on the methods.It is just another way of configuration Indicates that a class declares one or more @Bean methods and may be processed by the Spring container to generate bean definitions and service requests for those beans at runtime.

Use @Configuration annotation on top of any class to declare that this class provides one or more @Bean methods and may be processed by the Spring container to generate bean definitions and service requests for those beans at runtime.

AppConfig.java

@Configuration
public class AppConfig {
 
    @Bean(name="demoService")
    public DemoClass service()
    {
        
    }
}

pom.xml
The following dependency should be added to pom.xml before using @configuration annotation to get the bean from the context

<dependency>
		<groupId>org.springframework</groupId>
		<artifactId>spring-context</artifactId>
		<version>5.0.6.RELEASE</version>
</dependency>
public class VerifySpringCoreFeature
{
    public static void main(String[] args)
    {
        ApplicationContext context = new AnnotationConfigApplicationContext(ApplicationConfiguration.class); 
        DemoManager  obj = (DemoManager) context.getBean("demoService"); 
        System.out.println( obj.getServiceName() );
    }
}

What if I want to ensure the beans are already loaded even before requested and fail-fast

import org.springframework.context.annotation.AnnotationConfigApplicationContext;
public class MySpringApp {
	public static void main(String[] args) {
		AnnotationConfigApplicationContext ctx = new AnnotationConfigApplicationContext();
		ctx.register(MyConfiguration.class);
		ctx.refresh();
		MyBean mb1 = ctx.getBean(MyBean.class);
		MyBean mb2 = ctx.getBean(MyBean.class);
		ctx.close();
	}
}

In the above example Spring loads beans into it’s context before we have even requested it. This is to make sure all the beans are properly configured and application fail-fast if something goes wrong.

Now what will happen if we uncomment the @Configuration annotation in the above class. In this case, if we make a call to myBean() method then it will be a plain java method call and we will get a new instance of MyBean and it won’t remain singleton.

@Configurble – How to inject dependencies into objects that are not created by Spring

public class CarSalon {
    //...
    public void testDrive() {
        Car car = new Car();
        car.startCar();
    }
}
 
@Component
public class Car {
    @Autowired
    private Engine engine;
    @Autowired
    private Transmission transmission;
 
    public void startCar() {
        transmission.setGear(1);
        engine.engineOn();
        System.out.println("Car started");
    }
}
 
@Component
public class Engine {
//...
}
 
@Component
public class Transmission {
//...
}

In the above example

  1. We try to create a Object for Car class using new operator
  2. How ever objects created using new operator are not container managed rather Java Runtime Managed
  3. Trying to access the startCar method using car object will throw NullPointerException
  4. However using @Configurable annotation will tell Spring to inject dependencies into the object before the constructor is run
  5. You need to have these JAR files in pom.xml inorder to make it work.aspectj-x.x.x.jar, aspectjrt.jar, aspectjveawer-x.x.x.jar
@Configurable(preConstruction = true)
@Component
public class Car {
 
    @Autowired
    private Engine engine;
    @Autowired
    private Transmission transmission;
 
    public void startCar() {
        transmission.setGear(1);
        engine.engineOn();
 
        System.out.println("Car started");
    }
}

The Stream interface is located in the java.util.stream package. It represents a sequence of objects somewhat like the Iterator interface. However, unlike the Iterator, it supports parallel execution.The Stream interface supports the map/filter/reduce pattern and executes lazily, forming the basis (along with lambdas) for functional-style programming in Java 8.
There are also corresponding primitive streams (IntStream, DoubleStream, and LongStream) for performance reasons. Let’s take a simple example of Iterating through a List with aim of summing up numbers above 10. This laziness is achieved by a separation between two types of operations that could be executed on streams: intermediate and terminal operations.

private static int sumIterator(List<Integer> list) {
	Iterator<Integer> it = list.iterator();
	int sum = 0;
	while (it.hasNext()) {
		int num = it.next();
		if (num > 10) {
			sum += num;
		}
	}
	return sum;
}

The Disadvantages of above method are

  1. The program is sequential in nature, there is no way we can do this in parallel easily.
  2. We need to provide the code logic for sum of integers on how the iteration will take place, this is also called external iteration because client program is handling the algorithm to iterate over the list.

To overcome the above issue Java 8 introduced Java Stream API to implement internal iteration, that is better because java framework is in control of the iteration.Internal iteration provides several features such as sequential and parallel execution, filtering based on the given criteria, mapping etc.Java 8 Stream API method arguments are functional interfaces, so lambda expressions work very well with them. Using Stream the same code turnout to be

private static int sumStream(List<Integer> list) {
	return list.stream().filter(i -> i > 10).mapToInt(i -> i).sum();
}

Streams are lazy because intermediate operations are not evaluated unless a terminal operation is invoked. Each intermediate operation creates a new stream, stores the provided operation/function and return the new stream. The pipeline accumulates these newly created streams.The time when terminal operation is called, traversal of streams begins and the associated function is performed one by one. Parallel streams don’t evaluate streams ‘one by one’ (at the terminal point). The operations are rather performed simultaneously, depending on the available cores.

To perform a sequence of operations over the elements of the data source and aggregate their results, three parts are needed –

  1. Source
  2. intermediate operation
  3. terminal operation

How to create a simple stream

Collection<String> collection = Arrays.asList("a", "b", "c");
Stream<String> streamOfCollection = collection.stream();
Stream<String> streamOfArray = Stream.of("a", "b", "c");
String[] arr = new String[]{"a", "b", "c"};
Stream<String> streamOfArrayFull = Arrays.stream(arr);
Stream<String> streamOfArrayPart = Arrays.stream(arr, 1, 3);

Using Stream.builder() When builder is used the desired type should be additionally specified in the right part of the statement, otherwise the build() method will create an instance of the Stream Object

Stream<String> streamBuilder =
  Stream.<String>builder().add("a").add("b").add("c").build();

Using Stream.generate()
The generate() method accepts a Supplier for element generation. As the resulting stream is infinite, developer should specify the desired size or the generate() method will work until it reaches the memory limit

Stream<String> streamGenerated =
  Stream.generate(() -> "element").limit(10);

The code above creates a sequence of ten strings with the value – “element”.

Stream.iterate()
Another way of creating an infinite stream is by using the iterate() method:

 Stream<Integer> streamIterated = Stream.iterate(40, n -> n + 2).limit(20);

The first element of the resulting stream is a first parameter of the iterate() method. For creating every following element the specified function is applied to the previous element. In the example above the second element will be 42.

A stream by itself is worthless, the real thing a user is interested in is a result of the terminal operation, which can be a value of some type or action applied to every element of the stream. Only one terminal operation can be used per stream.

For More details on streams refer here

ArrayList is not synchronized. That means sharing an instance of ArrayList among many threads where those threads are modifying (by adding or removing the values) the collection may result in unpredictable behavior.A thread-safe variant of ArrayList in which all mutative operations (e.g. add, set, remove..) are implemented by creating a separate copy of underlying array. It achieves thread-safety by creating a separate copy of List which is a is different way than vector or other collections use to provide thread-safety.Iterator does not throw ConcurrentModificationException even if copyOnWriteArrayList is modified once iterator is created because iterator is iterating over the separate copy of ArrayList while write operation is happening on another copy of ArrayList.

There are two ways to Synchronize ArrayList

  1. Collections.synchronizedList() method – It returns synchronized list backed by the specified list.
  2. CopyOnWriteArrayList class – It is a thread-safe variant of ArrayList.

Collections.synchronizedList()

import java.util.*; 
  
class GFG 
{ 
    public static void main (String[] args) 
    { 
        List<String> list = 
           Collections.synchronizedList(new ArrayList<String>()); 
  
        list.add("practice"); 
        list.add("code"); 
        list.add("quiz"); 
  
        synchronized(list) 
        { 
            // must be in synchronized block 
            Iterator it = list.iterator(); 
  
            while (it.hasNext()) 
                System.out.println(it.next()); 
        } 
    } 
} 

CopyOnWriteArrayList

import java.io.*; 
import java.util.Iterator; 
import java.util.concurrent.CopyOnWriteArrayList; 
  
class GFG 
{ 
    public static void main (String[] args) 
    { 
        // creating a thread-safe Arraylist. 
        CopyOnWriteArrayList<String> threadSafeList 
            = new CopyOnWriteArrayList<String>(); 
  
        // Adding elements to synchronized ArrayList 
        threadSafeList.add("geek"); 
        threadSafeList.add("code"); 
        threadSafeList.add("practice"); 
  
        System.out.println("Elements of synchronized ArrayList :"); 
  
        // Iterating on the synchronized ArrayList using iterator. 
        Iterator<String> it = threadSafeList.iterator(); 
  
        while (it.hasNext()) 
            System.out.println(it.next()); 
    } 
} 

1.What is the Default Size and Capacity of ArrayList in Java 8?What is the Maximum Size of ArrayList?
Size is the number of elements you have placed into the arrayList while capacity is the max number of elements the arrayList can take. Once you’ve reached max, the capacity is doubled.The initial List size is zero (unless you specify otherwise).However the initial capacity of ArrayList is 10.The size of the list is the number of elements in it. The capacity of the list is the number of elements the backing data structure can hold at this time. The size will change as elements are added to or removed from the list. The capacity will change when the implementation of the list you’re using needs it to. (The size, of course, will never be bigger than the capacity.)

When it has to grow, this is used:

 int newCapacity = oldCapacity + (oldCapacity >> 1)

oldCapacity >> 1 is division by two, so it grows by 1.5

int newCapacity = oldCapacity + (oldCapacity >> 1);
int newCapacity = oldCapacity + 0.5*oldCapacity; 
int newCapacity = 1.5*oldCapacity ;

Maximum Size of ArrayList
It would depend on the implementation, but the limit is not defined by the List interface.An ArrayList can’t hold more than Integer.MAX_VALUE elements

2.Difference is between a fixed size container (data structure) and a variable size container.
An array is a fixed size container, the number of elements it holds is established when the array is created and never changes. (When the array is created all of those elements will have some default value, e.g., null for reference types or 0 for ints, but they’ll all be there in the array: you can index each and every one.)

A list is a variable size container, the number of elements in it can change, ranging from 0 to as many as you want (subject to implementation limits). After creation the number of elements can either grow or shrink. At all times you can retrieve any element by its index.

List is actually an interface and it can be implemented in many different ways. Thus, ArrayList, LinkedList, etc. There is a data structure “behind” the list to actually hold the elements. And that data structure itself might be fixed size or variable size, and at any given time might have the exact size of the number of elements in the list, or it might have some extra “buffer” space.The LinkedList, for example, always has in its underlying data structure exactly the same number of “places for elements” as are in the list it is representing. But the ArrayList uses a fixed length array as its backing store.

3.How to create a Synchronized ArrayList
There are two ways to Synchronize ArrayList

  1. Collections.synchronizedList() method – It returns synchronized list backed by the specified list.
  2. CopyOnWriteArrayList class – It is a thread-safe variant of ArrayList.It achieves thread-safety by creating a separate copy of List which is a is different way than vector or other collections use to provide thread-safety

More here

4.Why to use arrayList when vector is synchronized?
Vector synchronizes at the level of each individual operation. Generally a programmer like to synchronize a whole sequence of operations. Synchronizing individual operations is both less safe and slower.Vectors are considered obsolete an d unofficially deprecated in java.

5.Difference between CopyOnWriteArrayList and synchronizedList
Both synchronizedList and CopyOnWriteArrayList take a lock on the entire array during write operations.The difference emerges if you look at other operations, such as iterating over every element of the collection. The documentation for Collections.synchronizedList says It is imperative that the user manually synchronize on the returned list when iterating over it.Failure to follow this advice may result in non-deterministic behavior.

 List list = Collections.synchronizedList(new ArrayList());
    ...
    synchronized (list) {
        Iterator i = list.iterator(); // Must be in synchronized block
        while (i.hasNext())
            foo(i.next());
    }

Iterating over a synchronizedList is not thread-safe unless you do locking manually. Note that when using this technique, all operations by other threads on this list, including iterations, gets, sets, adds, and removals, are blocked. Only one thread at a time can do anything with this collection.

CopyOnWriteArrayList uses “snapshot” style iterator method uses a reference to the state of the array at the point that the iterator was created. This array never changes during the lifetime of the iterator, so interference is impossible and the iterator is guaranteed not to throw ConcurrentModificationException. The iterator will not reflect additions, removals, or changes to the list since the iterator was created. “snapshot” style iterator method uses a reference to the state of the array at the point that the iterator was created. This array never changes during the lifetime of the iterator, so interference is impossible and the iterator is guaranteed not to throw ConcurrentModificationException. The iterator will not reflect additions, removals, or changes to the list since the iterator was created.

Operations by other threads on this list can proceed concurrently, but the iteration isn’t affected by changes made by any other threads. So, even though write operations lock the entire list, CopyOnWriteArrayList still can provide higher throughput than an ordinary synchronizedList.

6.What is Functional Interface?What are the rules to define a Functional Interface?Is it Mandatory to define @FunctionalInterface annotation?
Functional Interface also know as Single Abstract Method(SAM) interface contains one and only one abstract method. @FunctionalInterface is not amndatory but tells other developers the interface is Functional and prevents them from adding anymore methods to it.We can have any number of Default methods and Static methods.Overridding methods in java.lang.object such as equals and hashcode doesnot count as an abstract method. More here

7.Difference between Streams and Collections?

Stream Collections
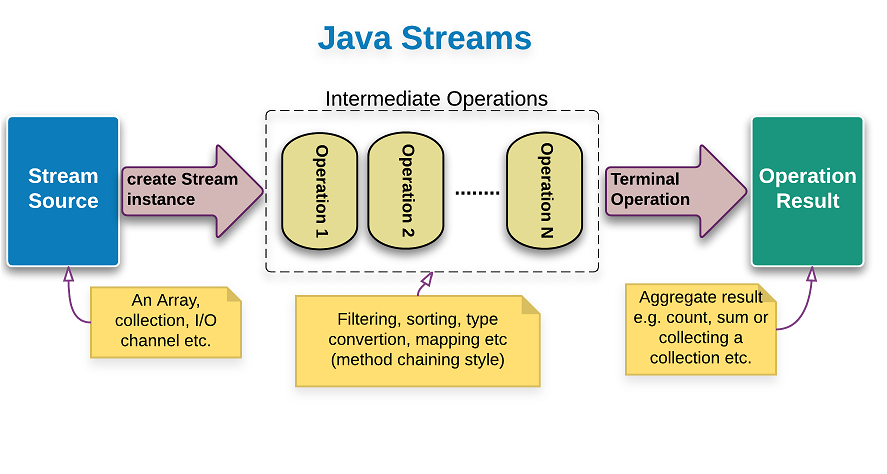
A stream is not a data structure that stores elements; instead, it conveys elements from a source such as a data structure, an array, a generator function, or an I/O channel, through a pipeline of computational operations. Collection is a Datastructure
An operation on a stream produces a result, but does not modify its source. For example, filtering a Stream obtained from a collection produces a new Stream without the filtered elements, rather than removing elements from the source collection. Operation on collection will have direct impact on collection object itself
Streams are based on ‘process-only, on-demand’ strategy.Many stream operations, such as filtering, mapping, or duplicate removal, can be implemented lazily, exposing opportunities for optimization. Stream operations are divided into intermediate (Stream-producing) operations and terminal (value- or side-effect-producing) operations. Intermediate operations are always lazy. All Data Values in collections are processed in single shot
Stream acts upon infinite set of Values i.e. infinite stream Collections always act upon finite set of Data
The elements of a stream are only visited once during the life of a stream. Like an Iterator, a new stream must be generated to revisit the same elements of the source. Collections can be iterated any number of Times

8.How do I read / convert an InputStream into a String in Java?
Using Apache commons IOUtils to copy the InputStream into a StringWriter

StringWriter writer = new StringWriter();
IOUtils.copy(inputStream, writer, encoding);
String theString = writer.toString();
String theString = IOUtils.toString(inputStream, encoding); 

Using only the standard Java library

static String convertStreamToString(java.io.InputStream is) {
    java.util.Scanner s = new java.util.Scanner(is).useDelimiter("\\A");
    return s.hasNext() ? s.next() : "";
}

Scanner iterates over tokens in the stream, and in this case we separate tokens using “beginning of the input boundary” (\A), thus giving us only one token for the entire contents of the stream.

9.How do I convert a String to an InputStream in Java?

InputStream stream = new ByteArrayInputStream(exampleString.getBytes(StandardCharsets.UTF_8));

Using Apache Commons IO

String source = "This is the source of my input stream";
InputStream in = org.apache.commons.io.IOUtils.toInputStream(source, "UTF-8");

Using StringReader

String charset = ...; // your charset
byte[] bytes = string.getBytes(charset);
ByteArrayInputStream bais = new ByteArrayInputStream(bytes);
InputStreamReader isr = new InputStreamReader(bais);

10.Difference between hashtable and hashmap?
Click here

11.What is exception-masking?
When code in a try block throws an exception, and the close method in the finally also throws an exception, the exception thrown by the try block gets lost and the exception thrown in the finally gets propagated. This is usually unfortunate, since the exception thrown on close is something unhelpful while the useful exception is the informative one. Using try-with-resources to close your resources will prevent any exception-masking from taking place.

11.Try With Resources vs Try-Catch

  1. The main point of try-with-resources is to make sure resources are closed, without requiring the application code to do it.
  2. when there are situations where two independent exceptions can be thrown in sibling code blocks, in particular in the try block of a try-with-resources statement and the compiler-generated finally block which closes the resource. In these situations, only one of the thrown exceptions can be propagated. In the try-with-resources statement, when there are two such exceptions, the exception originating from the try block is propagated and the exception from the finally block is added to the list of exceptions suppressed by the exception from the try block. As an exception unwinds the stack, it can accumulate multiple suppressed exceptions.
  3. On the other hand if your code completes normally but the resource you’re using throws an exception on close, that exception (which would get suppressed if the code in the try block threw anything) gets thrown. That means that if you have some JDBC code where a ResultSet or PreparedStatement is closed by try-with-resources, an exception resulting from some infrastructure glitch when a JDBC object gets closed can be thrown and can rollback an operation that otherwise would have completed successfully.

12.How to get Suppressed Exceptions?
only one exception can be thrown by a method (per execution) but it is possible, in the case of a try-with-resources, for multiple exceptions to be thrown. For instance one might be thrown in the block and another might be thrown from the implicit finally provided by the try-with-resources.The compiler has to determine which of these to “really” throw. It chooses to throw the exception raised in the explicit code (the code in the try block) rather than the one thrown by the implicit code (the finally block). Therefore the exception(s) thrown in the implicit block are suppressed (ignored). This only occurs in the case of multiple exceptions.

The try-catch-resource block does expose the suppressed exception using the new (since Java 1.7) getSuppressed() method. This method returns all of the suppressed exceptions by the try-catch-resource block (notice that it returns ALL of the suppressed exceptions if more than one occurred). A caller might use the following structure to reconcile with existing behavior

try { 
  testJava7TryCatchWithExceptionOnFinally(); //Method throws exception in both try and finally block
} catch (IOException e) {   
  Throwable[] suppressed = e.getSuppressed();
    for (Throwable t : suppressed) {
    // Check T's type and decide on action to be taken
  }
}

13.How do you avoid fuzzy try-catch blocks in code like one below?

try{ 
     ...
     stmts
     ...
} 
catch(Exception ex) {
     ... 
     stmts
     ... 
} finally {
     connection.close // throws an exception
}

Write a SQLUtils class that contains static closeQuietly methods that catch and log such exceptions, then use as appropriate.

public class SQLUtils 
{
  private static Log log = LogFactory.getLog(SQLUtils.class);

  public static void closeQuietly(Connection connection)
  {
    try
    {
      if (connection != null)
      {
        connection.close();
      }
    }
    catch (SQLExcetpion e)
    {
      log.error("An error occurred closing connection.", e);
    }
  }

  public static void closeQuietly(Statement statement)
  {
    try
    {
      if (statement!= null)
      {
        statement.close();
      }
    }
    catch (SQLExcetpion e)
    {
      log.error("An error occurred closing statement.", e);
    }
  }

  public static void closeQuietly(ResultSet resultSet)
  {
    try
    {
      if (resultSet!= null)
      {
        resultSet.close();
      }
    }
    catch (SQLExcetpion e)
    {
      log.error("An error occurred closing result set.", e);
    }
  }
}

and

Connection connection = null;
Statement statement = null;
ResultSet resultSet = null;
try 
{
  connection = getConnection();
  statement = connection.prepareStatement(...);
  resultSet = statement.executeQuery();

  ...
}
finally
{
  SQLUtils.closeQuietly(resultSet);
  SQLUtils.closeQuietly(statment);
  SQLUtils.closeQuietly(connection);
}

14.What is Difference between Iterator and Split Iterator
A Spliterator can be used to split given element set into multiple sets so that we can perform some kind of operations/calculations on each set in different threads independently, possibly taking advantage of parallelism. It is designed as a parallel analogue of Iterator. Other than collections, the source of elements covered by a Spliterator could be, for example, an array, an IO channel, or a generator function.

There are 2 main methods in the Spliterator interface.

  1. tryAdvance()- With tryAdvance(), we can traverse underlying elements one by one (just like Iterator.next()). If a remaining element exists, this method performs the consumer action on it, returning true; else returns false.
  2. forEachRemaining() -For sequential bulk traversal we can use forEachRemaining()

A Spliterator is also a “smarter” Iterator, via it’s internal properties like DISTINCT or SORTED, etc (which you need to provide correctly when implementing your own Spliterator). These flags are used internally to disable unnecessary operations, also called optimizations, like this one for example:

 someStream().map(x -> y).count();

Because size does not change in case of the stream, the map can be skipped entirely, since all we do is counting.

You can create a Spliterator around an Iterator if you would need to, via:

Spliterators.spliteratorUnknownSize(yourIterator, properties)

15.What is Type Inference?
Type Inference means determining the Type by compiler at compile-time.It is not new feature in Java SE 8. It is available in Java 7 and before Java 7 too.Java 8 uses Type inference for calling lambda expressions. Refer here

16.What is Optional in Java 8? What is the use of Optional?Advantages of Java 8 Optional?
Optional is a final Class introduced as part of Java SE 8. It is defined in java.util package.It is used to represent optional values that is either exist or not exist. It can contain either one value or zero value. If it contains a value, we can get it. Otherwise, we get nothing.It is a bounded collection that is it contains at most one element only. It is an alternative to “null” value.

17.What is difference between initialization and instantiation?
instantiation – This is when memory is allocated for an object. This is what the new keyword is doing. A reference to the object that was created is returned from the new keyword.
initialization – This is when values are put into the memory that was allocated. This is what the Constructor of a class does when using the new keyword.A variable must also be initialized by having the reference to some object in memory passed to it.
Refer here

18.What are different Method References in Java?

  1. Reference to a static method – ClassName::MethodName
  2. Reference to an instance method – Object::methodName
  3. Reference to a constructor – ClassName::new

Refer Here

19.What are the difference between predicate and function?
Predicate interface has an abstract method test(T t) which has a Boolean return type. Usage, when we need to return/check the condition as True or False. It is best suited to code.

Function interface has an abstract method apply which takes the argument of type T and returns a result of type R. Here, R is nothing but the type of result user wants to return. It may be Integer, String, Boolean, Double, Long.

20.Why to go for Optional instead of NULL Check?
The Effectiveness of Optional could be only seen during Chaining in Streams or when accessing multiple getters at once like one below

.
.
computer.getSoundcard().getUSB().getVersion();
.
.
.
Optional.ofNullable(modem2)
       .map(Modem::getPrice)
       .filter(p -> p >= 10)
       .filter(p -> p <= 15)
       .isPresent();

21.What is Lambda Expressions?
The Lambda expression is used to provide the implementation for abstract method in functional interface. No need to define the method again for providing the implementation. Here, we just write the implementation code.

@FunctionalInterfac
interface Drawable {
 public void draw();
}

public class LambdaExpressionExample2 {
 public static void main(String[] args) {
  int width = 10;

  //with lambda  
  Drawable d2 = () -> {
   System.out.println("Drawing " + width);
  };
  d2.draw();
 }
}

22.How to handle Checked Exceptions in Lambda Expressions?
To handle checked exception we use a lambda wrapper for the lambda function. Refer here

23.What is the Difference between Lambda Expression and Anonymous Inner Class?
The key difference between Anonymous class and Lambda expression is the usage of ‘this’ keyword. In the anonymous classes, ‘this’ keyword resolves to anonymous class itself, whereas for lambda expression ‘this’ keyword resolves to enclosing class where lambda expression is written.

Another difference between lambda expression and anonymous class is in the way these two are compiled. Java compiler compiles lambda expressions and convert them into private method of the class. It uses invokedynamic instruction that was added in Java 7 to bind this method dynamically.

Functions reside in permanent memory whereas for classes the memory is loaded on demand.
Functions act on unrelated data whereas objects act on their own data.

Refer here

24.Why static methods are Not allowed in Interface prior to Java 8?
Prior to Java 8 Interface could only have abstract methods. If you are writing a static method and defining it then the defining of the static methods may vary based on the implementing classes. So if two classes implement static method and since the
purpose of interface is to provide multiple inheritance when the fourth class implementsthe second and third method which is overrided the it would lead to Diamond of Death Problem.
This is similar to same thing with default methods in Java 8

This Works

class Animal {
    public static void identify() {
        System.out.println("This is an animal");
    }
}
class Cat extends Animal {}

public static void main(String[] args) {
    Animal.identify();
    Cat.identify(); // This compiles, even though it is not redefined in Cat.
}

This Doesnot Works

interface Animal {
    public static void identify() {
        System.out.println("This is an animal");
    }
}
class Cat implements Animal {}

public static void main(String[] args) {
    Animal.identify();
    Cat.identify(); // This does not compile, because interface static methods do not inherit. (Why?)
}

Cat can only extend one class so if Cat extends Animal, Cat.identify has only one meaning. Cat can implement multiple interfaces each of which can have a static implementation.
So Java Compiler is not sure which implementation to call

25.Explain different memory Allocation in JVM?
Memory in Java is divided into two portions

Stack: One stack is created per thread and it stores stack frames which again stores local variables and if a variable is a reference type then that variable refers to a memory location in heap for the actual object.

Heap: All kinds of objects will be created in heap only.

Heap memory is again divided into 3 portions
Young Generation: Stores objects which have a short life, Young Generation itself can be divided into two categories Eden Space and Survivor Space.
Old Generation: Store objects which have survived many garbage collection cycles and still being referenced.
Permanent Generation: Stores metadata about the program e.g. runtime constant pool.