Used to perform a release of a project with Maven.

Key goals in mvn release Plugin

  1. release:clean Clean up after a release preparation.
  2. release:prepare Prepare for a release in SCM(Source Code Management i.e. nexus).
  3. release:rollback Rollback a previous release.
  4. release:perform Perform a release from SCM.

Prerequisite
Since this plugin releases artifacts(could be JAR’s, ZIP’s WAR’s or TAR’s) into the repository we need to make sure
credentials are properly configured in settings.xml in the conf folder, Maven installation directory. Failing to do so would
end up in authorization error while running the goals in the plugin

Syntax

>>mvn release:clean release:prepare
>>mvn release:perform

How it Works

  1. Once you run release:clean it would clean the old class files just like maven clean
  2. When you run release:prepare it would read the pom.xml in the project. If you don’t have snapshot version defined you would end up with snapshot not found error since the
    plugin assumes snapshot is the one which needs to be released.
  3. Now on running release:prepare will ask for the name of the version and will change the line snapshot in pom.xml. It also does a git push of pom.xml in the remote repo
  4. When you run release:perform it will push the jar in the nexus repo so it would be available for other teams.
  5. When you are working on App-Model-0.0.1-SNAPHSOT using mvn:prepare and mvn:perform would put App-Model-0.0.1 in repo at the same time modifying pom.xml in local and git to 0.0.2-SNAPSHOT. So the dependent project needs to be updated likewise

Other know issues:
Sometime the release:perform fails because it complains tag already exists in repo. In such a case, you need to delete the tags and perform release again.
During the release, the list of files that needs to go along release would be tagged to particular version. In some cases, there would be files with the same tag name. In such case, maven-plugin complains the tag already exists.

To get the recent Tag

//Recent Tags
git describe --tags

//Latest Tags - With --abbrev=0 it should return closest annotated tag
git describe --abbrev=0

To delete the tag
git fetch is needed to get the remote tags to be displayed in local, kind of refresh

 
//To delete tag locally
git tag -d TAG_NAME  

git fetch

//To delete tag remote
git push --delete origin TAG_NAME

To get the Latest tags for different commits done across various branches

 
git describe --tags $(git rev-list --tags --max-count=1)
There would be scenarios where you need to skip few modules when building parent project because the unit test fail in child project. In such scenario we should define the surefire plugin at parent pom.xml and include and exclude the child modules for which the unit test should be executed.

<project>
  [...]
  <build>
    <plugins>
      <plugin>
        <groupId>org.apache.maven.plugins</groupId>
        <artifactId>maven-surefire-plugin</artifactId>
        <version>2.4.2</version>
        <configuration>
          <skipTests>true</skipTests>
        </configuration>
      </plugin>
    </plugins>
  </build>
  [...]
</project>

Rather than defining plugin(in our case surefire plugin), we can create a profile and define the behavior of plugins within the profile.

<project>
  [...]
  <profiles>
    <profile>
      <id>noTest</id>
      <activation>
        <property>
          <name>noTest</name>
          <value>true</value>
        </property>
      </activation>
      <build>
        <plugins>
          <plugin>
            <groupId>org.apache.maven.plugins</groupId>
            <artifactId>maven-surefire-plugin</artifactId>
            <version>2.4.2</version>
            <configuration>
              <skipTests>true</skipTests>
            </configuration>
          </plugin>
        </plugins>
      </build>
    </profile>
  </profiles>
  [...]
</project>

Now lets include and exclude child modules for which unit test should be carried out

Including Unit Test
Only the following(ChildModule3.java) file would be included and others would be excluded

<project>
  [...]
  <build>
    <plugins>
      <plugin>
        <groupId>org.apache.maven.plugins</groupId>
        <artifactId>maven-surefire-plugin</artifactId>
        <version>3.0.0-M4</version>
        <configuration>
          <includes>
            <include>ChildModule3.java</include>
          </includes>
        </configuration>
      </plugin>
    </plugins>
  </build>
  [...]
</project>

Excluding Unit Test
Only the following(ChildModule1.java, ChildModule2.java) file would be excluded

<project>
  [...]
  <build>
    <plugins>
      <plugin>
        <groupId>org.apache.maven.plugins</groupId>
        <artifactId>maven-surefire-plugin</artifactId>
        <version>3.0.0-M4</version>
        <configuration>
          <excludes>
            <exclude>**/ChildModule1.java</exclude>
            <exclude>**/ChildModule2.java</exclude>
          </excludes>
        </configuration>
      </plugin>
    </plugins>
  </build>
  [...]
</project>

How to activate profile in command prompt

>>mvn clean install -PnoTest

How to see list of active Profiles

>>mvn help:active-profiles

If you want to know what version of an specific plugin you have installed you can do this:

mvn -Dplugin=org.codehaus.mojo:wagon-maven-plugin help:describe
mvn -Dplugin=groupId:artifactId help:describe
mvn help:effective-pom

How to execute life cycle task using specific plugin

>>mvn groupID:artifactID:version:goal
>>mvn org.apache.maven.plugins:maven-checkstyle-plugin:2.5:checkstyle

  1. Gradle is Partly Declarative and Partly Programmatic and Uses Domain Specific Language(DSL) coded in groovy or kotlin in build.gradle
  2. Gradle Parses build.gradle file and constructs DAG(Directed Acyclic Graph) and constructs a graph of task
  3. Gradle executes tasks in order.If ouput of task is same as last output, then task wont be executed
  4. Gradle manages trasitive dependency on its own(Similar to maven) and gradle uses repositories.
  5. Gradle updates to new version of Dependencies

Teardown of build.gradle file

  1. To make gradle, java aware we need to add apply plugin:’java’
  2. Once the above line is added, the following tasks get tagged to project – clean, assemble, compile, test
  3. dependencies and repositories are added in flower bracket like one below
  4. under dependencies we can have multiple tasks. In the below code compile is added as a task

build.gradle

group 'com.mugil.employeeManagement'
version '1.0-Snapshot'

apply plugin: 'java'

sourceCompatibility=1.8

repositories {    
    mavenCentral()
}

dependencies {
	compile 'com.google.code.gson:gson:2.8.4'
}

What is the Difference between gradlew and gradle?

gradlew is a wrapper(w – character) that uses gradle.

Under the hood gradlew performs three main things:

  1. Download and install the correct gradle version
  2. Parse the arguments
  3. Call a gradle task

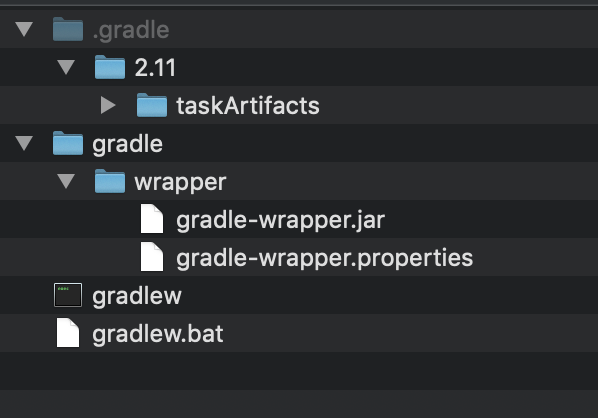
Using Gradle Wrapper we can distribute/share a project to everybody to use the same version and Gradle’s functionality(compile, build, install…) even if it has not been installed.

To create a wrapper run:

gradle wrapper

This command generate:

gradle-wrapper.properties will contain the information about the Gradle distribution

How to skip Gradle Test?

gradle build -x test 

How to supply Argument to Spring Controller during application startup in Gradle Wrapper

gradlew bootRun --args='--welcome.message=Mugil'

WelcomeController.java
In the below code welcomeMsg variable is assigned value during application startup. In similar ways environment variables could be setup
by supplying arguments as parameters while executing gradlew bootrun

import org.springframework.beans.factory.annotation.Autowired;
import org.springframework.beans.factory.annotation.Value;
import org.springframework.web.bind.annotation.GetMapping;
import org.springframework.web.bind.annotation.RestController;

@RestController
public class WelcomeController {
    public String welcomeMsg;

    @Autowired
    public WelcomeController(@Value("${welcome.message}") String message) {
        welcomeMsg = message;
        System.out.println("Hi "+ message);
    }

    @GetMapping("/")
    public String sayHello() {
        return "Mugil";
    }
}

This is caused by setting something too large on a 32-bit HotSpot vm, for example:If you have running the x86 JVM instead of the 64 bit you may end up with this issue

While running Maven Sure fire plugin you may endup with this problem mostly when you are using 32 bit version of Java

org.apache.maven.plugins
maven-surefire-plugin
2.7.2

-Xms1024m -Xmx1024m -XX:MaxPermSize=512m
 set "JAVA_OPTS=-Xms512m -Xmx512m -XX:MaxPermSize=512m


The MaxPermSize allowed is 512m, but it still throws error when you try to run a build setting to max of 512m.

Set MaxPermSize less than 500m

Solution

 set "JAVA_OPTS=-Xms512m -Xmx400m -XX:MaxPermSize=512m

This may also happen if maven is not using the right JVM if more that one JVM is installed in the system or set MAVEN_OPTS = -Xmx512m -XX:MaxPermSize=128m

parent-pom.xml

<dependencyManagement>
  <dependencies>
    <dependency>
      <groupId>junit</groupId>
      <artifactId>junit</artifactId>
      <version>3.8</version>
    </dependency>
 </dependencies>
</dependencyManagement>

child-pom.xml

<dependencies>
    <dependency>
      <groupId>junit</groupId>
      <artifactId>junit</artifactId>
    </dependency>
 </dependencies>

Two Main Differeneces

  1. Dependency Management allows to consolidate and centralize the management of dependency versions without adding dependencies which are inherited by all children. This is especially useful when you have a set of projects (i.e. more than one) that inherits a common parent.Another extremely important use case of dependencyManagement is the control of versions of artifacts used in transitive dependencies.You still need to define them in the child POM to show that you are using them. They are not actually included in the child projects just because they are in in the parent POM. Enclosing dependencies in centralizes management of the version, scope, and exclusions for each dependency, if and when you decide to use it.
  2. Artifacts specified in the section <dependencies> will ALWAYS be included as a dependency of the child module(s).Artifacts specified in the section will only be included in the child module if they were also specified in the section of the child module itself. Why is it good you ask? because you specify the version and/or scope in the parent, and you can leave them out when specifying the dependencies in the child POM. This can help you use unified versions for dependencies for child modules, without specifying the version in each child module.

To sum up the above points in simple words in the parent-pom.xml if you are adding things inside tag then it would be available to the child-pom.xml. If you are adding the same thing within tag then you should manually add them to the child-pom.xml.In the child-pom.xml if the version is not specified it will take the parent-pom.xml version of the dependency as default else you can override them by specifying one in child-pom.xml

References Read It

Java Archives (JAR) A JAR file encapsulates one or more Java classes, a manifest, and a descriptor. JAR files are the lowest level of archive. JAR files are used in J2EE for packaging EJBs and client-side Java Applications.

A WAR (Web Archive) is a module that gets loaded into a Web container of a Java Application Server. A Java Application Server has two containers (runtime environments) – one is a Web container and the other is a EJB container.

The Web container hosts Web applications based on JSP or the Servlets API – designed specifically for web request handling – so more of a request/response style of distributed computing. A Web container requires the Web module to be packaged as a WAR file – that is a special JAR file with a web.xml file in the WEB-INF folder.

An EJB container hosts Enterprise java beans based on the EJB API designed to provide extended business functionality such as declarative transactions, declarative method level security and multiprotocol support – so more of a RPC style of distributed computing. EJB containers require EJB modules to be packaged as JAR files – these have a ejb-jar.xml file in the META-INF folder.

Enterprise applications may consist of one or more modules that can either be Web modules (packaged as a WAR file) or EJB modules (packaged as a JAR file) or both of them. Enterprise applications are packaged as EAR files – these are special JAR files containing an application.xml file in the META-INF folder.

Basically EAR files are a superset containing WAR files and JAR files. Java Application Servers allow deployment of standalone web modules in a WAR file, though internally they create EAR files as a wrapper around WAR files. Standalone web containers such as Tomcat and Jetty do not support EAR files – these are not full fledged Application servers. Web applications in these containers are to be deployed as WAR files only.

In application servers – EAR files contain configurations such as application security role mapping, EJB reference mapping and context root url mapping of web modules.

Apart from Web modules and EJB modules EAR files can also contain connector modules packaged as RAR files and Client modules packaged as JAR files.

Failure to find org.jfrog.maven.annomojo:maven-plugin-anno:jar:1.4.0 in http://myrepo:80/artifactory/repo was cached in the local repository, resolution will not be reattempted until the update interval of MyRepo has elapsed or updates are forced -> [Help 1]

The above statement tells that the artifact is cached in local repository.Now the artifact is not going to get downloaded unless it is

  1. It is forced to update from client Side
  2. Forcing from server side the expiration time

From Client Side 3 Solutions

  1. Using Maven Update to force update Snapshots(Mostly doesn’t work)
  2. Deleting the failed directory of Snapshot and forcing it to download
  3. By setting the Time interval for looking for Snapshot
    c:\Users\mugilvannan\maven\conf\settings.xml

    <profile>
      <id>nexus</id>
      <!--Enable snapshots for the built in central repo to direct -->
      <!--all requests to nexus via the mirror -->
      <repositories>
        <repository>
          <id>central</id>
          <url>http://central</url>
          <releases><enabled>true</enabled><updatePolicy>always</updatePolicy></releases>
          <snapshots><enabled>true</enabled><updatePolicy>always</updatePolicy></snapshots>
        </repository>
      </repositories>
     <pluginRepositories>
        <pluginRepository>
          <id>central</id>
          <url>http://central</url>
          <releases><enabled>true</enabled><updatePolicy>always</updatePolicy></releases>
          <snapshots><enabled>true</enabled><updatePolicy>always</updatePolicy></snapshots>
        </pluginRepository>
      </pluginRepositories>
    </profile>
    

There may be times direct access to JAR files are not allowed due to license restrictions.In such case declaring dependency in POM.xml has no effect. In such case the jar files should be manually downloaded and copied to maven local repository so while defining dependency in POM.xml it would take from mavens local repository

In Terminal

$ mvn install:install-file -Dfile={Path/ojdbc6.jar}
      -DgroupId=com.oracle -DartifactId=ojdbc6 -Dversion=11.2.0 -Dpackaging=jar

In my case I have downloaded the file to Downloads Directory

 mvn install:install-file -Dfile=C:\\Downloads\\ojdbc14.jar
           -DgroupId=com.oracle -DartifactId=ojdbc7 -Dversion=12.1.0 -Dpackaging=jar

On executing the above command it would be copied to maven .m2 local repository

Now the above will add the file to maven local repository.This should be followed by definition in pom.xml for dependency

<dependencies>  

  	<dependency>
            <groupId>com.oracle</groupId>
            <artifactId>ojdbc14</artifactId>
            <version>12.1.0</version>
        </dependency>
   </dependencies>
<dependencies>
    <dependency>
      <groupId>junit</groupId>
      <artifactId>junit</artifactId>
      <version>3.8.1</version>
      <scope>test</scope>
    </dependency>
  </dependencies>

Specifying Version

      <!--Version should be 3.8.1-->
      <version>3.8.1</version>

      <!--Version should less than or up to  3.8-->
      <version>[,3.8]</version>
      
      <!--Version should less than 3.8-->
      <version>[,3.8)</version>

      <!--Version should be between 3.1 to 3.8-->
      <!--If 3.8 is available it picks those-->
      <version>[3.1,3.8]</version>

Specifying Scope


<!--Jar file would be available to JUnit Test Folder-->
<scope>test</scope>

<!--available as Part of Web Server i.e tools.jar-->
<scope>provided</scope>

<!--Jar File available only during runtime-->
<!--Use of Interface at Compile Time and actual class at runtime-->
<scope>runtime</scope>

<!--Use of Interface at Compile Time and actual class at runtime-->
<scope>runtime</scope>

Defines the Maven Plugin with which the compilation has to be carried out

<plugins>
      <plugin>
        <groupId>org.apache.maven.plugins</groupId>
        <artifactId>maven-compiler-plugin</artifactId>
        <version>3.6.1</version>
        <configuration>
          <source>1.8</source>
          <target>1.8</target>
        </configuration>
      </plugin>
    </plugins>

Effective POM
Tells the Details of Super POM.xml Lists default configuration.

.
.
<build>
    <sourceDirectory>D:\java\TestMvnProj2\src\main\java</sourceDirectory>
    <testSourceDirectory>D:\java\TestMvnProj2\src\test\java</testSourceDirectory>
    <outputDirectory>D:\java\TestMvnProj2\target\classes</outputDirectory>
</build>
.
.

The above XML code specify the details of sourceDirectory, outputDirectory

You can also see list of plugins called at different phases of maven life cycle.

Parent POM
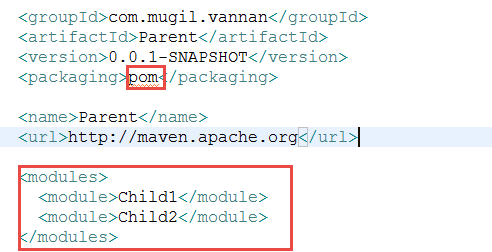
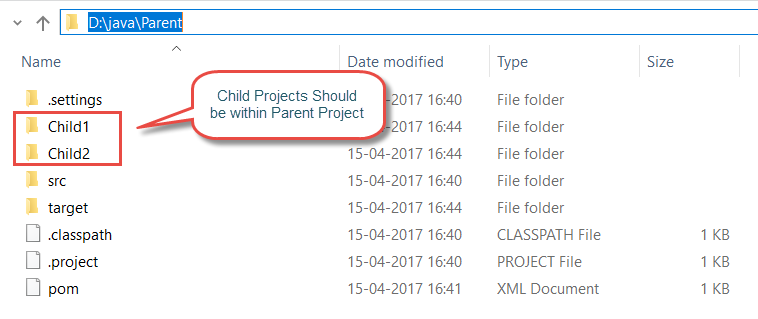
List of Child Projects are added into modules as separate module.

.
.
<packaging>pom</packaging>

<modules>
<module>Service</module>
<module>Controller</module>
<module>Model</module>
</modules>
.
.