How to Delete duplicate Rows from Table

In the below table studId 1,6 and 9 is repeated which should be deleted.

studId studentName age
1 Mugil 35
2 Vinu 36
3 Viju 42
4 Mani 35
5 Madhu 36
6 Mugil 35
7 Venu 37
8 Banu 34
9 Mugil 35

Below query wont work on MySQL but the format doesn’t change. When you take Max only last occurrence of row would be taken and others would be excluded.

DELETE FROM tblStudents TS
 WHERE TS.studId NOT IN (SELECT MAX(TSS.studId)
                            FROM tblStudents TSS
                        GROUP BY TSS.studentName, TSS.age)c

The same could be done using MIN function.

SELECT TS.* FROM tblStudents TS
 WHERE TS.studId NOT IN (SELECT MIN(TSS.studId)
                           FROM tblStudents TSS
                          GROUP BY TSS.studentName, TSS.age)                        

Output

studId studentName age
6 Mugil 35
9 Mugil 35

Find the Minimum and Maximum Sum

Input Format
A single line of five space-separated integers.

Constraints

    \[1<arr[i]<10^9\]

Output Format
Print two space-separated long integers denoting the respective minimum and maximum values.

Sample Input

1 2 3 4 5

Sample Output

10 14
  1. Find the Minimum and Maximum Element in array
  2. When you calculate the minSum and maxSum – discard the maxElement and minElement
  3. Trick is you may miss logic if the array contains 5 elements and all are of same value. In such case the maximum and minimum value elements are same
  4. For finding minimum number, start by assigning maximum number to minNum
.
.
 public static void miniMaxSum(List<Integer> arr) {
        long minNum = 0;
        long maxNum = 0;

        long minSum = 0;
        long maxSum = 0;


        //To find maximum Number
        for(int num=0;num<arr.size();num++){
            if(maxNum<=arr.get(num)){
                maxNum = arr.get(num);
            }
        }

        //To find minimum Number
        minNum = maxNum;

        for(int num=0;num<arr.size();num++){
            if(arr.get(num)<=minNum){
                minNum = arr.get(num);
            }
        }

        for(int num=0;num<arr.size();num++){
            //If the array elements are of same value
            if(num!=0 && arr.get(num) == arr.get(num-1)){
                minSum +=arr.get(num);
                maxSum +=arr.get(num);
            }


            if(arr.get(num) != maxNum)
              minSum +=arr.get(num);

            if(arr.get(num) != minNum)
              maxSum +=arr.get(num);
        }

        System.out.println(minSum);
        System.out.println(maxSum);
    }
.
.

Get Count of biggest Element in array – Total Tallest Candles to be blown

Input Format
Array of Integers

Constraints

    \[1<candles[i]<10^7\]

Output Format
Count of Biggest Element in array

Sample Input

3 2 1 3 5 6 5 4 5

Sample Output

1
  1. In the above example 6 is the biggest element and it occurs only once
  2. Find the biggest element in array
  3. Find the count of the biggest element
public static int birthdayCakeCandles(List<Integer> candles) {
        // Write your code here
        long tallestCandle = 0;
        int tallestCandleCnt = 0;

        for(int num=0;num<candles.size();num++){
            if(tallestCandle<=candles.get(num)){
                tallestCandle = candles.get(num);
            }
        }

        for(int num=0;num<candles.size();num++){
            if(candles.get(num) == tallestCandle)
                tallestCandleCnt +=1;
        }

        return tallestCandleCnt;
    }

To pass data between components at the same level under parent, I.E. passing data between two children within the same parent we use @Input and @Output and pass the value through the tags.

The Other option is using EventEmitter as variable in Service and emitting value from component1 and getting value in component2.

  1. In the below code we are passing data from list-person.component.ts to add-person.component.ts
  2. We are calling instance of personcrudService to call a function which emits event which is received by ListPersonComponent OnInit() method
  3. In add-person.component.ts we subscribe to the event by using instance of personcrudService

personcrud.service.ts

import {EventEmitter, Injectable, OnInit} from '@angular/core';
import {LoggingServiceService} from './logging-service.service';

@Injectable({
  providedIn: 'root'
})
export class PersoncrudService{  
  statusUpdated: EventEmitter<string> = new EventEmitter<string>();

  constructor(public loggingServiceService: LoggingServiceService) {}

  updatePerson(id: number, status: boolean){
    .
    . 
    this.statusUpdated.emit(this.arrPersons[id].name);
    .
    .
  }
}

list-person.component.ts

@Component({
  selector: 'app-list-person',
  templateUrl: './list-person.component.html',
  styleUrls: ['./list-person.component.css'],
  providers: [LoggingServiceService]
})
export class ListPersonComponent implements OnInit {
  constructor(private personcrudService: PersoncrudService,
              private loggingServiceService: LoggingServiceService) { }

  ngOnInit(): void {
  }

  updateStatus(i, status){
    this.personcrudService.updatePerson(i, status);
    this.loggingServiceService.logStatusOfPerson(status);
  }
}

add-person.component.ts

@Component({
  selector: 'app-add-person',
  templateUrl: './add-person.component.html',
  styleUrls: ['./add-person.component.css']
})
export class AddPersonComponent implements OnInit {
  constructor(private personcrudService: PersoncrudService) {
  }

  ngOnInit(): void {
    this.personcrudService.statusUpdated.subscribe(
      (name: string) => alert(name + ' has been updates')
    );
  }
}

Custom Attribute Directive

  1. Below is a Custom Attribute Directive which applies Background color to HTML Elements
  2. However we could not apply anylogic based on which directive would apply like checking row is even or odd
  3. Entry should be made in app.modules.ts for new directives created so it would be available

EvenrowHighlighterDirective.ts

import {AfterViewInit, Directive, ElementRef, OnInit} from '@angular/core';

@Directive({
  selector: '[appevenrow]'
})
export class EvenrowHighlighterDirective implements  OnInit, AfterViewInit{
  constructor(public elementRef: ElementRef) {
  }

  ngOnInit(): void {
    this.elementRef.nativeElement.style.backgroundColor = 'gray';
  }

  ngAfterViewInit(){
    //Add the above code here if ng-content and @child-content is used
  }
}

Custom Structural Directive

  1. In below code we replace the functionality of ngIf using custom structural directive which checks for condition based on value set in isPresent
  2. Similar to ElementRef, TemplateRef gives access to template
  3. ViewContainer is a reference to the place where the Custom Structural Directive is placed
  4. One of the key thing while using structural directive is selector, @Input should have the same name. This reason behind this is due to the fact that *ngIf would be convered to ng-template before rendering.ng-template works on refernce basis within html. So when reference and directive name are different it would end up in error

test.component.ts

import {Directive, Input, TemplateRef,  ViewContainerRef} from '@angular/core';

@Directive({
  selector: '[appDounless]'
})
export class DounlessDirective {

  constructor(private templateRef: TemplateRef<any>, private vcRef: ViewContainerRef) { }

  @Input() set appDounless(condition: boolean){
    if(condition) {
      this.vcRef.createEmbeddedView(this.templateRef);
    }else{
      this.vcRef.clear();
    }
  }
}

test.component.ts

@Component({
  selector: 'app-test',
  templateUrl: './test.component.html',
  styleUrls: ['./test.component.css']
})

export class testComponent implements OnInit {

  public isPresent = true;

  ngOnInit() {
  }
}

test.component.html

<p appevenrow> This is Custom Attribute Directive</p>
<p *appDounless="isPresent">This is Custom Structural Directive</p>

Output

Angular Components

  1. Decorators – Passing value between components

    1. Passing Value from Parent to Child – @Input
    2. Passing Value from Child to Parent – @Output
  2. Change Detection
  3. Value Projection

Sending value from Parent to Child Component – Input decorator

  1. There may be times where the value needs to be passed between Parent Component and Child Component
  2. Passing Value occurs by parent HTML app.component.html by defining value to be passed and by using @Input() annotation
  3. In the app.component.ts we are sending a Student object with variable name classRepSent
  4. In the registration.component.ts we are receiving a Student object with variable name classRepReceive
  5. app.component.html is the one which enables passing of variable. The passed variable(classRepSent) is at the right side of bracket “classRepSent” and received variable is on left side in square brackets [classRepReceive]

Sending value from Parent to Child Component
app.component.ts

export class AppComponent {
  public classRepSent:Student; 

  constructor(){
    this.classRepSent= new Student(110, 'Baalaaji', 31, 74, 65,55,64,84); 
  }
  .
  . 
}

registration.component.ts

import { Component, OnInit, Input } from '@angular/core';
.
.
export class RegistrationComponent implements OnInit {
  @Input() public classRepReceive:Student; 
  .
  . 
  ngOnInit() {   
    console.log(this.classRepReceive);                    
  }

app.component.html

<app-registration [classRepReceive]="classRepSent"></app-registration>

Sending value from Child to Parent Component – Output decorator

  1. For Sending value from child component to parent component we use EventEmitter and @Output annotation
  2. We want to send a Student object from Child Component(registration.component.ts) to parent Component(app.component.ts)
  3. Value from child component to parent component could not be sent at time of loading since the components are loaded in hieracial order – parent to child. hence it should be triggered manually in our case we are doing it by using a button
  4. We use a button in registration.component.html which calls a function sendStudent that inturn calls the emitter to send a student with value anand to parent
  5. The Same would be received in app.component.ts using receiveStudent function
  6. Note we are sending a event and receiving a student object. In the HTML we have used receiveStudent as getting event rather than receiving a student object

app.component.ts

export class AppComponent {
.
.
receiveStudent(student:Student){
  console.log(student);
}
.
}

registration.component.ts

import { Component, OnInit, Input, Output, EventEmitter } from '@angular/core';
.
.
export class RegistrationComponent implements OnInit {
  .
  .
  .
  @Output() private student:EventEmitter<Student> = new EventEmitter<Student>();
  .
  .
  sendStudent(pEvent)
  {
    this.student.emit(new Student(106, 'Anandh', 23, 31, 65,55,89,84));
  }
}

app.component.html

<app-registration [classRepReceive]="classRepSent" (student)="receiveStudent($event)"></app-registration>

registration.component.html

.
.
.
<td><input type="button" name="btnCallParent" id="btnCallParent" value="Send Student" (click)="sendStudent($event)"/></td>
.
.
.

Change Detection using ChangeDetection Strategy

  1. Every time angular notices an event it goes through each and every component tree to check the change in the attribute of object. In very large application this could be a bottleneck and going to have a hit on performance.To avoid the unnecessary check on all component we can let angular know the possible components which could be affected during operation.
  2. ChangeDetectionStrateg.default- is the change strategy available to component by default. When a object is created by parent component and shared with child component
    then any change in attribute of object made in parent component would be immediately available to child component and updated in model
  3. ChangeDetectionStrateg.OnPush – is forcing angular to refresh view of child only when the object is accessed.(Note:This object is created in Parent). Though the child component
    would have the updated value it wont be shown up in view.

  1. The object which is created in parent is shared in between parent and child.
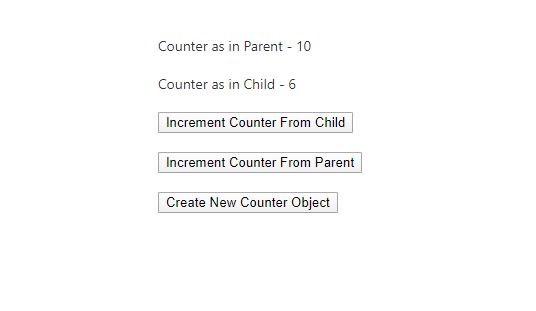
  2. In the above Screen the Counter as in Parent and Counter as in Child would have the same value irrespective of whether you click increment from parent or increment from childwhen the ChangeDetection Strategy is set to default.When the ChangeDetection Strategy is set to default then incrementing counter using Increment Counter From Parent and Increment Counter From child would have the same effect.
  3. The Counter as in Parent and Counter as in Child would be changed immediately and reflected in screen. This is nature of angular to detect refresh all component when attribute of object used in one component is changed.But in big application many component need not be refreshed and we could tell angular what component needs to be checked
  4. When the ChangeDetection Strategy is set to onPush in child then the incrementing the parent counter wont be reflected in Counter as in Child.The updated value would be shown in child only when object is accessed by child component. Otherwise, increment counter in child would display updated value in Counter as in Child

ParentcounterComponent.ts

import { Component, OnInit } from '@angular/core';
import { Counter } from 'src/app/model/counter';

@Component({
  selector: 'app-parentcounter',
  templateUrl: './parentcounter.component.html',
  styleUrls: ['./parentcounter.component.css']
})
export class ParentcounterComponent implements OnInit {

  constructor() { }

  public counter : Counter;

  ngOnInit(): void {
    this.counter = new Counter(1);
  }


  increaseCounter()
  {        
    this.counter.value +=2;
    console.log(this.counter.value);
  }

  createNewCounter(){
    this.counter = new Counter(1);
  }
}

CounterComponent.ts

import { Component, OnInit, Input, Output, EventEmitter, ChangeDetectionStrategy } from '@angular/core';
import { Counter } from 'src/app/model/counter';

@Component({
  selector: 'app-counter',
  templateUrl: './counter.component.html',
  styleUrls: ['./counter.component.css']
})
export class CounterComponent implements OnInit {

  @Input() public counterVal: Counter;
  @Output() private counterEmitter: EventEmitter<Counter>;   

  ngOnInit(): void {    
  }

  increaseChildCounter()
  {
    console.log(this.counterVal.value);
    this.counterVal.value +=1;
  }

  sendCounterToParentComp(){     
    this.counterEmitter.emit(this.counterVal);
  }
}

parentcounter.component.html

<span>Counter as in Parent - {{counter.value}}</span><br/>    <br/>    
<app-counter [counterVal]="counter"></app-counter><br/>    
<button (click)="increaseCounter()">Increment Counter From Parent</button><br/> <br/>       
<button (click)="createNewCounter()">Create New Counter Object </button><br/>  <br/>     

counter.component.html

<span>Counter as in Child - {{counterVal.value}}</span><br/>    <br/>    
<button (click)="increaseChildCounter()">Update Counter From Child</button><br/>    

5 ways of passing data between html and components

1 Parent Child @Input
2 Child Parent @Output
3 HTML Form Component Using @Viewchild and ElemRef
4 HTML Form Component @ng-content and @ContentChild
5 HTML Form Component [(ngModel)]

3.@Viewchild and ElemRef
test.component.html

.
.
<input type="text" id="name" class="form-control" #ingName>
.

test.component.ts

export class ShoppingEditComponent implements OnInit 
{
  @ViewChild('ingName') strNameOfIngredient: ElementRef;
  
  ngOnInit(): void 
  {
    console.log(this.strNameOfIngredient.nativeElement.value);
  }
}
  1. main.ts is starting point of angular application
  2. main.ts refers to app.module.ts which tells the components to be considered during bootstrap
  3. the component by default would be AppComponent which loads the app.component.html
  4. index.html is the root html file which loads the whole app in broswer.When you inspect index.html it would have the same code as one in editor showing loading. The JS files would replace the content in index.html once it gets loaded.Its the same js file which gets generated during ng build placed in dist folder
  5. All components newly added should be registered in app.module.ts. This file is like registry which would help angular to keep track of components
main.ts -> app.module.ts -> Check for bootstrap component
ng serve Loads the project in server
ng test Carries out unit testing.
karma.config.js – defines configuration of test runner
ng lint Checks for violation in coding standard. Checks whether it conforms to standard as defined in tslint.json
ng build creates dist folder in project. dist folder contains js files generated from ts files. The dist folder could be copied and added along with java app and deployed in web server for supporting front end. dist folder is one deployed at end of development I prod
ng e2e much more than unit test. It works by launching angular application in a headless chrome browser. The test are defined in e2e folder
ng new PROJECT_NAME –no-strict creates a new angular project mostly for Development You can toggle by setting strict:false in tsconfig.json
ng new PROJECT_NAME creates a new angular project
ng generate component COMPONENT_NAME generates a new component with component name
ng generate class models/CLASS_NAME generates a class in models folder
ng generate service SERVICE_NAME generates a service
Files and Folders Comments
src->app contains actual project code
dist Contains final distributable js file generated as result of ng build
e2e Contains script for end to end testing
environments Contains the details specific to environment
tsconfig.json code written in ts should be converted to js to get interpretted by browser. This would be configured in tsconfig,json
package.json frameworks and packages needs to execute ng command are defined here
src->main.ts, index.html Responsible for bootstrapping angular application
polyfills.ts take care of browser incompatibility
style.css specifies global application style
test.ts starting point for running unit test
app-routing.module.ts file where all routes are defined

Mocking Dependency Injection Objects
There may be times where the service would be injected into the component using constructor by DI. In such a case while creating a component instance for test class we could end up with a problem. To answer this we pass mock objects as alternate to constructors

add.employee.component.ts

export class EmployeeComponent implements OnInit {
 .
 .
  constructor(private objEmpserviceService : EmpserviceService) {
  }

  checkForAuthentication(): string {
    if(this.objEmpserviceService.authenticateEmp('Admin')){
      return "You are allowed to Edit";
    }
    return "You are Not allowed to Edit";
  }
 .
 .

Two Methods to Answer this Problem
Method 1 : If you are not going to call the mockedObject methods

To address this the injected object using dependency injection we use providers. Providers provide mockedobject to constructor instead of real object like below

add.employee.component.spec.ts

let mockEmpserviceService:EmpserviceService;

beforeEach(async(() => {
    mockEmpserviceService = jasmine.createSpyObj(['authenticateEmp', 'addEmployee', 'deleteEmployee']); 

    TestBed.configureTestingModule({
      .
      declarations: [ EmployeeComponent ],
      providers : [ 
                   {provide:EmpserviceService, useValue:mockEmpserviceService}
                  ]
      .
      .
    }).compileComponents();
  }));
  • Now in the above code we have mocked the service using mockEmpserviceService and providing a list of methods. But the returnType is still missing. So this could be used only to check if the actual method under test is called without using callThrough which in turn calls the method in mockedObject.
     .
     it('Check for Service Method', ()=>{
        spyOn(component, 'checkForAuthentication');
       
        let auth = component.checkForAuthentication();
        (or)
        const btnAddEmp = fixture.debugElement.query(By.css("#btnAddEmp"));
        btnAddEmp.triggerEventHandler('click', {});
        fixture.detectChanges();
         
        expect(auth).toHaveCalled();
     });
     .
    

    Method 2 : If you are going to call the mocked object methods then in such case the return type of the method should be defined.The same code can be done using actual EmpserviceService in provider and using spyOn inside its block to define the returnType of service method.

    let empService: EmpserviceService;
    
    beforeEach(async(() => {
        TestBed.configureTestingModule({
          declarations: [ EmployeeComponent],
          providers : [ EmpserviceService],
          imports: [HttpClientTestingModule]
        })
        .compileComponents();
    
        empService = Testbed.inject(EmpserviceService);
      }));
    
      fit('Check for Service Method', ()=>{  
        //Mocking authenticateEmp to return true as if it is called    
        spyOn(empService, 'authenticateEmp').withArgs('Admin').and.returnValue(true);      
        spyOn(component, 'checkForAuthentication').and.callThrough();
        let auth = component.checkForAuthentication();
        expect(auth).toBe('You are allowed to Edit');
      })
    

    In the above code, checkForAuthentication calls authenticateEmp in empService since it does callThrough.

    Note:Even now the control doesnt goes through empService. It would be called and returnvalue would be sent back.

  • Using spyOn with different Options

    1. Using spyon with callThrough would make the call to actual service
    2. spyOn with returnValue returns the value specified without making call to real function
    3. spyOn withArgs does the same but takes arguments incase there is somelogic needs to change when using along callthrough
    4. spyOn callFake would run anonymous function withits own logic rather than calling original function to act on logic
    spyOn(empService, 'authenticateEmp').withArgs('Admin').and.callThrough();
    
    spyOn(empService, 'authenticateEmp').and.returnValue(true);
    
    spyOn(empService, 'authenticateEmp').withArgs('Admin').and.returnValue(true);
    
    spyOn(empService, 'authenticateEmp').and.callFake(function(name, args){
       return true;
    });
    

    What is difference between returnValue and callFake?
    If we just want a return value when a service method is called then we can use any of and.callFake or and.returnValue. Lets take below example

    component file:

    @Component(...)
    export class DependencyComponent {
      constructor(private service: RandomService){....}
      .....
      sampleMethod() {
       return this.service.randomMethod();
      }
      .....
    }
    

    unit test case for above component:

    it('test callFake vs returnValue', () => {
      let randomService= new RandomService();
      let component = new DependencyComponent(randomService);
      spyOn(randomService, 'randomMethod').and.callFake(() => 4)
      expect(component.sampleMethod()).toBe(4)
      spyOn(randomService, 'randomMethod').and.returnValue(10);
      expect(component.sampleMethod()).toBe(10)
    })
    

    in above case both the ways are correct.

    Suppose we are passing a parameter to service method to perform its logic then in that case we have to use and.callFake((param) => {…}). Here param parameter will be the argument passed to the spied method.

    component file:

    @Component(...)
    export class DependencyComponent {
      constructor(private service: RandomService){....}
      .....
      sampleMethod(val) {
      return this.service.randomMethod(val);
      }
      .....
    }
    

    unit test case for above component:

    it('test callFake vs returnValue', () => {
      let randomService= new RandomService();
      let component = new DependencyComponent(randomService);
      spyOn(randomService, 'randomMethod').and.callFake((param) => param+4)
      expect(component.sampleMethod(4)).toBe(8);
      expect(component.sampleMethod(12)).toBe(16)
    })
    

    when component.sampleMethod(4) is executed it will call this.service.randomMethod(4). As randomMethod() is being spied using and.callFake therefore 4 will be passed as argument of call back function of and.callFake.

    One obvious question is can i use returnValue instead of callFake? You can still use but you need to define multiple returnValue methods based on total arguments needs to be tested.