1. JDBC-ODBC Bridge Driver
  2. JDBC-Native API
  3. Network Protocol driver(Pure Java Driver)
  4. Thin driver(Pure Java Driver)

What is Difference between Thin client driver and Thick Client driver?
Thick driver – type 1 and type 2 JDBC drivers are called thick drivers.It provides JDBC access via ODBC drivers. ODBC binary code, and in many cases, database client code, must be loaded on each client machine that uses such a driver. and as the program is connected to database by an extra layer, hence thick drivers.

Thin drivers: Drivers converts JDBC calls into the network protocol, used directly by DBMS, allowing a direct call from the client machine to the DBMS server and providing a practical solution for intranet access.

There may be times direct access to JAR files are not allowed due to license restrictions.In such case declaring dependency in POM.xml has no effect. In such case the jar files should be manually downloaded and copied to maven local repository so while defining dependency in POM.xml it would take from mavens local repository

In Terminal

$ mvn install:install-file -Dfile={Path/ojdbc6.jar}
      -DgroupId=com.oracle -DartifactId=ojdbc6 -Dversion=11.2.0 -Dpackaging=jar

In my case I have downloaded the file to Downloads Directory

 mvn install:install-file -Dfile=C:\\Downloads\\ojdbc14.jar
           -DgroupId=com.oracle -DartifactId=ojdbc7 -Dversion=12.1.0 -Dpackaging=jar

On executing the above command it would be copied to maven .m2 local repository

Now the above will add the file to maven local repository.This should be followed by definition in pom.xml for dependency

<dependencies>  

  	<dependency>
            <groupId>com.oracle</groupId>
            <artifactId>ojdbc14</artifactId>
            <version>12.1.0</version>
        </dependency>
   </dependencies>

Array Implementation
CustomArray.java

package com.mugil.alg;

public class CustomArray {
	private int[] arrNum = new int[50];
	private int arrSize = 10;
	
	public static void main(String[] args) {
		CustomArray objCustomArray = new CustomArray();
		System.out.println("---------------");
		System.out.println("Array Initialized");
		objCustomArray.initializeArray();
		objCustomArray.printArray();
		
		System.out.println("---------------");
		System.out.println("Search for No(Index) - " + objCustomArray.getNumIndex(8));
		
		System.out.println("---------------");
		System.out.println("Delete Called");
		objCustomArray.deleteArrayByIndex(5);		
		objCustomArray.printArray();
		
		
		System.out.println("---------------");
		System.out.println("Insert Called");
		objCustomArray.insertArray(20);		
		objCustomArray.printArray();
		
		
	}
	
	public void initializeArray()
	{	
		for (int i = 0; i < arrSize; i++) {
			arrNum[i]  = (int)(Math.random()*10); 
		}
	}
	
	public void printArray()
	{
		
		System.out.print("Array - ");
		for (int i = 0; i < getArraySize(); i++) {
			System.out.print(arrNum[i]);
			System.out.print(" ");
		}		
		System.out.println();
	}
	
	
	//Linear Search
	//Use this if you want to find all the
	//all the places where the element Occurs
	public String getNumIndex(int pNum)
	{
		String NumPOS = "";
		
		for (int i = 0; i < getArraySize(); i++) {
			if(pNum == arrNum[i])
			{
				NumPOS +=  i + " ";
			}
		}
		
		if(NumPOS == "")
		 NumPOS = "None";
		
		return NumPOS;
	}
	
	
	public int getArraySize()
	{
		return arrSize;
	}
	
	public void deleteArrayByIndex(int pPOS)
	{
		
		for (int i = pPOS; i < getArraySize(); i++) {
				arrNum[i] = arrNum[i+1]; 
		}
		
		arrSize--;
	}
	
	public void insertArray(int pNum)
	{
		arrNum[arrSize] = pNum;		
		arrSize++;	
	}
}

Why LinkedList is Faster than ArrayList?
Adding Element in middle of ArrayList requires reshuffling of other elements.Whereas in Linked list only two nodes(Nodes between which the element is added) needs to be changed.

Types of LinkedList?

  1. singly linked list
  2. doubly-linked list
  3. Circular linked list

singly linked list doubly-linked list
Pros:Simple in implementation, requires relatively lesser memory for storage, assuming you need to delete/insert (at) next node – deletion/insertion is faster. Can be iterated in forward as well as reverse direction. In case of needing to delete previous node, there is no need to traverse from head node, as the node to be deleted can be found from ‘.previous’ pointer.
Cons:Cannot be iterated in reverse, need to maintain a handle to the head node of the list else, the list will be lost in memory. If you’re deleting previous node or inserting at previous node, you will need to traverse list from head to previous node to be able to carry out those operations – O(N) time Relatively complex to implement, requires more memory for storage (1 ‘.previous’ pointer per node). Insertions and deletions are relatively more time consuming (assigning/reassigning ‘.previous’ pointer for neighbor nodes)

Time complexity of a linked list

Operation Metrics
Indexing O(n)
Inserting / Deleting at end O(1) or O(n)
Inserting / Deleting in middle O(1) with iterator O(n) with out

The time complexity for the Inserting at the end depends if you have the location of the last node, if you do, it would be O(1) other wise you will have to search through the linked list and the time complexity would jump to O(n).

<dependencies>
    <dependency>
      <groupId>junit</groupId>
      <artifactId>junit</artifactId>
      <version>3.8.1</version>
      <scope>test</scope>
    </dependency>
  </dependencies>

Specifying Version

      <!--Version should be 3.8.1-->
      <version>3.8.1</version>

      <!--Version should less than or up to  3.8-->
      <version>[,3.8]</version>
      
      <!--Version should less than 3.8-->
      <version>[,3.8)</version>

      <!--Version should be between 3.1 to 3.8-->
      <!--If 3.8 is available it picks those-->
      <version>[3.1,3.8]</version>

Specifying Scope


<!--Jar file would be available to JUnit Test Folder-->
<scope>test</scope>

<!--available as Part of Web Server i.e tools.jar-->
<scope>provided</scope>

<!--Jar File available only during runtime-->
<!--Use of Interface at Compile Time and actual class at runtime-->
<scope>runtime</scope>

<!--Use of Interface at Compile Time and actual class at runtime-->
<scope>runtime</scope>

Defines the Maven Plugin with which the compilation has to be carried out

<plugins>
      <plugin>
        <groupId>org.apache.maven.plugins</groupId>
        <artifactId>maven-compiler-plugin</artifactId>
        <version>3.6.1</version>
        <configuration>
          <source>1.8</source>
          <target>1.8</target>
        </configuration>
      </plugin>
    </plugins>

Effective POM
Tells the Details of Super POM.xml Lists default configuration.

.
.
<build>
    <sourceDirectory>D:\java\TestMvnProj2\src\main\java</sourceDirectory>
    <testSourceDirectory>D:\java\TestMvnProj2\src\test\java</testSourceDirectory>
    <outputDirectory>D:\java\TestMvnProj2\target\classes</outputDirectory>
</build>
.
.

The above XML code specify the details of sourceDirectory, outputDirectory

You can also see list of plugins called at different phases of maven life cycle.
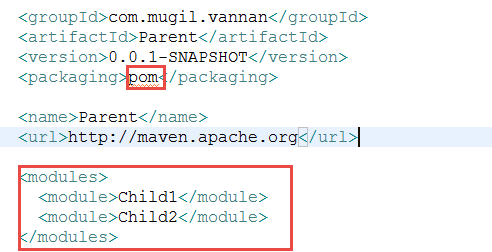
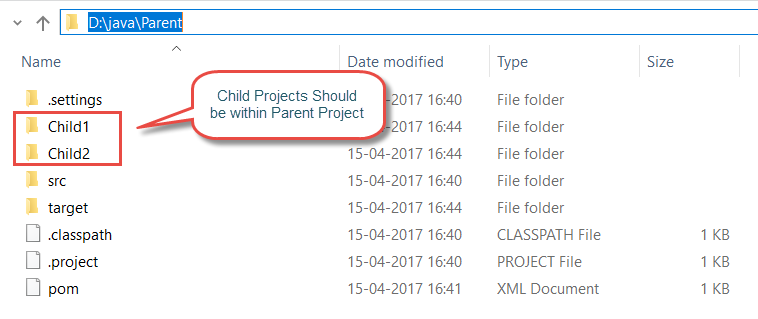
Parent POM
List of Child Projects are added into modules as separate module.

.
.
<packaging>pom</packaging>

<modules>
<module>Service</module>
<module>Controller</module>
<module>Model</module>
</modules>
.
.

Basic Paradigms

What is POM.xml
A Project Object Model or POM is the fundamental unit of work in Maven. It is an XML file that contains information about the project and configuration details used by Maven to build the project. It contains default values for most projects. Examples for this is the build directory, which is target. Super POM is Mavens default POM. All POMs extend the Super POM unless explicitly set

Maven works in two modes in Command Prompt –
Interactive Mode – Takes command one after another
Batch Mode – takes all command at once

Archetype – Archetype is the one which defines the type of project and project structure. i.e. mvn archetype generate
ArtifactID – Specifies the name of the project.
GroupID – Group Id is one by which similar products or components are tied together under one groupId
i.e.

org.springframework
org.apache
org.commons

If you don’t specify the package name during creation it will take the groupId as package name for classes.

Types of Repo
Remote Repo is of Two type – Internal and External

  1. Central Repo-is mavens own repo accessed over mvn.com
  2. External Repo– are those whose JARs are provided by organizations like IBM for DB2. Those JARs are initially not available in Central Repo.Paid drivers are not available in Central repo rather available in organizations repo
  3. Internal Repo-Internal repos are the one provided by working organization.The main goal of such repos are to provide stable JARs and avoiding downloads of unstable jar directly from Central or external repos and to avoid network traffic

Apart from the above we have one more repo called local repo.
Local Repo – Local repo is the one which we have in the development system under .m2 folder. Local repos would be holding old JARs even when you run clean command which does nothing more than cleaning .class files. Inorder to get rid of old JARs we need to purge

purge local repo

Other Notable Points

  1. Maven is intelligent when you run install it would instatiate before phases(validate,compile and test).When one java file is changed in the list of 100 only 1 file would be compiled rather than 100 files
  2. mvn install – will deploy the JAR fils in the local repo(local .m2 folder) where as mvn deploy(disabled by default) – will deploy the JAR in the remote repo(Internal Repo)
  3. mvn compile – will compile only the java files in the source folder not the java classes in the Test Folder
  4. The Scope of the dependency JARs would be PROVIDED incase you are planning to deploy your code in environment which has someother higher version of JAR than dev environment.The default scope is compile.Though scope is compile the JARS would be available till target container.
  5. If the Team has completed coding for release then the JAR files would be named as RELEASE (or) FINAL.If the Project is still under development than the JAR would be named as SNAPSHOTThis is to make other development team to understand that there would be still code changes accompanied with JAR.
  6. .m2 folder should not be created manually.When you create your first project(maven project) .M2 folder would be created on its own.

An artifact in maven is a resource generated by a maven project. Each maven project can have exactly one artifact like a jar, war, ear, etc.Each maven project has a unique identifier consiting of [groupId, artifactId, version]. When a maven project requires resources of another project a dependency is configured in it’s pom.xml using the above-mentioned identifier. Maven then automatically resolves the dependencies when a build is triggered. The artifacts of the required projects are then loaded either from the local repository, which is a simple directory in your user’s home, or from other (remote) repositories specified in you pom.xml.

Now the once mvn install is done the same snapshots are available in repository location as below

Two Dimensional Arrays (Array of Arrays)

 //Seating Arrangement for 20 Seats
 int arrSeating[][] = new int[4][5];

 //No of Items Produced in Hr By Days in Month
 int arrProdHrByDaysInMonth[][] = new int[30][24];

Two Dimensional Arrays(Array of Arrays of Arrays)

 //No of Items Produced in Hr By Days in Month by Month
 int arrProdHrByDaysInMonth[][][] = new int[12][30][24];

Jagged Arrays
array of arrays such that member arrays can be of different sizes

Looping through ArrayList

         	//Iterate over Collection
		for (Iterator iterator = arrNames.iterator(); iterator.hasNext();) {
			String object = (String) iterator.next();
			System.out.println(object);
		}			
		
		//Iterate over array or Collection
		for (String string : arrNames) {
			System.out.println(string);
		}		
		
		//Iterate over array 
		for (int i = 0; i < arrNames.size(); i++) {
			System.out.println(arrNames.get(i));
		}
		
		//Iterate over array using Temporary Variable
		for (int i = 0; i < arrNames.size(); i++) {
			String string = arrNames.get(i);
			System.out.println(string);
		}

Which one of the Above method is Faster?
All the methods are of same speed since the Traditional for loop uses Iterator inside.The performance difference is noted when there is change in data structure while doing random access like linkedlist is slower than arraylist when you use a traditional for loop since to traverse a 6th element in list it should start from all again

When there is a sorted Array and you should do a search in the sorted array then using BinarySearch is faster than Linear Search

Singleton.java

public class Singleton 
{ 
    private static Singleton instance;   
 
    private Singleton() {}

    public static Singleton getInstance() 
    {
       if (instance == null) {
          instance = new Singleton();
       }
       return instance;
    }
}

In a Multi-threaded Environment

  1. Two Threads, Thread A and Thread B tries to access Object of Singleton class
  2. Thread A and B does call to Static getInstance() method
  3. Now when Thread A tries to do Null Check of instance instance == null chances of Thread B also entered the if block exists
    .
    .
    .
    if (instance == null) 
    {
      //Two threads may have passed the condition and might have got in
      instance = new Singleton();
    }
    .
    .
    .
    
  4. Now both the Threads have their own instance for the Singleton class.
  5. So there would be 2 instances of Singleton class at the end of if Block

Now there are many work arounds but DoubleCheckedLocking, Enum Singleton and Initialization On Demand Holder are the Optimized approach

Refer Table in Link

Method 1
In this method we does static block initialization of Singleton along with synchronized getInstance() method which allows the access to only one thread at a point of time.
Singleton.java

public class Singleton 
{
    private static Singleton instance;
 
    private Singleton() {}

    public static synchronized Singleton getInstance() 
    {
       if (instance == null) {
          instance = new Singleton();
       }
       return instance;
    }
}

But the above method is expensive since there is unnecessary locking and unlocking done every time the object get accessed.

Method 2(Double Checked Locking Singleton)
Instead of synchronizing the whole method lets synchronize the block of code which allows single thread to access the instance during the first time access.The consecutive thread would be served with the same thread allocated for the First thread once it is done with its task.

Singleton.java

public class Singleton 
{
    private volatile static Singleton instance;

    private Singleton() {}

    public static Singleton getInstance() 
    {
      if (instance == null) {
          synchronized(Singleton.class) {
             if (instance == null) {
                instance = new Singleton();
             }
          }
       }
       return instance;
    }
}

Other ways of achieving singleton are by using Eager Initialization and ENUM which has its own advantages and disadvantages.

  1. Place the Cursor in Line and press Ctrl + R while Debugging instead of using Breakpoints to get the Control over the line

Ideal Debug Perspective Setup

Options in Debug Perspective
Inspect, Display, Execute, Watch